
Although one of the first (if not the first ever) conversational chatbot dates back to 1966, I think the biggest hype around this type of software dates back to mid-February 2016, when Facebook decided to open up access to bots on its Messenger instant messaging platform.
This news did definitely attracted the interest and attention of digital marketing professionals, always on the hunt for new opportunities and solutions to make companies and customers communicate.
At that time, already there was plenty of channels (website, email, Google My Business, Facebook, Instagram, LinkedIn, YouTube, Telegram, WhatsApp, etc…) that could be used to attract customers, engage users, and essentially make any sort of online business.
What, however, is the common problem to all these channels? Are users or customers really able to find the information they are looking for? How can they efficiently interact with these channels without abandoning them only after a few seconds?
In short, the great limit of the channels mentioned so far is that they don’t automatically interact with the user, who has to wait for some human being to find answers and solutions to his/her problems and needs.
Instead, the great power of a chatbot is that it can manage thousands of conversations, simultaneously, and multi-channel.
However, most of the chatbots available today only provide essential flows in which the user can only interact with buttons and quick replies. The flow is often guided and there’s no space for a slight semblance of a real conversation.
What happens if the user leaves this pre-programmed flow? How a chatbot that has not properly instructed can be able to respond to more free and wide-ranging interactions, such as sending questions, greetings, or thanks?
What is NLP?
NLP (which stands for Natural Language Processing), is a very important resource that helps software understanding how humans express themselves.
This process becomes possible thanks to the in-depth analysis of the expressions received by the users, identifying needs, essential elements, synonyms, and the reference context.
Thanks to an appropriate training phase, consisting of real linguistic training, the NLP can compare each expression of the user against an archive of expressions already processed, establishing which can be the most similar and, consequently, the most correct.
In this lesson, I’m trying to simplify all of the concepts around NLP, but if you want to obtain great results with a chatbot, you need to invest time and energy in the development of an effective NLP.
NLP: intent, entities, and context
When working with NLP, you have to deal with (at least) 3 fundamental concepts, which are: intent, entity, and context. Let’s see them in detail before dealing with concrete examples within Xenioo.
Intents simply correspond to the user’s needs: an intent could be called “Order Pasta“, another “Table Reservation“, yet another “Address Request“. Each one corresponds to a specific need, which can be expressed through very different expressions (or utterances).
For example, the intent “Order Pasta” could be expressed with expressions like:
“I would like some pasta“,
“Can I order a portion of spaghetti?“,
“I want to place an order for 6 people: 3 spaghetti and 3 lasagnas“.
The need of your user, regardless of the details related to the quantity and type of desired pasta, is always the same: you have a user who wants to order pasta, right?
However, how do you understand that the user wants pasta and not a pizza?
As you can see, each sentence contains elements that in NLP are called Entities. An entity identifies a specific element within a phrase expressing an intent.
“I would like a plate of pasta” contains the word “pasta“.
“Can I order a serving of spaghetti?” contains the word “spaghetti” (a type of pasta).
“I want to place an order for 6 people: 3 spaghetti and 3 tomato lasagna” contains the words “spaghetti” and “lasagna” (two different types of Italian pasta).
You can so identify the generic term “pasta” with the specific words “spaghetti” and “lasagna”. Finally, you can define PASTA as an entity to which the user could refer using terms very different from “pasta”, exactly like we have just seen before.
The third element is Context and it’s the most powerful though the most complicated to understand.
If the user writes “Yes thank you“, the meaning of this expression can have completely different meanings depending on the reference question.
If your bot asked: “Do you confirm your order?” the answer “Yes thank you” will trigger the processing of the order.
If, however, your bot asked, “Do you want to delete your order?” the same answer will produce the opposite result.
That’s why it’s often important to define the context, thanks to which you’ll be able to better control the flow of conversations.
Please keep in mind that this is a very simplified introduction. To really understand NLP, you have to know that companies like Google, IBM, Microsoft, Amazon, Facebook, and many others invest a lot of resources in this field, offering their services through proprietary systems, like Google Dialogflow and IBM Watson Assistant.
Integrating Dialogflow NLP
Xenioo offers native integrations for both Google Dialogflow and IBM Watson Assistant.
This means that you can design your flows with Xenioo, but easily delegate the understanding of user expressions to Dialogflow or Watson NLP engines. Crazy, isn’t it?
If you know and use Dialogflow, you may have already created an “Agent” (the term with which the chatbot is identified in this system) and you may have already trained it.
So how does the integration with Dialogflow work? It’s very straightforward since you decide when and in which mode Xenioo has to query Dialogflow to find out if a specific intent has been detected. Dialogflow responds to this query returning information such as the name of the detected intent as well as any text response already set in its environment. Based on this information, Xenioo can proceed with the logic created in the flow.
Xenioo provides two actions to work with the Google NLP engine: Dialogflow Input action and Dialogflow Detection action.
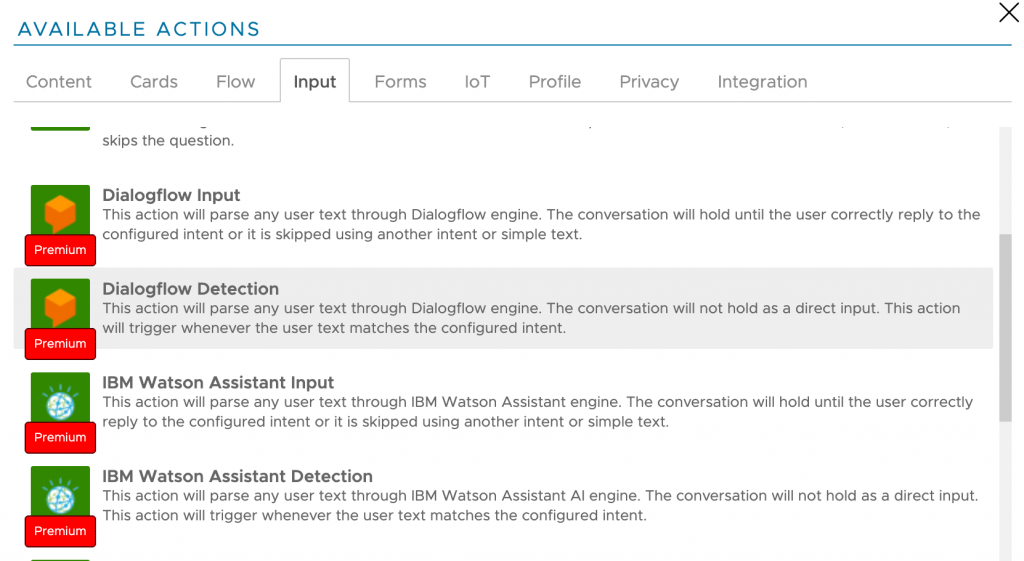
Dialogflow Detection Action will parse any user text through the Dialogflow engine. The conversation will not hold as a direct input. This action will trigger whenever the user text matches the configured intent.
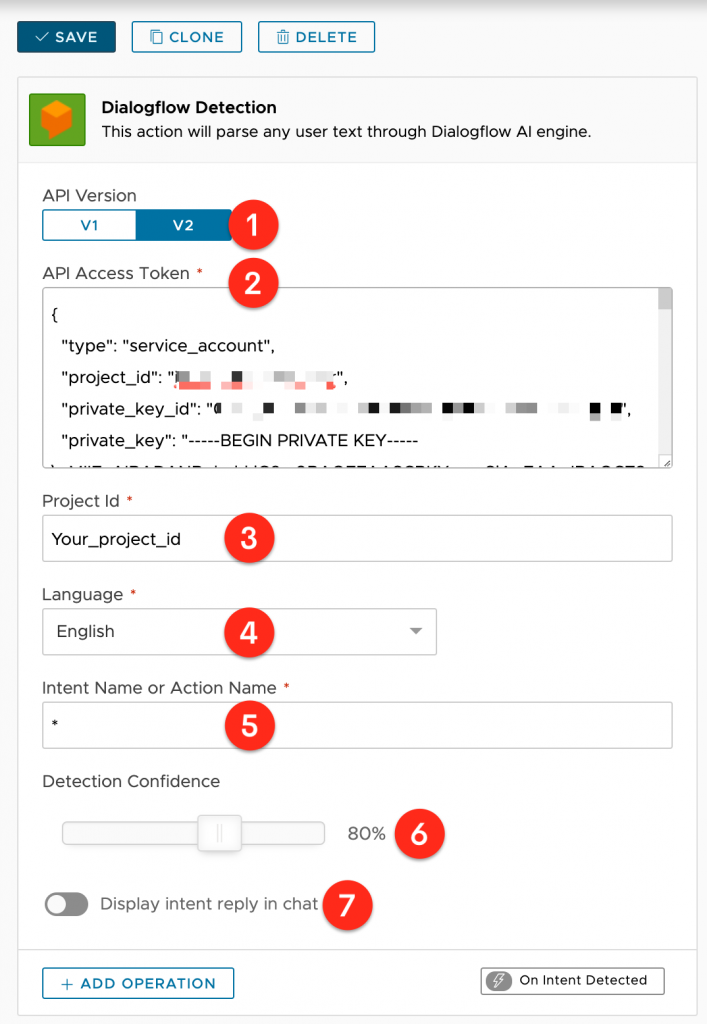
In the API Version field (1) you can choose V1 or V2, depending on the version of your Dialogflow agent. Most likely you will use V2 since Dialogflow has deprecated API V1 in late-2019.
The next field is API Access Token (2): you will most likely need to paste the full Google Auth Json authorization file contents as shown
You can copy the Dialogflow Project ID (3) from within your agent settings and the Language (4) must match the same language you’ve configured on your agent.
Intent Name or Action Name (5) must contain the full name of the intent or DF’s action that will trigger this action. Use an asterisk (*) to trigger any intent / DF’s action.
Use Detection Confidence (6) to choose the minimum confidence required to trigger this action.
Finally, with the Display intent reply in chat flag (7) you decide if Xenioo will display a message bubble with the text you’ve specified as a possible intent reply on Dialogflow.
Dialogflow Input Action will parse any user text through the Dialogflow engine. The conversation will hold until the user correctly replies to the configured intent or it is skipped using another intent or simple text.
Many of its settings are common to those just seen for the Dialogflow Detection Action, so I’ll just highlight the additional ones.
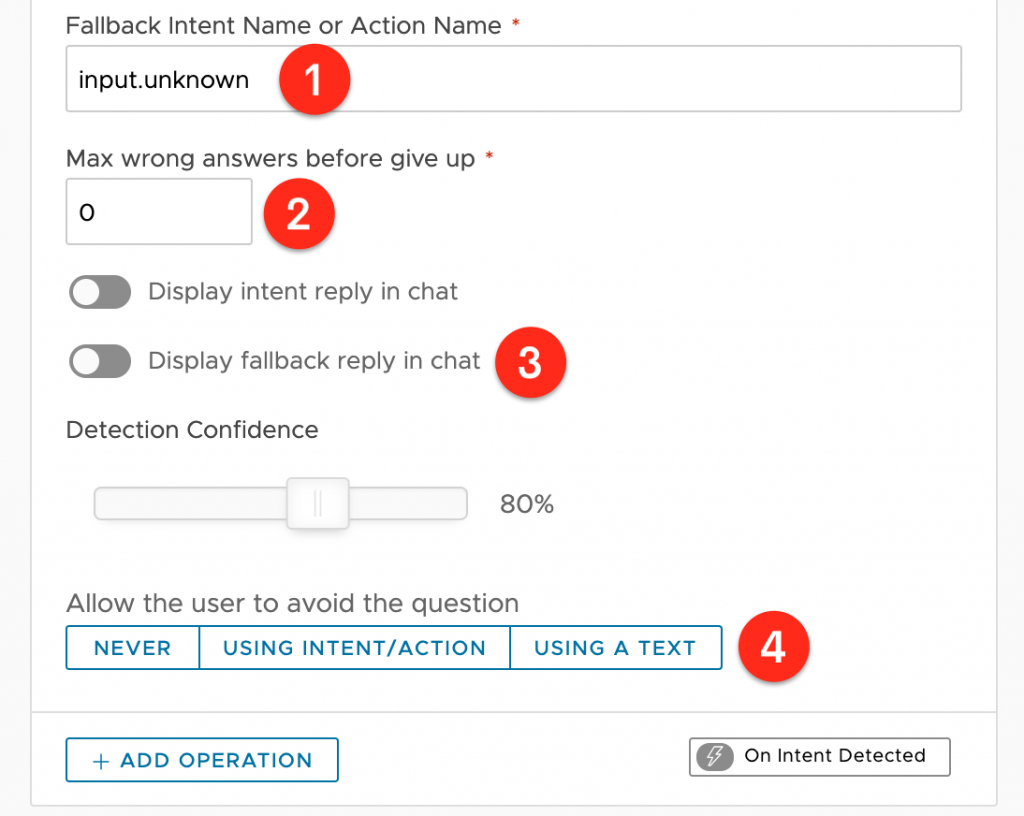
The first one is called Fallback Intent Name or Action Name (1) and indicates the fallback intent that should be used to retrieve a wrong input reply.
Max Wrong Answers (2) sets the maximum number of wrong inputs the user can send before the question is skipped. Set to 0 (zero) to never give up on wrong inputs.
If you enable Display fallback reply in chat (3) Xenioo will display a message bubble with the text you’ve specified as a possible fallback intent reply on Dialogflow.
Like what I’ve already explained for Input Action in previous articles, you can allow the user to Avoid the question (4) by detecting a specific text, another intent, or never.
Finally, let’s test the integration between Xenioo and Dialogflow to see if the two systems talk to each other and with what results.
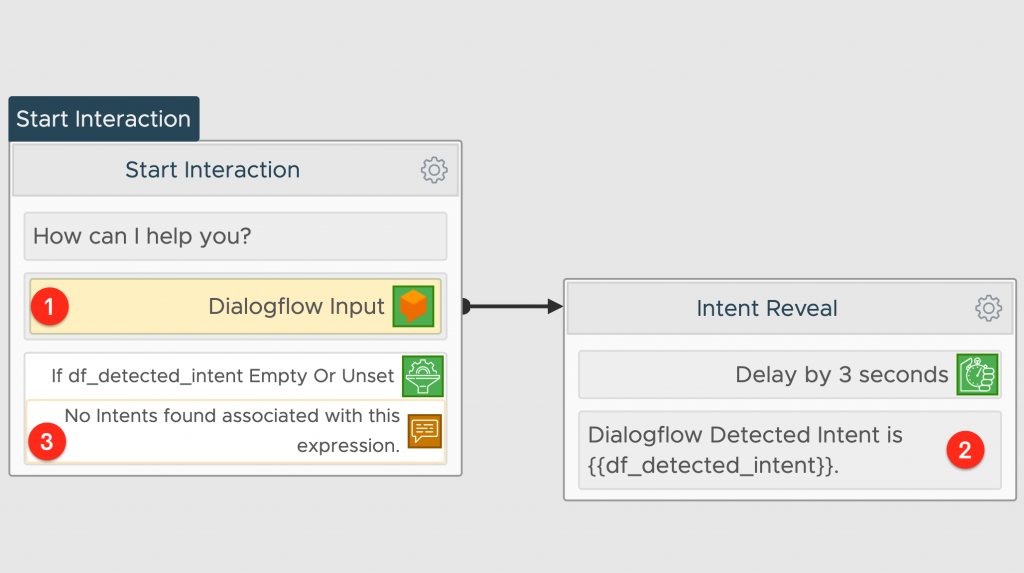
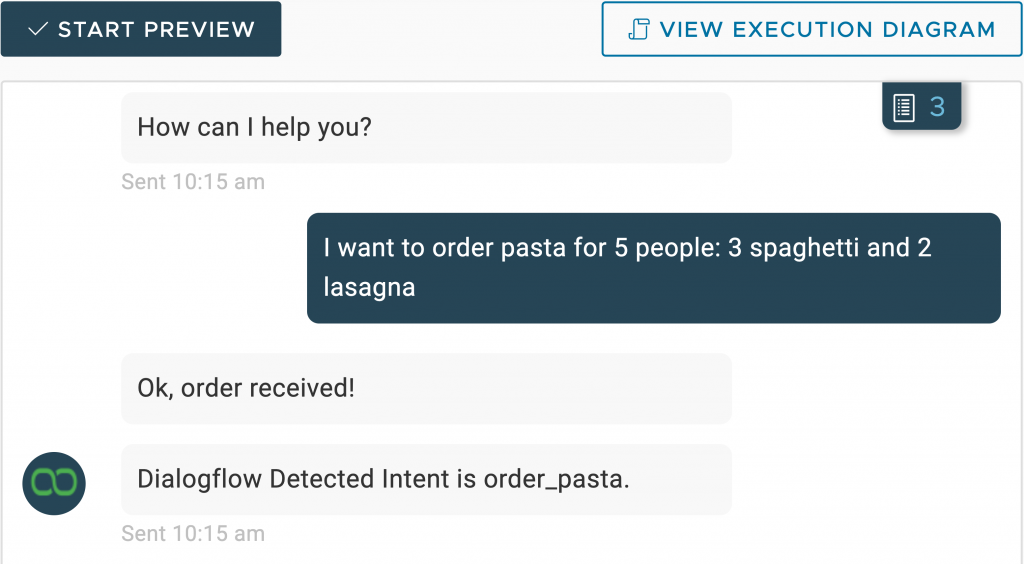
The bot asks “How can I help you?”, after which a Dialogflow Input Action (1) waits for a response to be sent to Dialogflow for the appropriate evaluations.
If Dialogflow succeeds in associating an intent to the user’s sentence, your bot will receive the information related to the detected intent. You can find that value inside a specific variable named df_detected_intent.
If Dialogflow does not recognize any intent (3), Xenioo will send the message “No intents found associated with this expression”.
In the image below you can see how it works inside the designer preview.
If you want to really understand what happened behind the curtains, just head to the Execution Diagram and you find out something like in the image below.
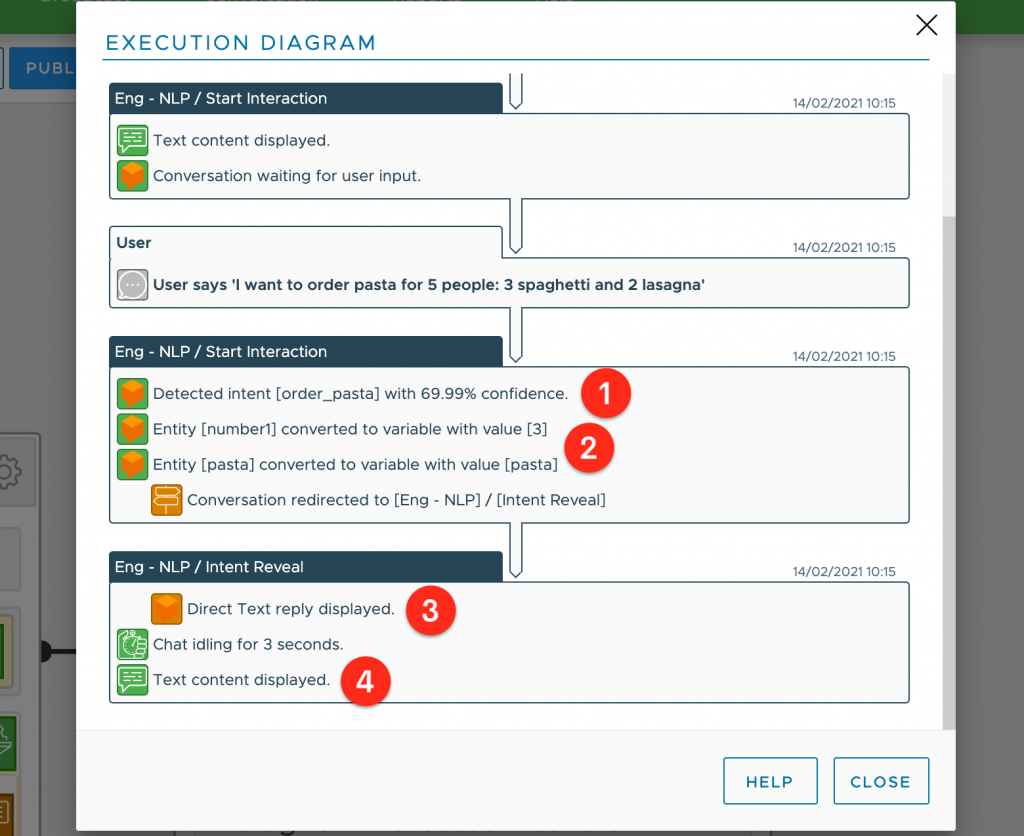
Right after the user expression, you can see that Dialogflow associates it (1) with a good 69.99% probability to the intent named [order_pasta]. After this, you can see the entities that have been recognized (2) and the expected response text from Dialogflow (3). Finally, after the 3-second wait, a final text message has been displayed from Xenioo (4).
Have you seen how simple and useful it is to get the superpowers of an external NLP system into Xenioo? Truly amazing, but that’s not all. What we’ve seen so far is really exciting, but there’s more… much more!
How to use Xenioo built-in NLP
Besides the integration with external NLP engines, Xenioo provides its own built-in language recognition engine.
To work with Xenioo’s NLP, you have to move to the AI tab (1), where you can configure intents, entities and do training.
It is so possible to recreate in Xenioo the previous scenario of intents and entities from Dialogflow.
Entities
Just click on the Entities menu (2) and then the Add Entity button (3).
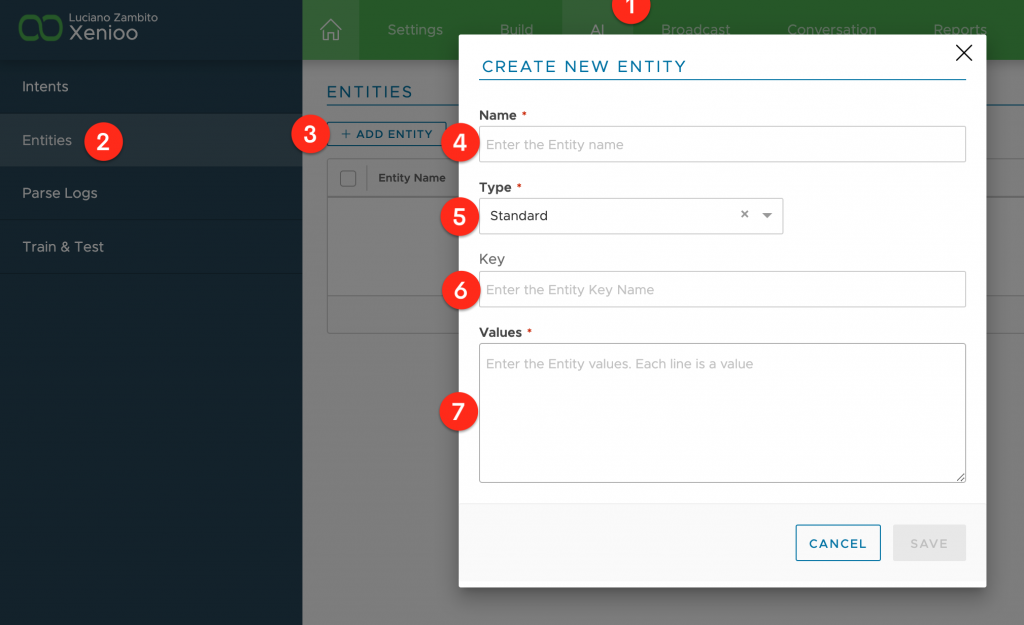
Here are the properties that you can set to properly define a new entity.
Name (4): you can use any name you like as long as it does not contain spaces. The name you choose for the entity will also be the name of the variable that will be created when a sentence is parsed by Xenioo.
Type (5): this field represent the type of entity you are creating or editing. Currently, Xenioo supports Standard and Wildcard entity types. Standard is the default type. Standard entities are represented by a list of values and possible variations, like synonyms. You can use Wildcard type if you need something like a placeholder representing any value at the specified position. Additionally, Xenioo is also capable of detecting numbers both in numerical and textual form and forward them to your chatbot as contextual entity variables.
Key (6): this value can be used to reference a specific entity type for a specific channel. If you are publishing for Alexa for example, you may enter here the corresponding Alexa Slot Type name.
Value (7): here you will set as many values as you wish and also specify synonyms.
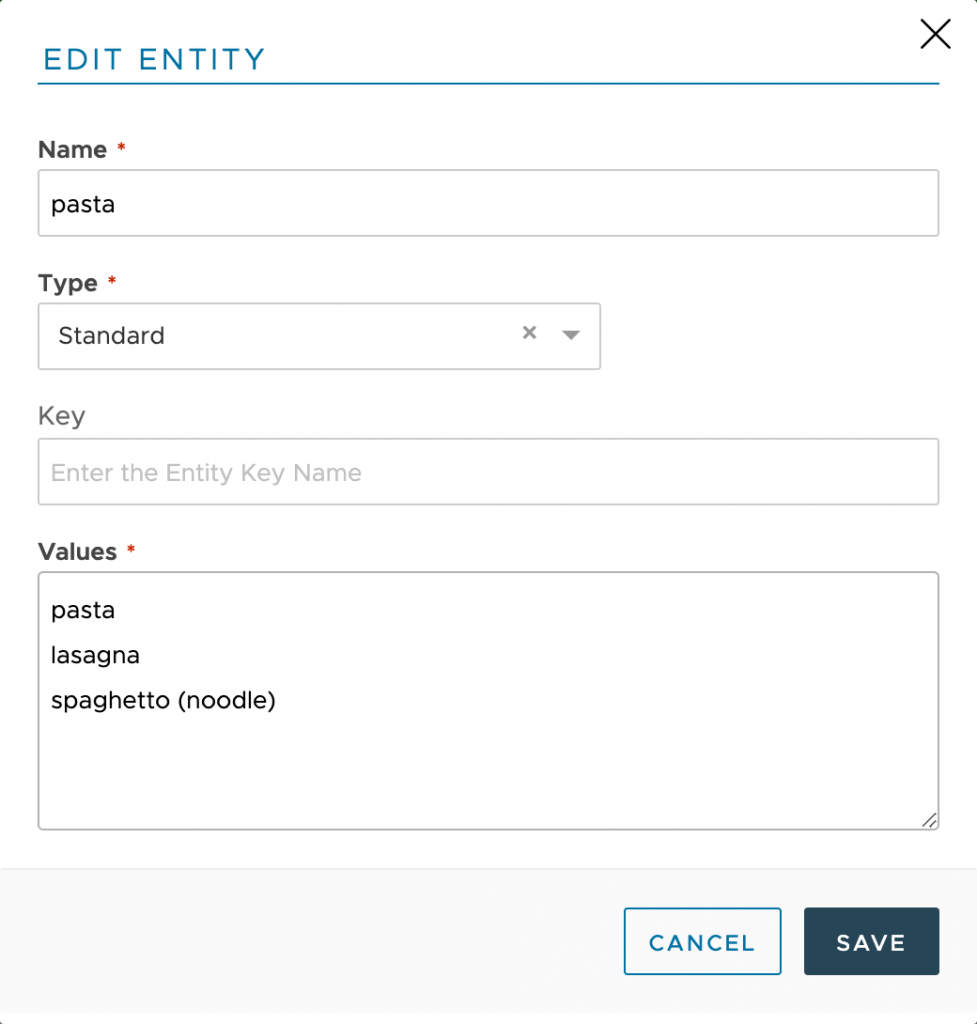
Here is an example of how it will be configured our “pasta” entity:
Intents
To create a new intent click on Add Intent (2) in the Intents (1) tab.
There are 4 sections to fully configure an intent.
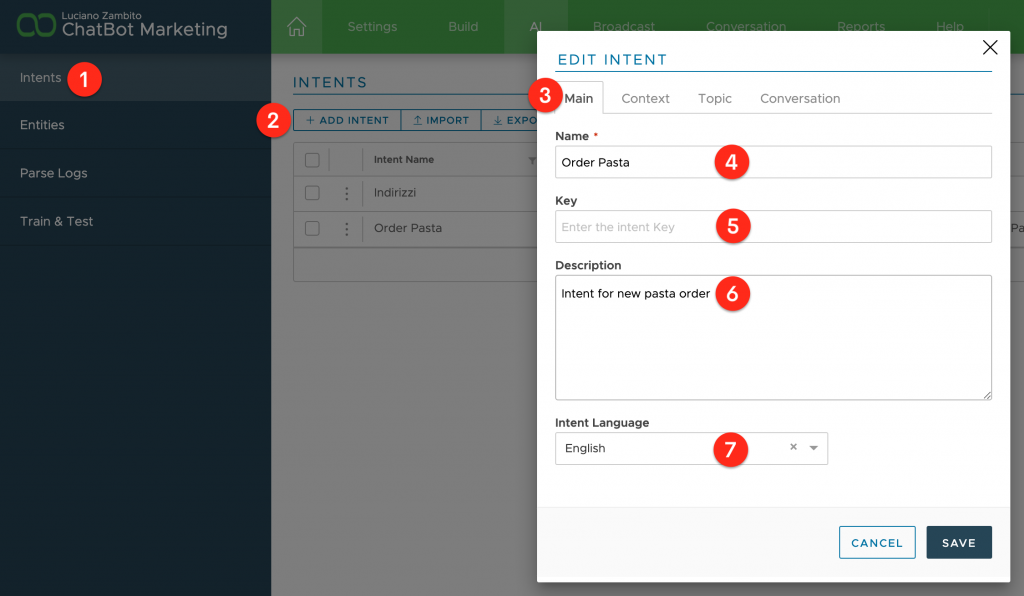
Main section (3)
Name (4): this is the name of the intent. It can be any name you like.
Key (5): this value is used only on platforms where intents may be used to represent built-in or default intents. In any other case, it can be anything you like.
Description (6): this is the description of the intent. It can be anything you like.
Intent Language (7): you can specify here the language that will be used by the NLP engine when training the expressions. Selecting the correct language may dramatically improve training results as many terms and words are automatically stemmed to a more common form, increasing confidence and detection percentage. The currently supported languages are English, Spanish, Italian, German, and French.
Context Section (1)
Context is used to automatically filter intents detection based on the context of a previous expression.
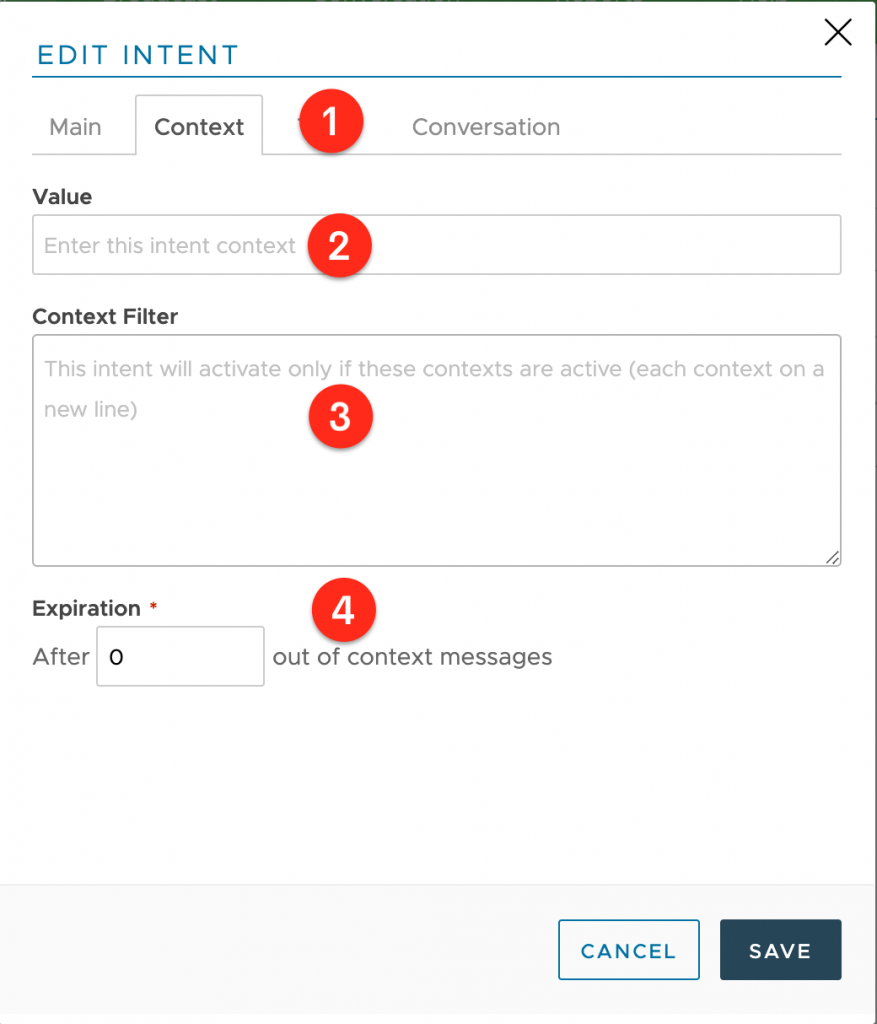
Value (2): this is the context value set by this intent. Usually, each intent sets its own context with some intents not setting any but also multiple intents can set the same context.
Context Filter (3): in this area, you can specify one or more context values that will act as a filter for this intent activation. If this area is empty this intent will be activated by any expression match that reaches the configured confidence.
Expiration (4): this is the number of times an out-of-context answer may happen before the current context is erased and reset to nothing. By default, the reset context number count is zero which means that context is reset as soon as an out-of-context answer is received.
Topic Section (1)
While your chatbot dialog capabilities grow, you may face issues like false positives or near confidence when a user expresses an intent that can lead to different topics.
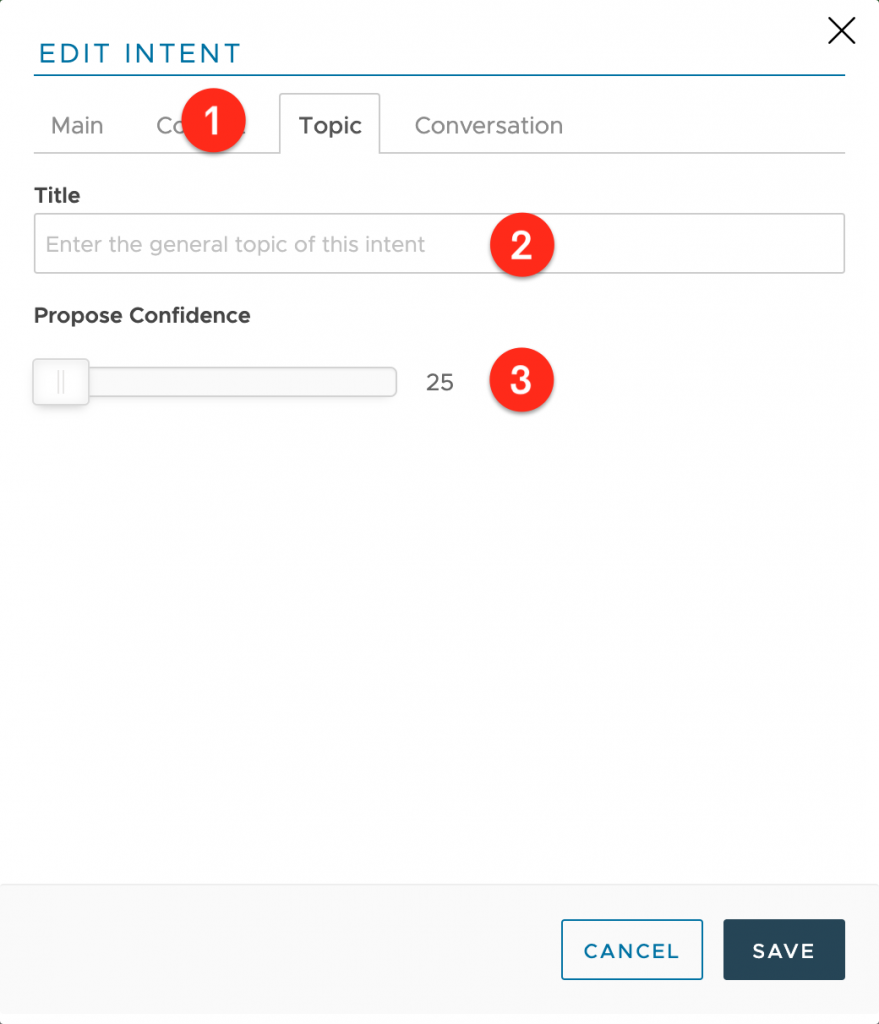
Using Topics you can assign to any intent a generic topic (2) and minimum viable confidence (3) and Xenioo will be able to detect, group, and display to your user all the intents that have matched the expression.
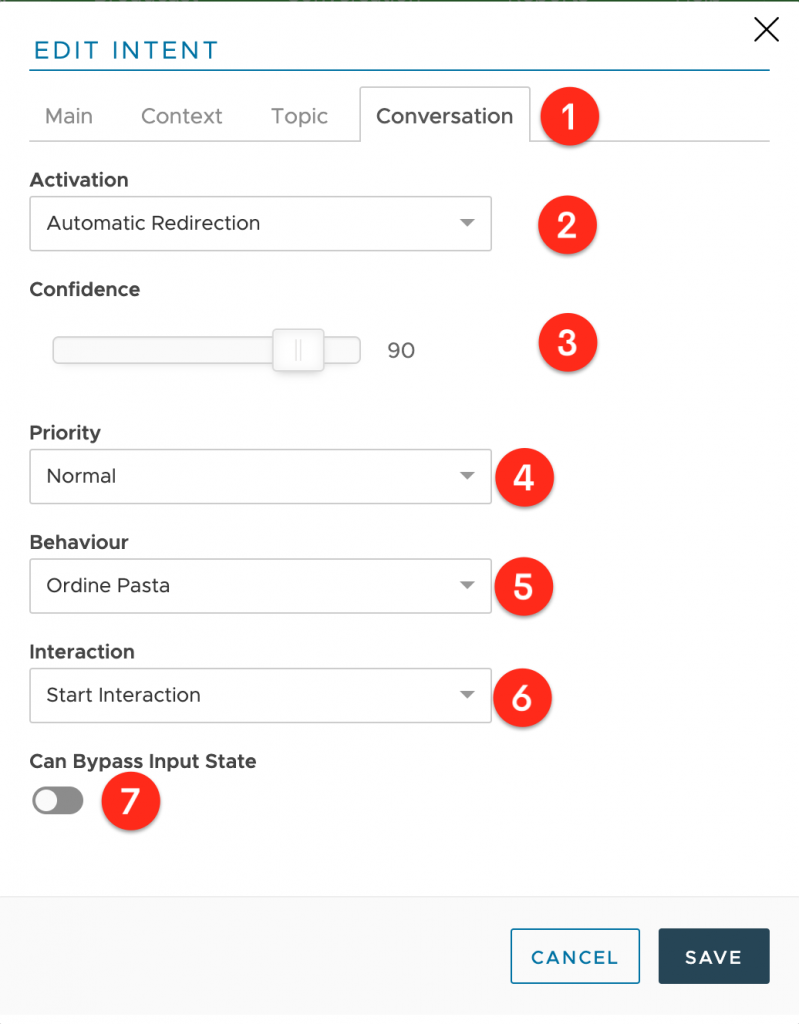
Conversation Section (1)
Using the conversation section of the intent settings you can configure your intent to generally activate without using any kind of behavior or global bot operations.
Type | Description |
Manual | The intent is activated manually by action or operation. This intent will not be triggered by your chatbot in any way unless used specifically. |
Automatic Redirection | Using this setting will automatically redirect the conversation to the specified behavior and interaction whenever the confidence goes above the selected percentage. |
Immediate Reply | A specific reply will be shown to the user whenever the intent is triggered by the selected percentage. |
Confidence (3): this is the minimum required confidence to be met by the engine to trigger the activation modes.
Priority (4): using this setting you can change the order of activation when multiple expressions may trigger automatically.
Behaviour (5): this is the behavior where the conversation will be automatically redirected when Automatic Redirection is selected.
Once your new entity [pasta] and your new intent [Order Pasta] have been created, clicking on it will redirect you to the Expressions creation page. If you have multiple intents and expressions you may also quickly import them. Once your intent is defined, just click on the intent row to access the expressions views.
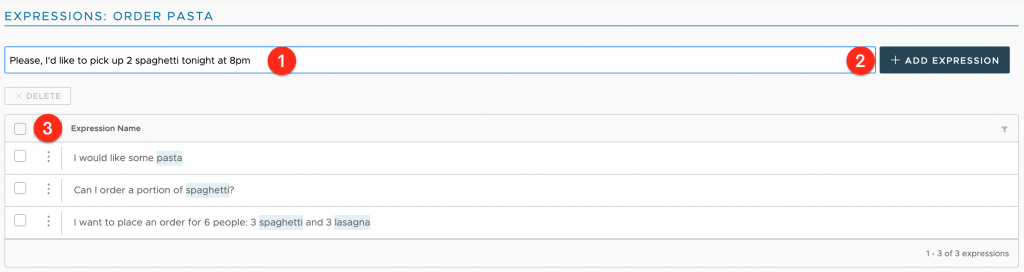
Expressions are basically a list of sentences (3) that define the parent intent. While the intent represents a generic description, expression defines what users would actually be saying to express it. As you add expressions (1,2) to your intent you improve the training of your AI and improve the future confidence percent of user messages. The more expressions you add the more precise the AI engine will become after training.
I recommend that you train each Intent by including at least a dozen different expressions, taking care to provide sentences in which the entities are expressed with the different values and synonyms they can take.
Training & Testing your Model
As you add new expressions and entities to your AI model, you will notice a warning sign near the Train & Test section. The warning sign is alerting you that re-training is required. To train your model just click on the “Train & Test” button on the left of the AI section.
To test your model, just type an expression in the evaluation text box and see what Xenioo AI is parsing as a result.
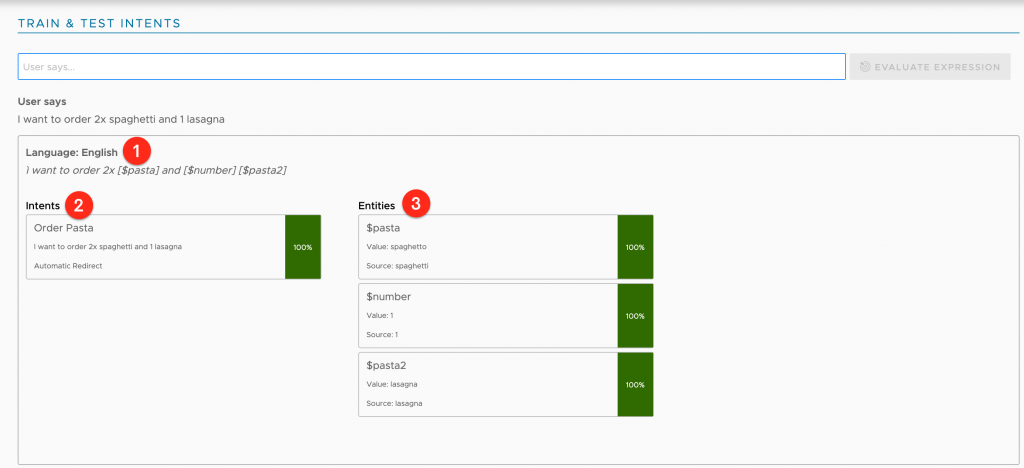
Parsed sentence (1): from here you can see what the Xenioo AI engine is parsing and stemming your example expression. Entities are expressed by their own name in place of words.
Intents (2): this is the list of all intents that are processed and that have any relevance to the expression. Below each intent name, you will see the expression that is triggering the intent. If you have more than one intent triggering a 100% relevance you may end up having false positives or out-of-context answers.
It may be a good idea to check your model or implement priority of topics.
Entities (3): this is the list of all the entities that have been found in the submitted expression noted both with main value and detected synonym (if any).
Testing time: let’s launch the Xenioo preview and try to order some pasta!
If I type the expression: “I want to order 2 spaghetti and 1 lasagna” (1) the bot replies to me asking for what seasoning I want in my spaghetti dish (2), great!
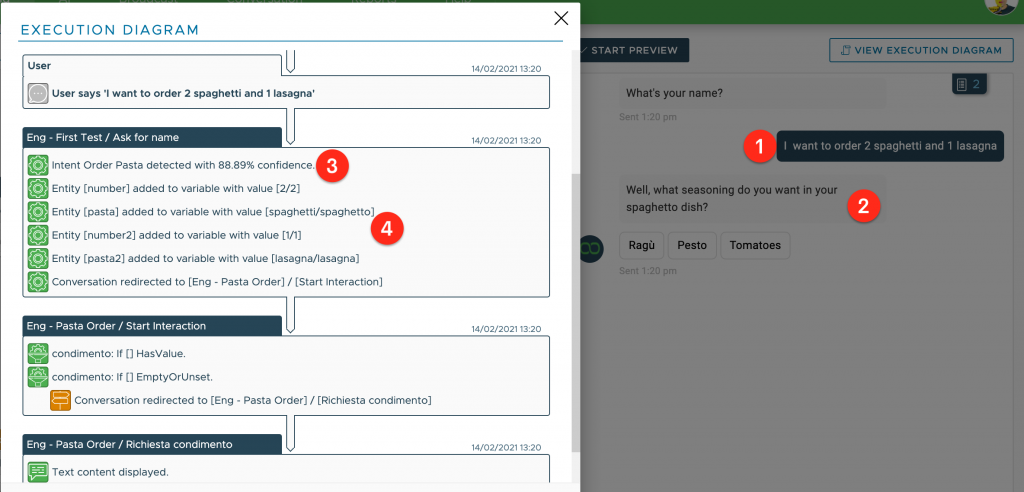
As you can see in the Execution Diagram on the left, the Order Pasta intent was detected with a good 88,99% of confidence (3), then all entities are recognized and values are assigned to relative variables (4).
The icing on the cake: as you can see in the preview on the right, the bot asked me what kind of sauce I want on my “spaghetto” dish (2), right? That’s because this value came following the valorization of the variable [pasta]. That’s amazing, isn’t it?
To Sum Things Up…
In this article, I’ve had just scratched the surface of the NLP topic. That’s why I recommend delving into this interesting matter as much as you can. Mastering NLP is what will allow you to make first-class conversational chatbots.