
In this video lesson, I’m going to teach you the very basics of how to start creating chatbots with Xenioo. You’ll learn how to access the platform and the basic concepts and terminology you should know to get the most out of Xenioo.
First of all, to get started and follow me along with this and all the subsequent lessons, just visit https://www.xenioo.com and click on “Sign In” to enter your account.
If you haven’t yet created an account, just click “Sign up now” to create one. It’s free and you only need to provide your best email.
After creating your account, just click on the green “Sign in” button to enter the platform.
On the top left, you’ll have the Dashboard where you can see data about the usage of your current plan.
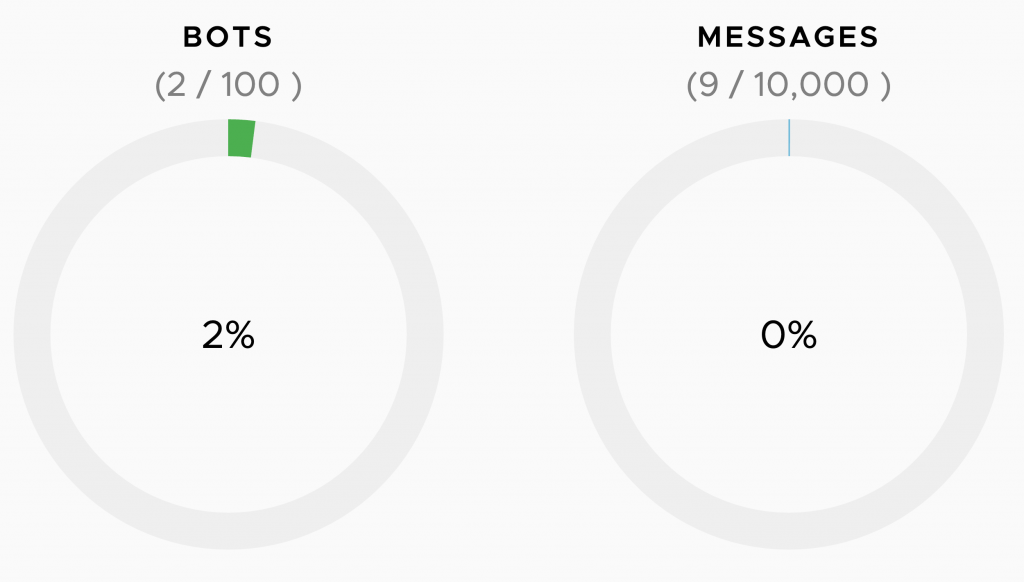
In terms of bots, you can have from 2 up to an unlimited number of bots: as you can see, I’m using just 2 bots out of 100 in my account.
When you create chatbots, the number of messages is a very important metric to monitor. In the pricing video, I have already clarified how message counting works, but I can briefly recap here as follows:
- if your account is active, then your chatbots can consume messages.
- messages are consumed by standard interaction like text bubbles, images, buttons, and API calls.
- messages are even consumed by broadcasts and actions that send or retrieve data from external services.
For more details on how messages are counted, you can visit the Help page.
Starting with the Starter plan, you’ll also have NLP Intents and Storage.
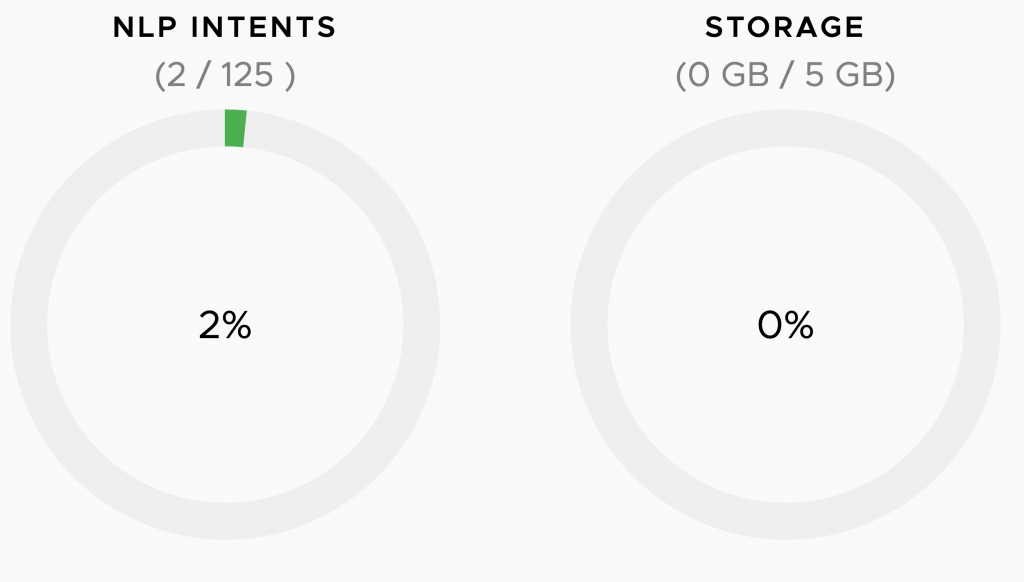
You can use NLP intents to make your chatbot smarter and capable to understand user expressions. Here you can quickly see how many intents you are globally using in your account.
Storage indicates how much Xenioo cloud storage you are using for your multimedia elements. In fact, while building your bots, you can choose whether to link your resources (such as images, videos, audio) to external sites, or upload them directly to the Xenioo cloud.
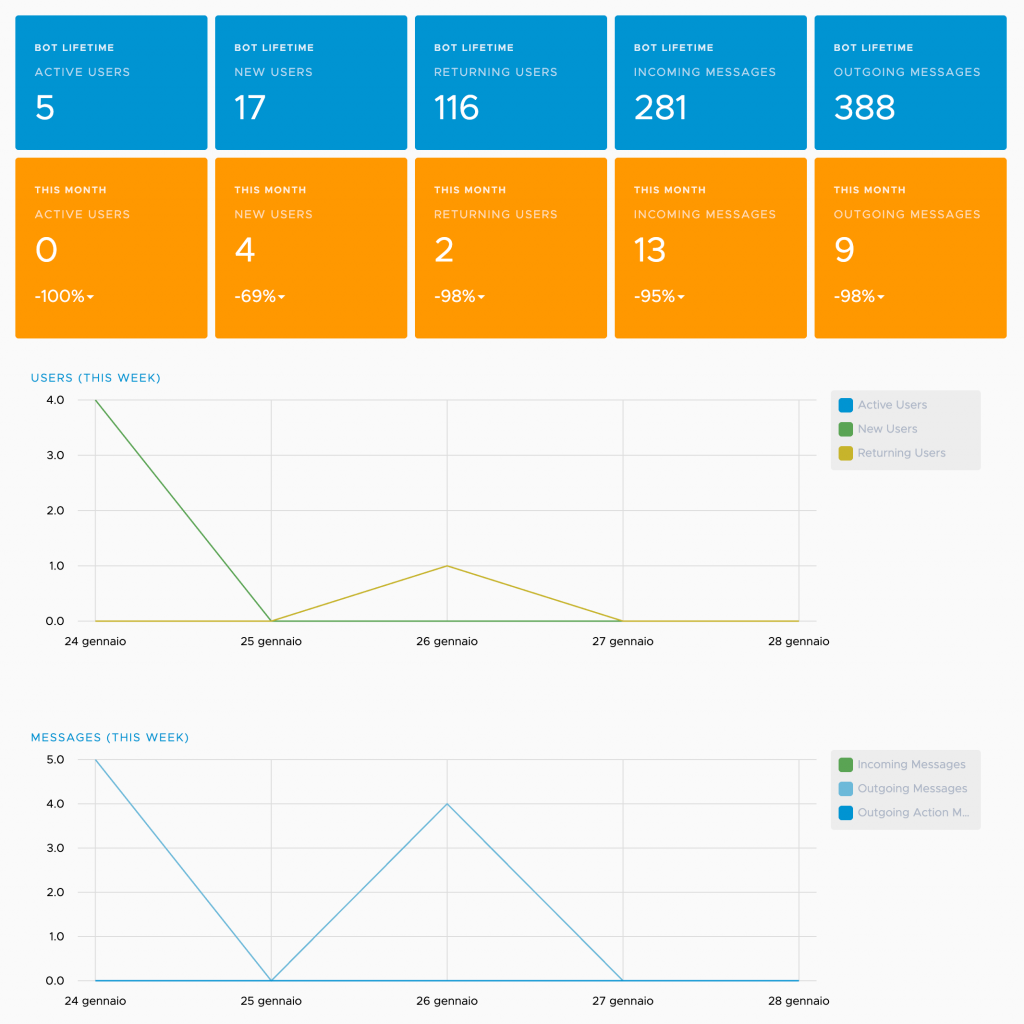
The Dashboard section gives you access to statistics about how your chatbots are performing in terms of messages and users.
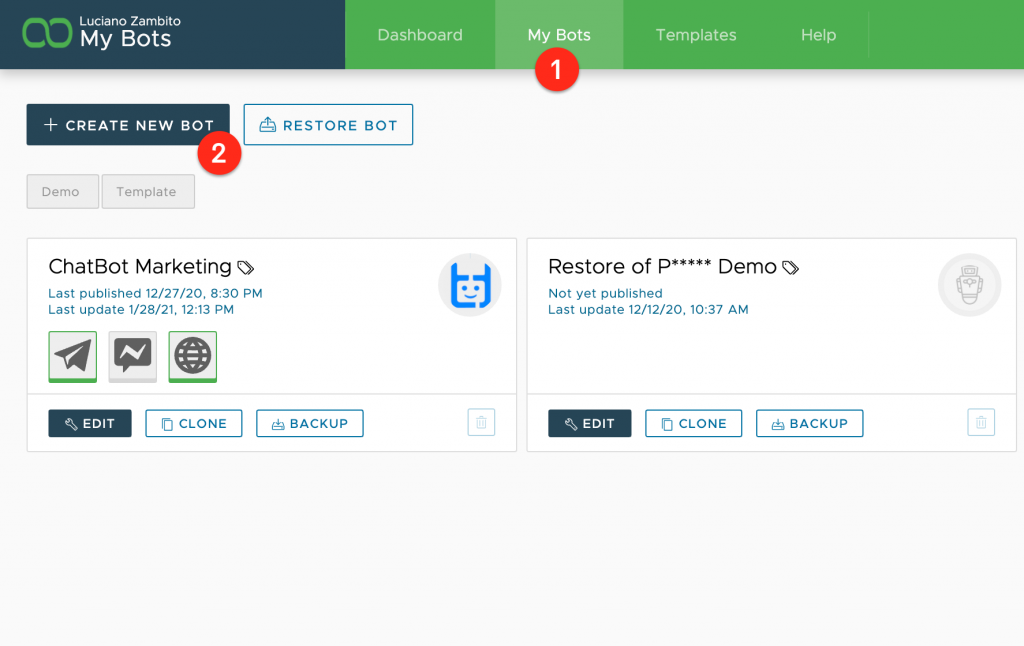
In the section “My Bots” you can find your bots or create new ones, while the “Template” section is where you’ll find already built chatbots that you can clone and freely use.
With just 2 clicks, the chatbot template will be up and running, so you can understand how it works, as well as being able to customize it as you like.
I recommend that you play with the templates because they provide solutions and guides for many common use cases.
Creating chatbot: your first bot from scratch
To create a new chatbot go to My Bots and click on Create New Bot: in just a few seconds Xenioo will create a new chatbot for you and will take you inside the flow designer. Flow Designer is the work area in which you will design, test, and publish your conversational flows.
Now, I think it’s useful to define the basic concepts of Xenioo. We have to think about it as a structure with many different layers. Each layer details more and more specifically a unique functionality. The highest layer is the behavior.
When you create a new chatbot, Xenioo will automatically create for you your very first and basic behavior, something like this:

A behavior is, generally speaking, how your chatbot handles a specific situation. The Behavior of your chatbot, for example, might be called “Restaurant Reservation” and handle everything related to receiving orders from the users.
You are not forced to create multiple behaviors in your chatbot and neither you are to create your chatbot using only one. It is up to you to choose how to organize your flow and your conversation blocks. You can also change your mind later and group all interactions into a single one or split them into multiple behaviors using the move command.
Inside each behavior, we can have one or more interactions.
An Interaction defines the steps of your chatbot behavior and contains information on how exchanges with your user happen. Each interaction will then contain one or more actions.
An Action defines a minimal unit and contains a single step within an interaction. A single action can be, for example, a text bubble, a button, or an image.
Lastly, each action may have one or more operations attached. As the user interacts with your chatbot actions, certain events can be fired, such as the redirections of the flow to another interaction.
Here is a graphical representation of these different layers:
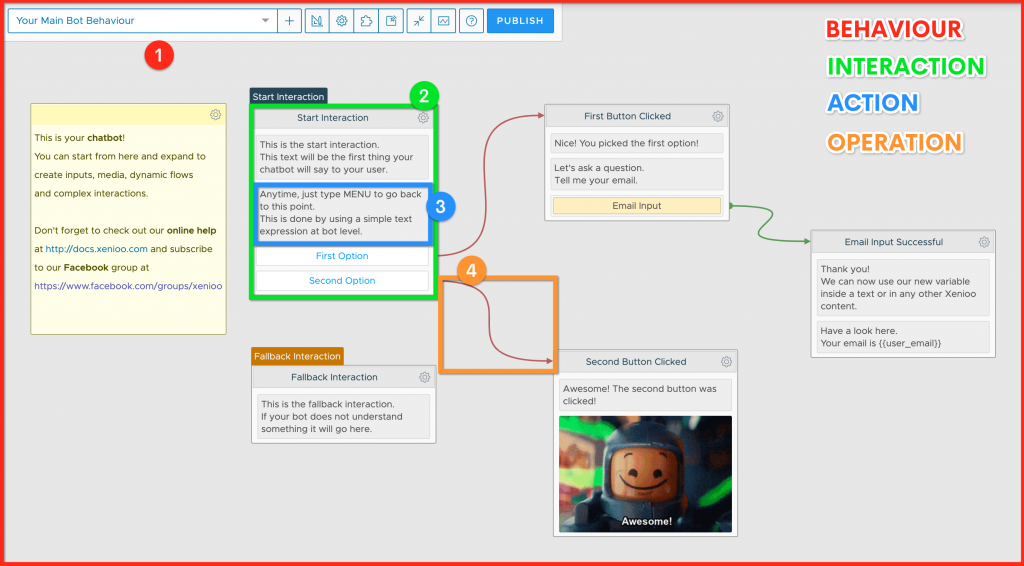
The red rectangle (number 1) corresponds to the entire behavior, the green rectangle (number 2) is an interaction that in turn contains more actions.
I highlighted a text action with the color blue (number 3) and, finally, an operation (in orange) that, once the Second Option is pressed, directs the conversation towards another interaction, called “Second Button Clicked”.
Are you confused? Don’t be worried! At first, it is normal because you have to familiarize yourself with these concepts. But I can assure you that this necessary little effort will reward you later in terms of the power and versatility you’ll have at your disposal.
Create your first Behaviour
Let’s create a first basic behavior together, which will ask the user to write his name.
To do this, click on the “+” sign next to the box containing the name of the current behavior (“Your Main Bot Behaviour”), then confirm. Your new behavior will be now named something like “New Bot Behaviour #” followed by a number.
To change the name of the behavior and access its properties, you can click on the gear icon in the toolbar:
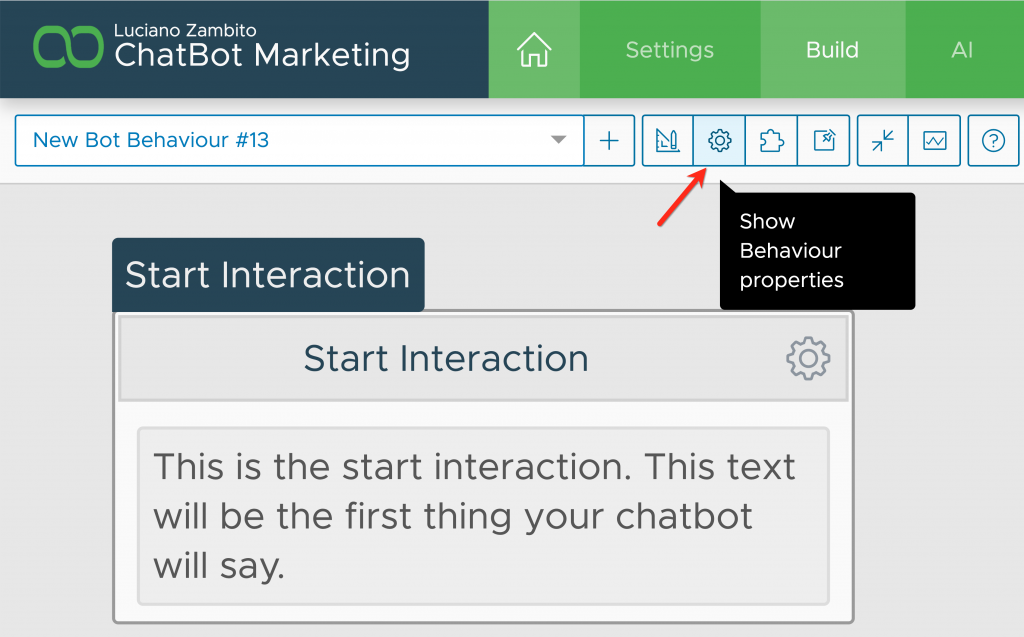
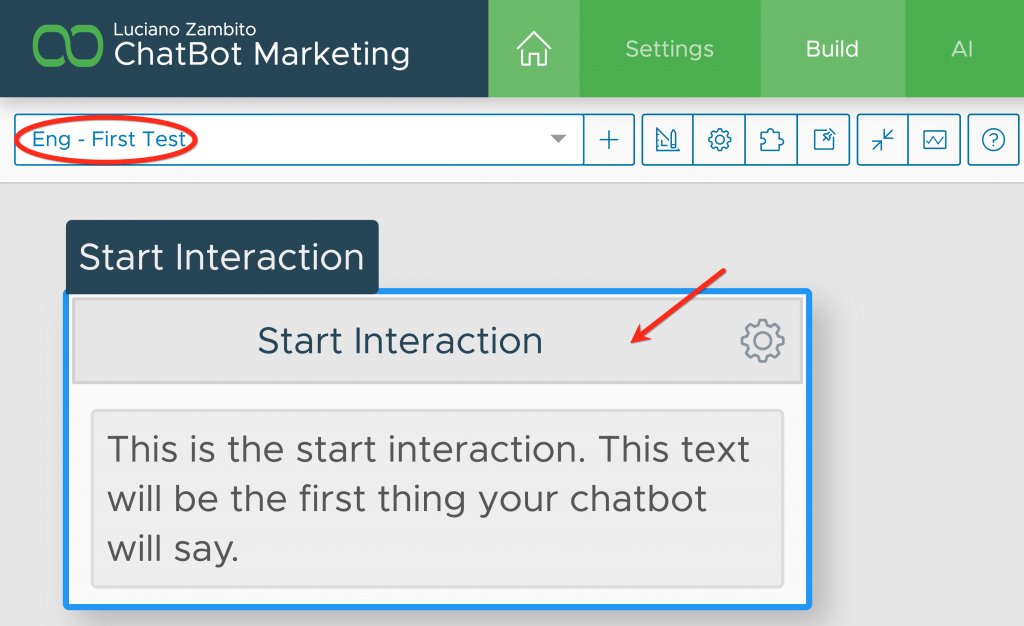
Let’s change the name to “Eng – First Test” and click on “Save”.
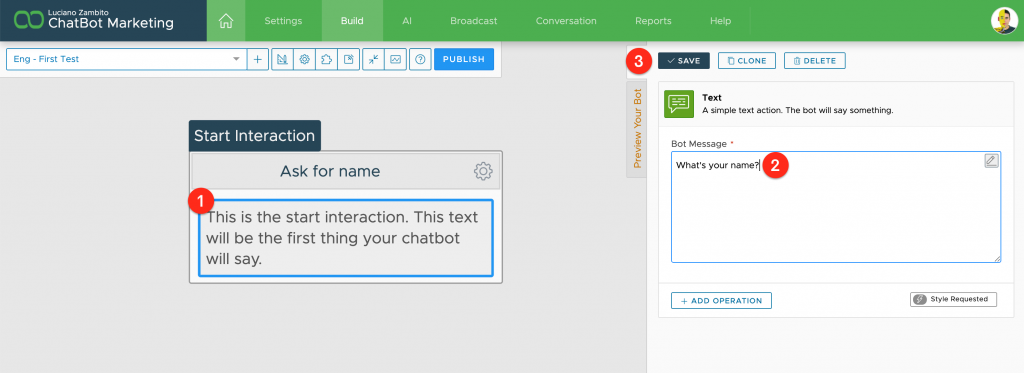
Now let’s do the same for the interaction by simply click on its grey background area and open up its settings on the right.
Name it “Ask for name” and save it again.
Now It’s time to change the text inside the first action, which is a Text Action. Click on it and change the text in the right area, then hit “Save”.
To Sum Things Up…
In this lesson, I’ve chosen to go very slow to make you able to digest the very basic concepts behind a Xenioo chatbot flow.
You have learned how to build a basic flow and now you’re ready to go deeper with the next lesson!