In this lesson, you are going to learn one of the most disruptive features of Xenioo, making it one of the most customizable and competitive platforms on the market: chatbot forms!
Until now, you’ve seen how it is easy to create interactive conversations based on text, buttons, and even carousels. However, especially if you are a seasoned chatbot builder, you may know how the classic pattern composed of multiple questions and answers is sometimes not the best solution.
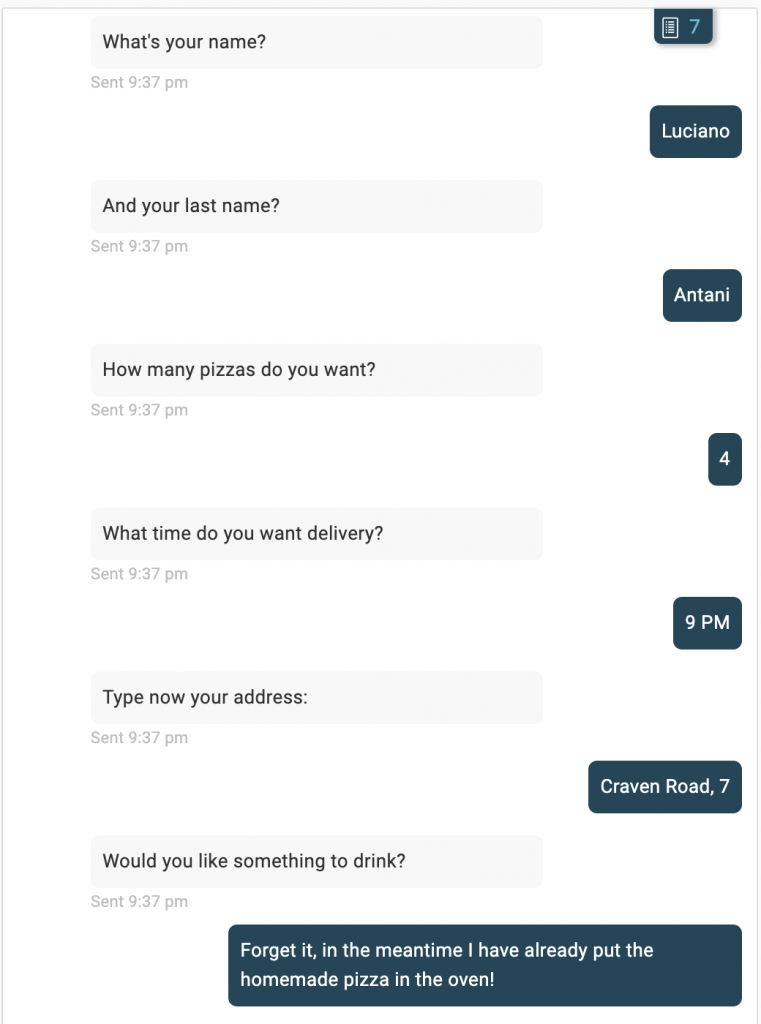
There are cases where you need to ask for a lot of information and you need a more intuitive and well-formatted form layout.
For example, the following are flows that might have benefits from having a customized layout to gather information: booking an appointment for a service, making a reservation for a room, collecting users’ feedback.
The solution that Xenioo provides out of the box to meet this need is Xenioo Forms.
Xenioo Forms is the revolutionary feature that can help you build complex, interactive forms that can be integrated into any channel to quickly and effectively collect your user’s information.
Bots are extraordinary tools, but it is important to understand their limitations and find the right solutions.
Without reinventing the wheel, Xenioo Forms has taken inspiration from other ecosystems, such as websites and mobile apps, where such problems have already been solved by finding the right compromise between design and usability.
Here is a practical example to make you better figure out what I’m talking about:
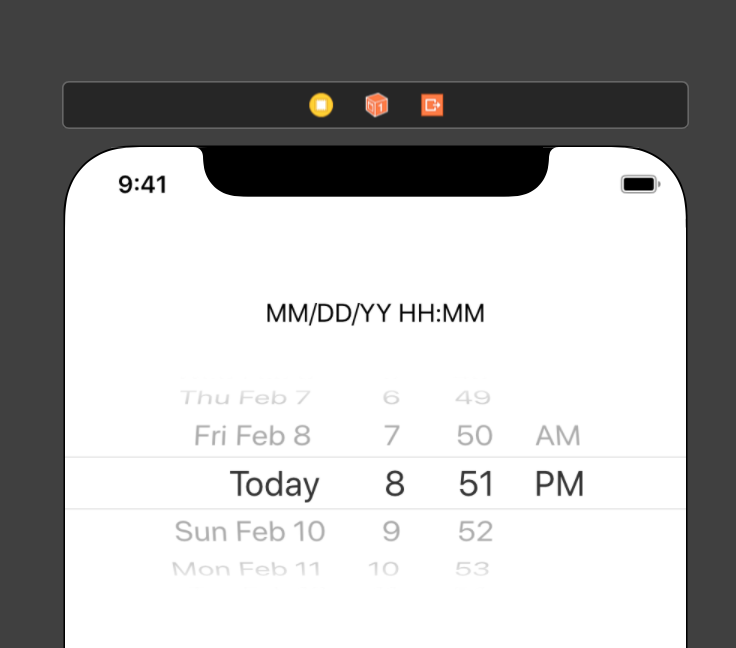
This is a Date Time picker used by the iOS operating system and I find it an amazing solution. I think it’s difficult, if not impossible, to generate an invalid date and time with this visual element, don’t you think? Wouldn’t it be great to have something like that inside our chatbots?
Well, the goal of Xenioo Forms is to provide a set of visual components to create standalone web forms that can be displayed from chatbots running on whatever channel to collect complex user data.
Although they are very simple to use, Forms are complicated components composed of different layers.
Collect complex data with Chatbot Forms
The first layer is the container, called Form Container.
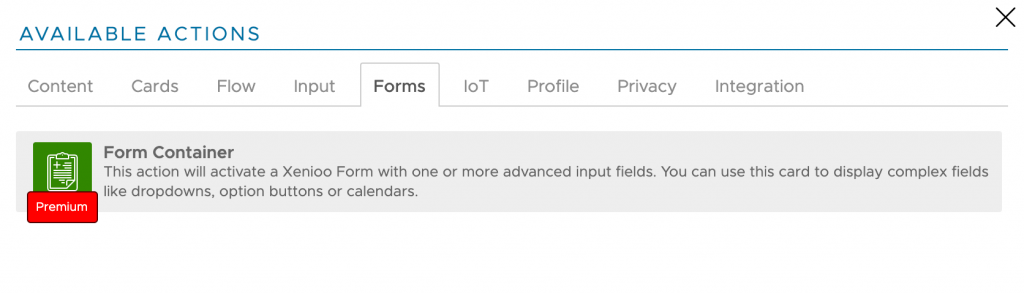
This action will add a new empty form container that can hold both input fields and layout components. Before discovering and adding elements inside the container, let’s see its properties in detail.
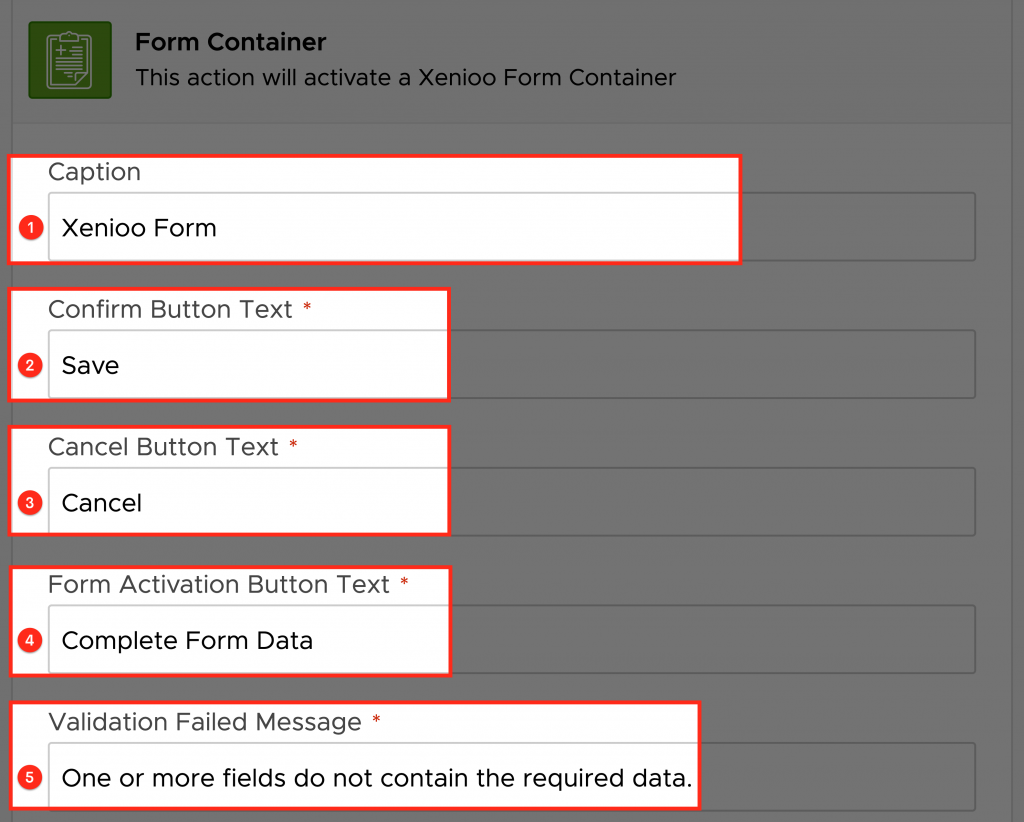
1) Caption: this text will be displayed in the floating title area or as the form page title.
2) Confirm Button Text: the confirm button text that will update data and close the form page.
3) Cancel Button: the cancel button text that will cancel the data entry and close the form page.
4) Form Activation Button Text: the text that will be displayed in the link button inside the chat and that will activate the form. If buttons are not available for the current channel, they will be rendered as text with a hyperlink. The auto-generated form URL is unique and can be used only once.
5) Validation Failed Message: the text that will be displayed when one or more mandatory fields have not been filled.
Then there is a list of options that can be turned on or off to enable or disable specific form behaviors:

1) Hide Confirm Button: if enabled, will hide the form default confirm button.
2) Hide Cancel Button: if enabled, will hide the form default cancel button.
3) Swap Buttons Order: if enabled, will swap the confirm button position with the cancel button position.
4) Redirect to Floating Area: enable or disable redirection of the form inside the Web Channel floating area.
5) Display inside chat area: if enabled, will force the form to appear inside the standard chat area.
6) Open Automatically: if enabled, will force the form to be opened automatically instead to wait for the user to click the link or button.
7) Rendering Mode: form rendering mode can be used to choose how the form will appear on mobile or desktop browsers. If set to Table, fields will be displayed in a table with field name on the left and field control on the right. Rows setting will display fields in rows with names on top of each field. Just set it to Auto if you want Xenioo to automatically choose the best rendering mode. Rows mode is best suited for the mobile screens, while Table mode fits best for all other platforms.
Chatbot Form Fields
Form fields are all the visual component that makes up your form. They are of two types: Form Fields and Layout elements.
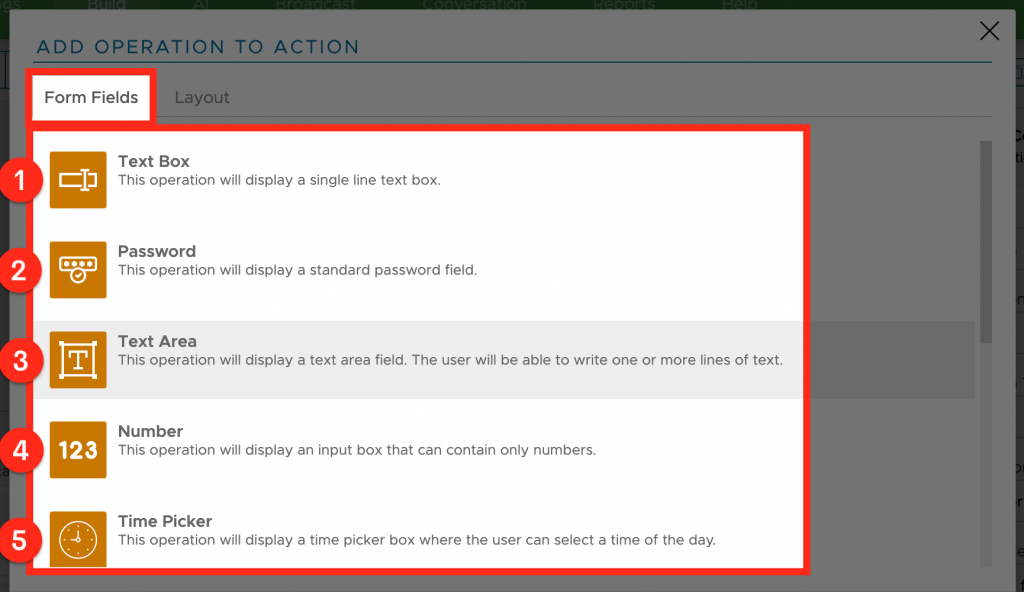
Form Fields are essentially the input component used to ask and gather information from users. Layout elements work on the layout rendering of the form itself.
1) Text Box
This operation will add a text box to the current Form Container. A text field can contain an arbitrary amount of free text.
2) Password
This operation will add a password text box to the current Form Container. A password text box will hide the characters typed by the user.
3) Text Area
This operation will display a text area field. Rows will set the number of rows displayed by the text area. This value will change the height of the text area.
4) Number
This operation will add a numeric text box to the current Form Container. A numeric text box will accept only numbers and usually display up/down arrows to increase and decrease the value.
5) Time Picker
This operation will display a time picker box. You can choose the Minimum and Maximum Time the user can enter into the field.
6) Date Picker
This operation will add a Date picker field to the current Form Container action. The date picker will let you choose a date by selecting it from a dropdown calendar widget.
7) Calendar
This operation will add a full-page calendar to the current Form Container.
8) Checkbox
This operation will add a checkbox field to the current Form Container. The target variable will be set to ON if the checkbox is checked or to OFF if the checkbox is unchecked.
9) Dropdown
This operation will add a dropdown box to the current Form Container. The field will allow the user to select a value from a list of possible values.
10) File Upload
This operation will add a file upload field to the current Form Container. An upload field will allow the user to attach a file to your form. You can set a comma-separated list of acceptable file extensions for this attachment.
As you have seen, there are a lot of fields that make you able to create even the most complex data entry form.
Layout Fields
Layout fields are not input fields and they should be used to make your form look better.
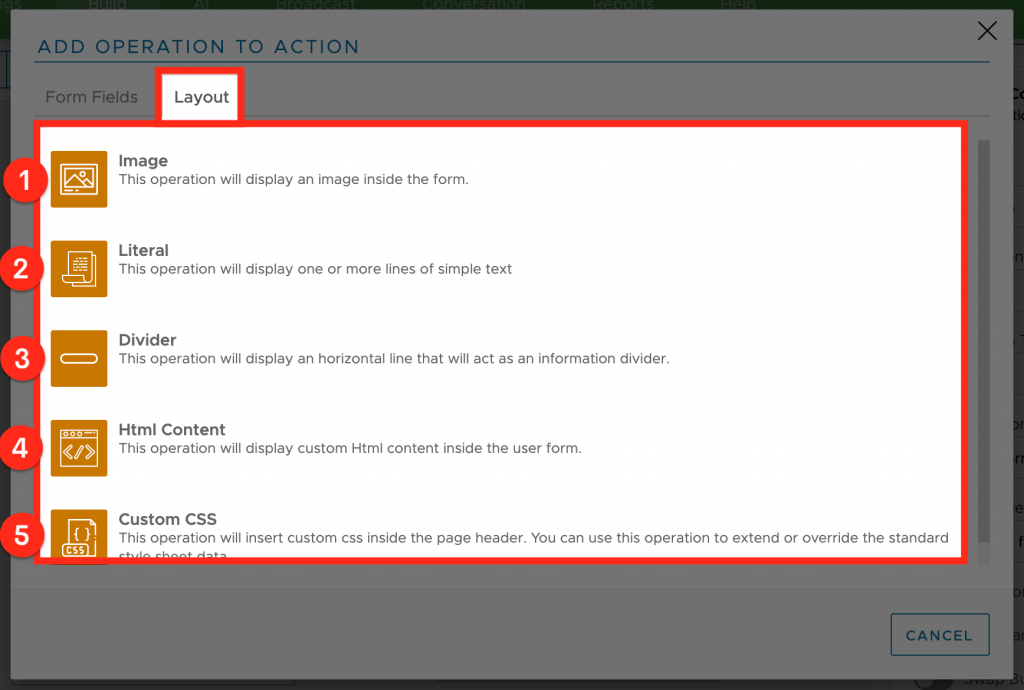
1) Image
This operation will add an image to the current Form Container. As usual with Xenioo, you can add images either by using an URL or by uploading them to the Xenioo Cloud.
2) Literal
This operation will add literal content to the current Form Container. The literal content will display simple text that will span the whole width of the form area. You can use standard HTML formatting to alter the layout and general presentation of the content.
3) Divider
This operation will display a divider Form Container. A divider will display a standard caption followed by a thin line that can be used to divide different sections of your form.
4) HTML Content
This operation will add raw HTML content to the current Form Container action. If you enable script header rendering, the content will be added in the general form script area as part of the required JavaScript code.
5) Custom CSS
This operation will add a custom style sheet content to the current Form Container. The style classes will be automatically rendered inside “style” tags that are already part of the page. Do not use “style” tags inside this text control as this could potentially disrupt the page layout.
A real example of Xenioo Chatbot Forms
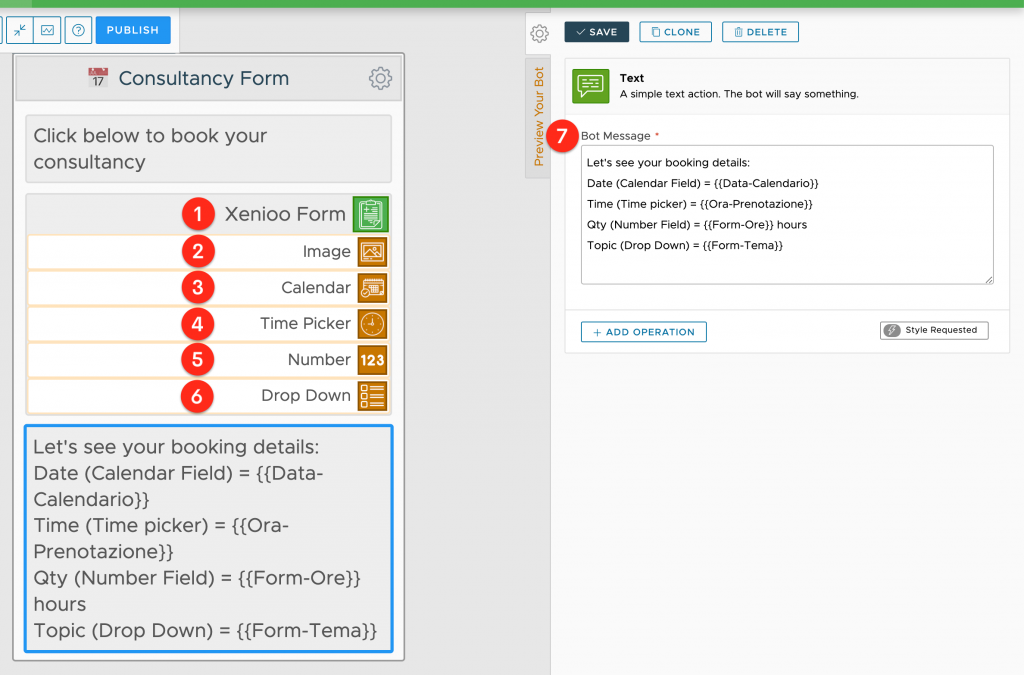
I’ve created an example just to show you how it is possible to use Xenioo Forms to optimize the process of booking a consultation.
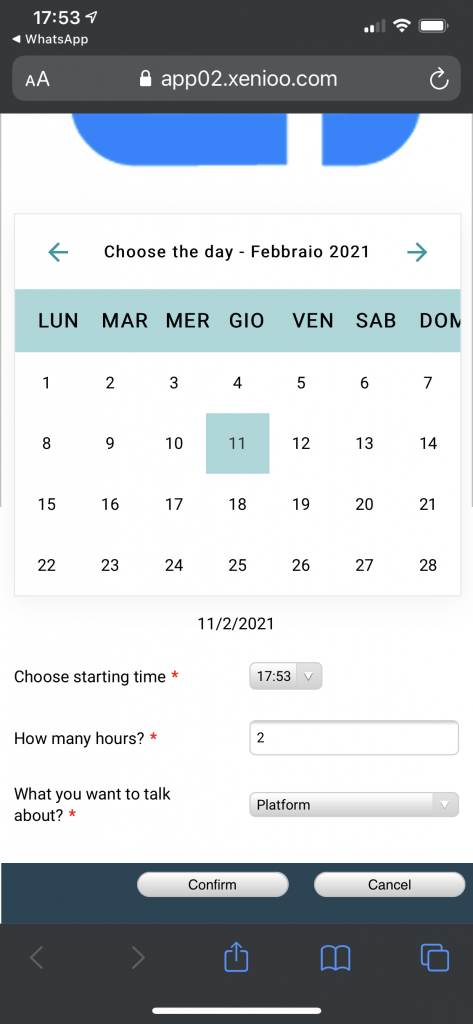
After inserting the Form Container (1), I’ve populated it with an initial Image (2) (perhaps a logo), a Calendar (3) to choose the date, a Time Picker (4) to choose the start time, a Number field (5) to set the duration of the call and, finally, a Drop Down (6) to choose the topic.
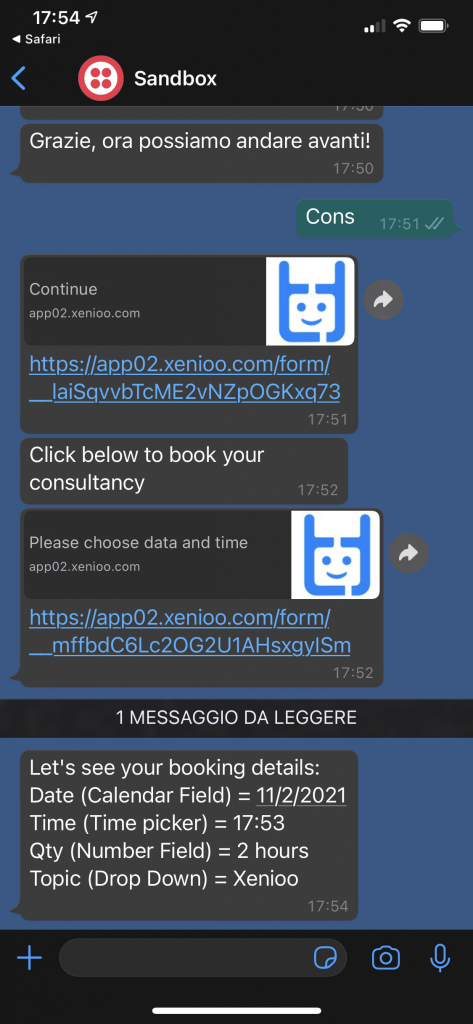
After sending the data, the bot will display a summary (7) of the data collected by the form. Remember that every form field will save its value in a standard Xenioo variable. Here is how our Form will look like in the designer:
Let’s now try this form in a real channel. In my case, I’ve used WhatsApp, but don’t forget that Xenioo Forms is compatible with all channels (except voice, of course).
Being the WhatsApp channel, (as of February 2021) the buttons are yet not supported. That’s not a problem for Xenioo that is capable of adapts its rendering capabilities and in this case sending back a simple link to click.
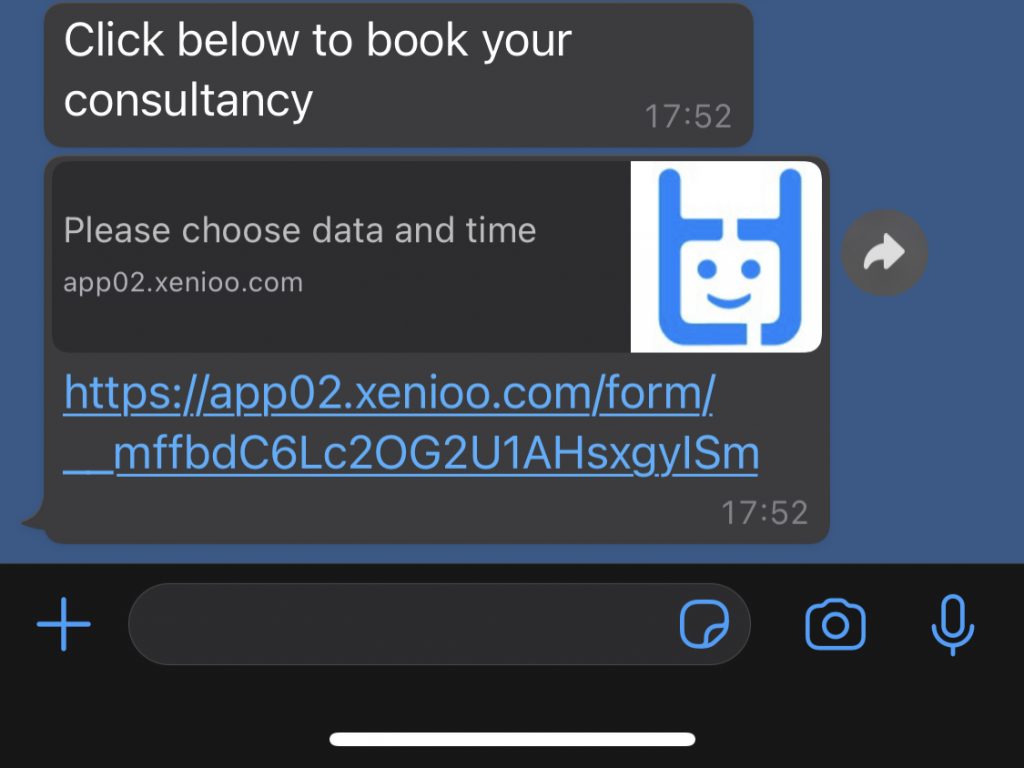
As you can see from the preview we have the Caption set for the Form and the image that I uploaded as the first Field. It looks good: let’s click!
A new window opens up in my browser on my mobile phone, so I can view and answer each question simply by interacting with the branded and well-formatted form.
Once I’m done with the form compilation, I just have to click on the Confirm button to get back to the chatbot. In the final part of the chat, you can see the chatbot displaying all the values of the variables that have been associated with the previous form fields.
To Sum Things Up…
Xenioo Forms is truly a breakthrough tool because it allows you to collect complex data with a chatbot, optimize and solve different situations in which instant messaging may be lacking. You can find full online help on Xenioo Chatbot Forms here.