
More than often, it’s very important to have a tool that allows the chatbot owner, or a team dedicated to supporting, to look at each chatbot conversation very carefully. And that’s what you’ll learn in this lesson.
As you may know, it’s very challenging to create chatbots able to manage any user expression and any possible situation. There are cases where even intensive NLP training is not enough to educate your chatbot to give the answers the users are asking. This is because chatbot users often use incorrect or very long sentences, as they’re speaking to a real person.
How can Xenioo help with that? Just keep reading!
Where to manage chatbot conversation?
Xenioo chatbot conversation is the section where all of your user’s chats are stored. In this lesson, you’re going to learn how to use conversation features to efficiently do support and get the most out of every acquired lead.
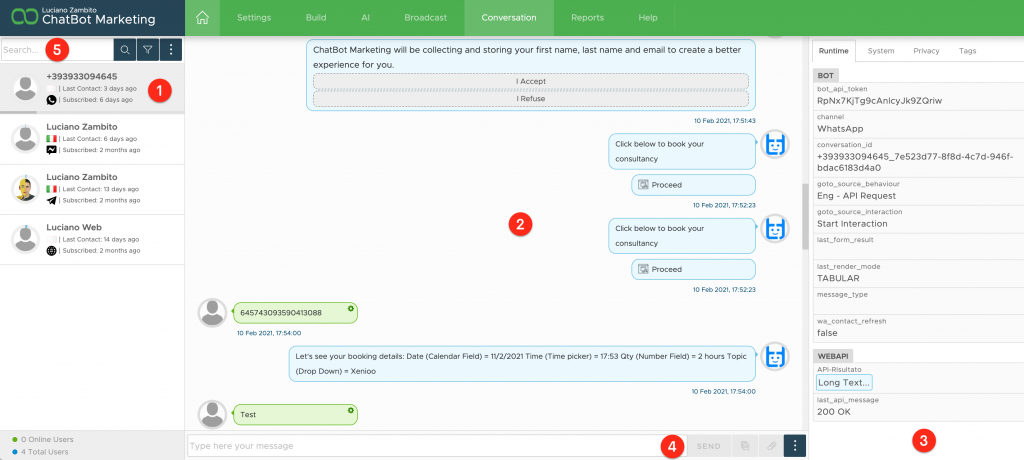
As you can see in the image above, on the left you’ll find your contacts list (1). All the users that have been contacted by your chatbot are listed here.
When you click on a contact the live chat area (2) changes, showing you all the conversation in real-time and independently from the channel where it happened.
All Variables & Tags that have been used at runtime by this chatbot instance are listed on the Variables & Tags Panel (3).
At the bottom center, there is the chat input area(4), where you or your operators can chat directly with the user or issue different chatbot commands.
If you need to search for a specific conversation user or carry out additional actions related to contacts, you’ll be able to use the Search Bar (5) in the upper left corner. Using the filter icon you can also apply advanced filters through the use of dynamic Audience matching.
Identify a contact
Let’s see in detail the information associated with each user of your contact list.
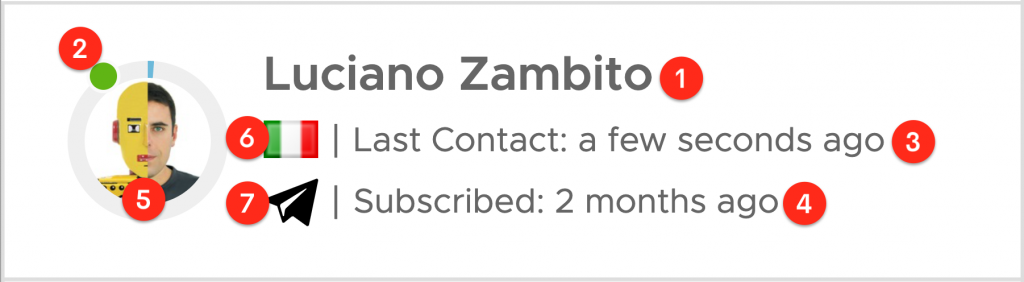
User Name (1)
This is the name of your user, if available. Depending on the channel you may see the service user name or the full name of the user. Xenioo will display here the contents of the first_name and last_name variables, if available. You can update this value from your chatbot or using the runtime editor.
Online State (2)
A small green dot near the avatar image indicates that the user is currently online. Depending on the channel it may indicate a live conversation or an interaction that happened in the past.
Last Seen (3)
This is the amount of time since the last time your chatbot interacted with this user.
Subscribed (4)
This is the amount of time since the very first time your chatbot had contact with this user.
Avatar (5)
This image is the user avatar, if available. Some channels will supply this value by default. Xenioo will display here any valid image you set in the profile_pic variable.
Flag (6)
This flag is based on the locale variable. If exposed by your channel, Xenioo will automatically fill it with the correct user-related locale.
Channel Icon (7)
This icon lets you know what is the user’s current communication channel.
When the chatbot conversation is currently being managed by an operator, a specific icon on the top right (1) will allow you to quickly figure out the status of the chat.
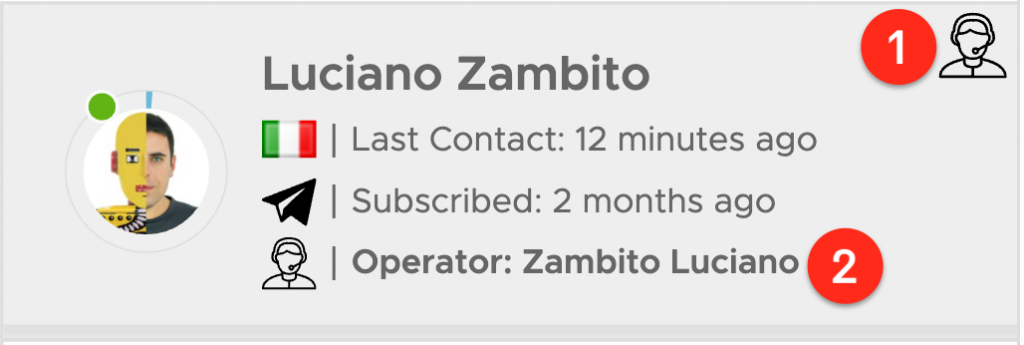
In the case of an operator chatting with the user, his first and last name (2) will be properly indicated. Be sure not to get confused in this screenshot, in which I am both the Telegram user and the live chat operator (2)!
Finally, you could also find out how each user is consuming messages of your chatbot. Just click on his avatar and you will have access to that numbers.

How to manage live chatbot conversation?
Xenioo provides a lot of functions to efficiently and actively manage conversations.
If you click the 3 dots (1) at the bottom right, you’ll see several categories: Privacy (2), Conversation (3), View (4), and Share (5).
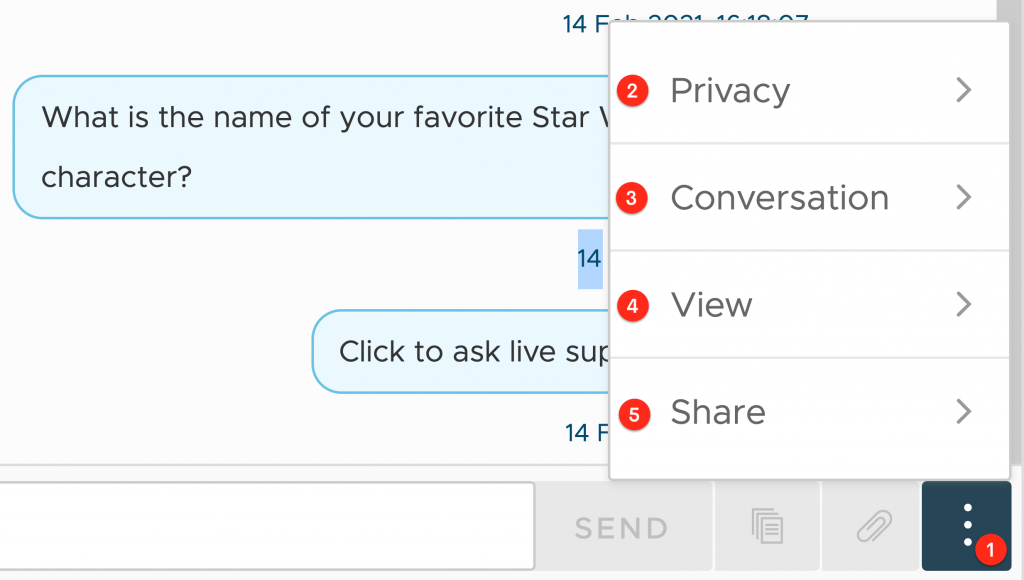
Let’s see them in detail, starting with the Privacy item.
Privacy
The Conversation Download command will export the full conversation history of the selected user since the very first contact as a CSV file. An additional CSV file will contain the full list of variables and tags for the whole conversation.
The Forget User command will completely remove any user’s conversation variable, tag, and data from Xenioo. After complete deletion, the user will be able to interact again with the chatbot but a brand new conversation will be started and the contact will be received as new.
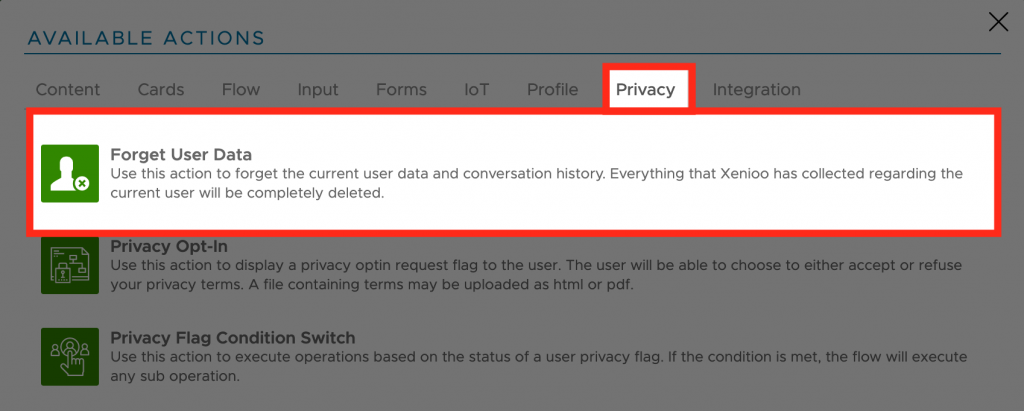
As you can see from the image above, it is possible to apply the “forget user data” feature as an action inside the chatbot flow itself. This is useful if you would like to give users the chance to delete any trace of them inside Xenioo.
Conversation
This is where you’ll find many of the functions useful to agents and operators who do support and checking of quality of conversations.
Before going on, let me clarify two important terms: Take Over and Hand Over.
Take Over is when control of conversation switch from chatbot to human. In this case, the chatbot stops responding to any user input and the only possible interaction is between the user and a human operator.
Hand Over is when the control of conversation returns to the chatbot, resuming the standard flow of interactions.
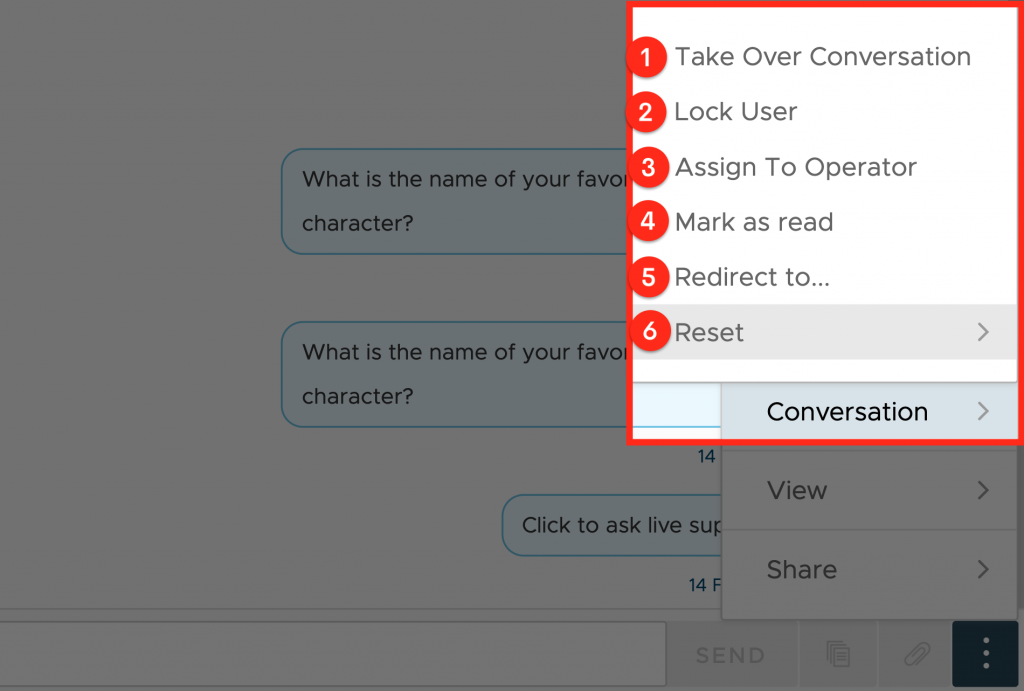
About the first menu command (1), if Xenioo currently manages the chat, it will be called “Take Over Conversation”, otherwise it will be called “Hand Over To Xenioo”.
Lock/Unlock commands (2) should be used to stop every user’s incoming messages. When a user is locked every message is ignored and no chatbot activity happens. This is equivalent to banning users from your chatbot.
If you work in a team, operator A may need to assign the conversation to operator B. In this case, you can use Assign To Operator (3) to assign the conversation to a specific user or group.
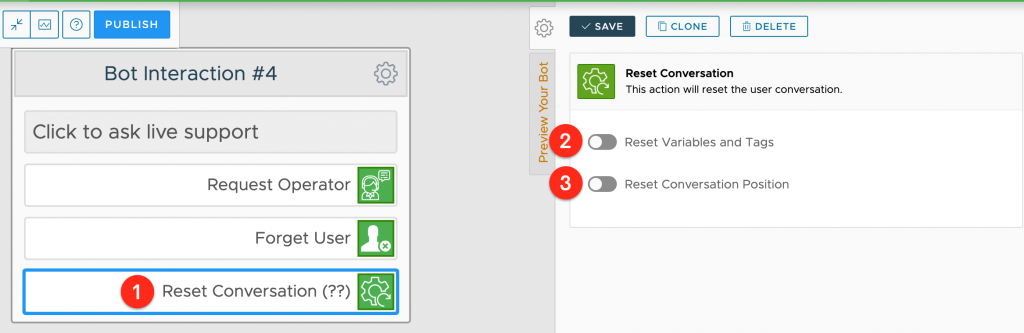
Thanks to the Reset Conversation Action (1) you can also decide when and what to reset from within the flow
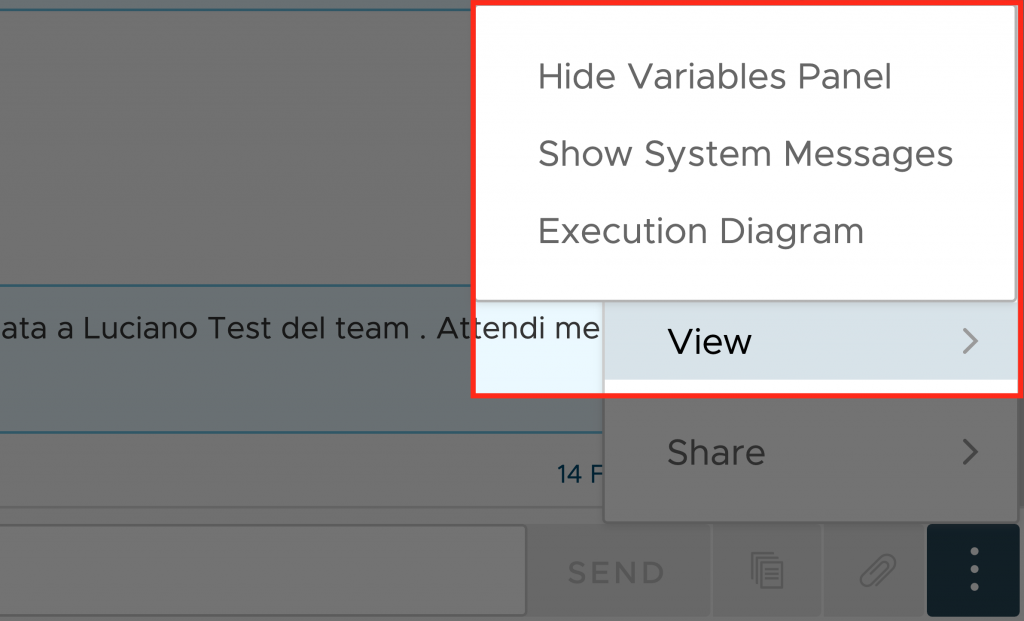
Furthermore, you have Execution Diagram to fully visualize flow execution steps. It is very useful to debug and detect issues.
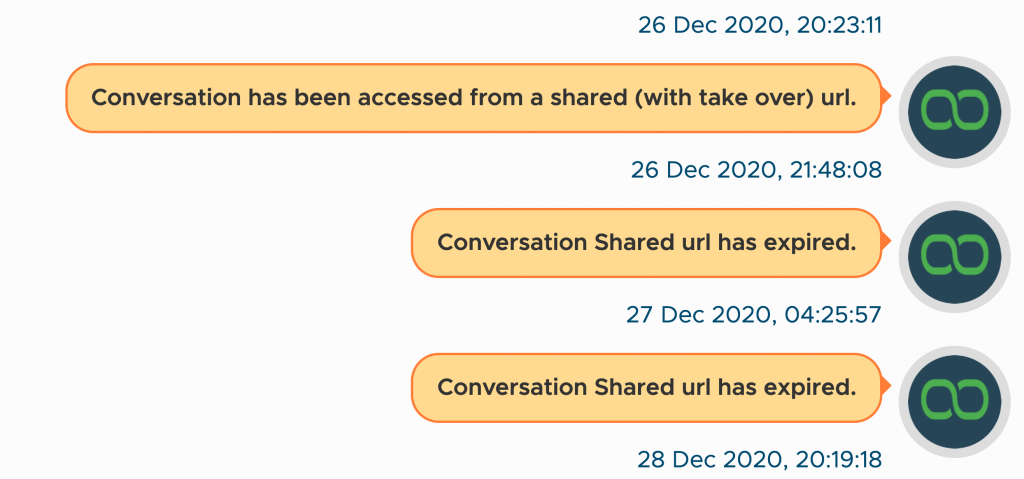
Share menu contains functions that allow you to optimize and boost teamwork. As you can see, you can share a single conversation by generating a unique URL that expires after a given time. The generated URL will display a simplified conversation interface on any browser and without any login to access it. Only one view and one take-over URL can be active at any time. Generating a new URL will invalidate the previous one.
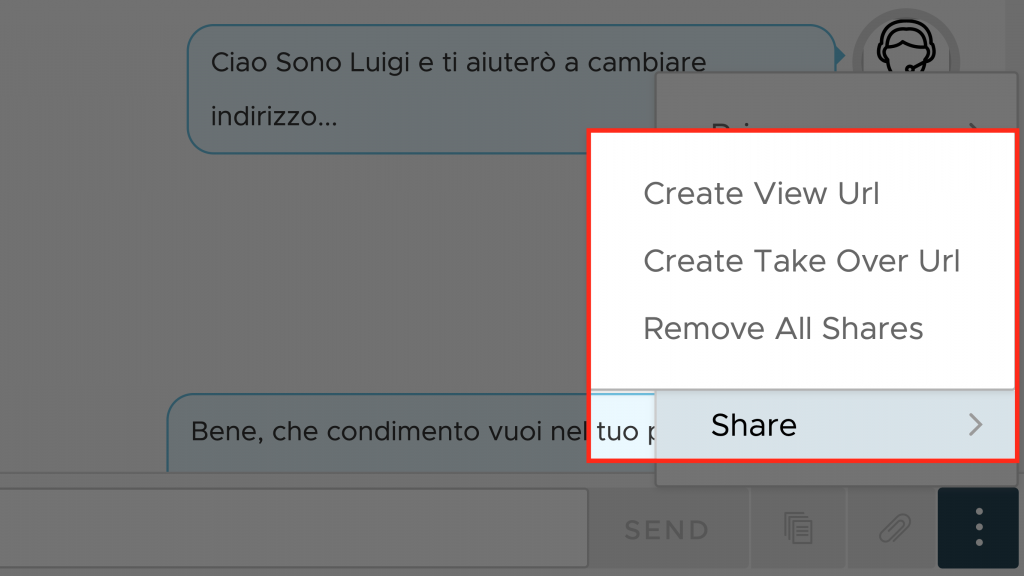
Create View URL generates a new, view-only URL. The user receiving this URL will be able to see the selected conversation in any browser for 48 hours.
Create Take Over URL generates a new take over URL. The user receiving this URL will be able to see the selected conversation and talk to the user in any browser for 48 hours.
Remove All Shares command will delete all active shares for the selected conversation. All active shares will expire and become inaccessible.
How to manage a team of collaborators?
Within Xenioo you can create real working teams, assigning each member specific roles and permissions. You can have a dedicated team for each chatbot.
In the Teams section, you’ll find all the tools to easily create your team. Multiple members can simultaneously work on different areas of your chatbot. For example, your NLP specialist could see and work only into the AI section, while your customer support team will only access the conversations section.
As you can see below, I have already invited 2 Members (1) inside my bot: each one is a member of a Group (2) and, for each one, I can set different Permissions (3). Permissions are essentially what operations they will be able to perform inside Xenioo. Finally, in the last column called Status (4), you can see the status of the members, as well as remove them completely from the Xenioo account.
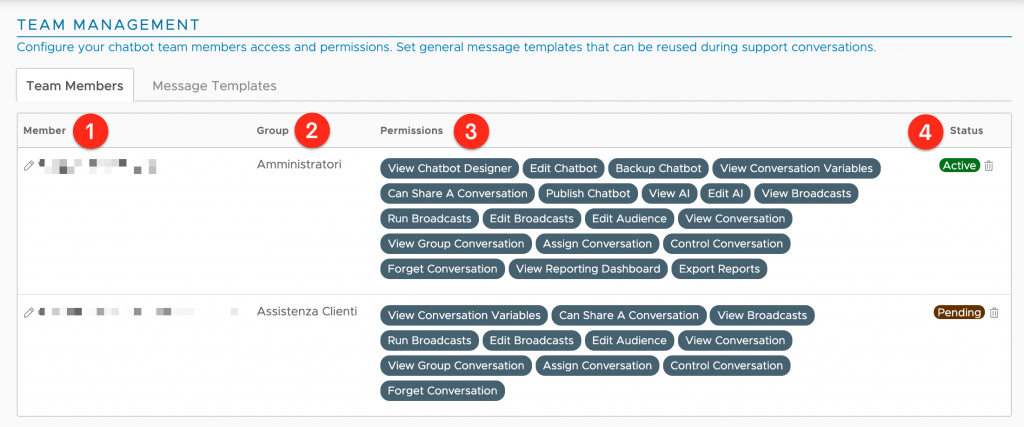
To invite a new member to your work teams, simply enter their email address, the optional workgroup they belong to, and their permissions.
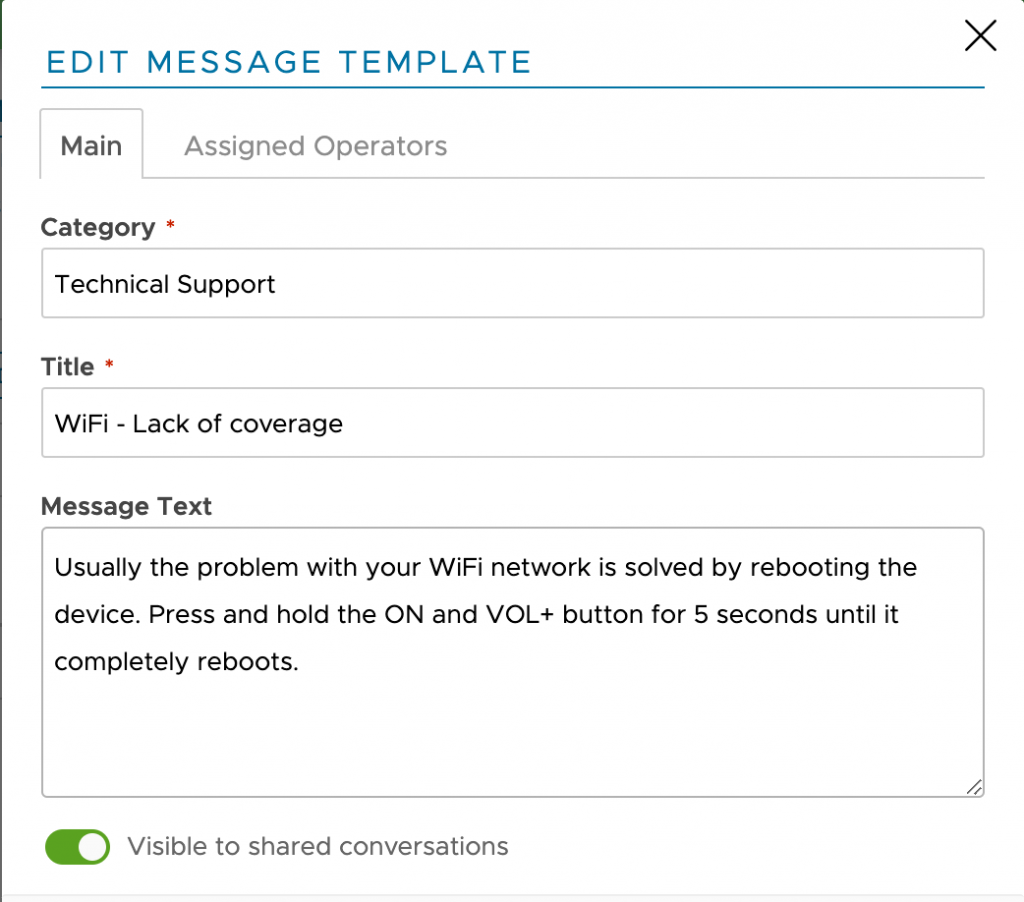
In addition to the Team Members tab, you’ll also find one called Message Templates. Message templates are a library of pre-built responses that you can make available to your collaborators when they’re chatting one-to-one with users. As soon as they have taken over the conversation, they will be able to access these templates and send them with a simple click.
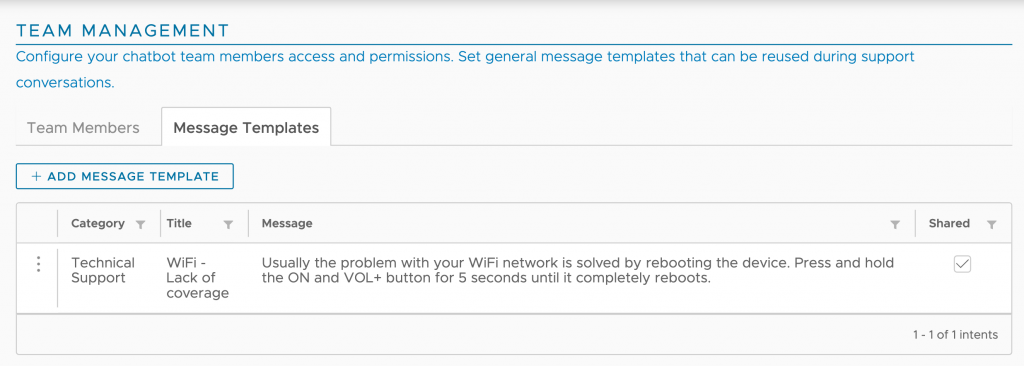
Click Add Message Template to create a new one, defining its Category, Title (which the operators will see), and the Message Text that will be sent to the users in conversation. Optionally, you can also decide whether to make a template available to all operators or only to some of them.
To Sum Things Up…
In this lesson, you have seen how Xenioo is a lot more than a simple chatbot builder. Xenioo is a powerful and complete solution that gives you all the tools to fully manage chatbot conversation.