
Let’s look at the anatomy of the bot inside the Xenioo chatbot flow designer, which is composed of several layers. The largest one is the behaviour, which contains several interactions that contain actions.
Great! Now it’s time to see how Xenioo chatbot flow designer works!
When a user chats with the chatbot for the first time, the chatbot will send the same behaviour, which is called Start Behaviour. You can set it simply by clicking on the gear icon (1), then click to turn on the flag next to “Start Behaviour” (2).
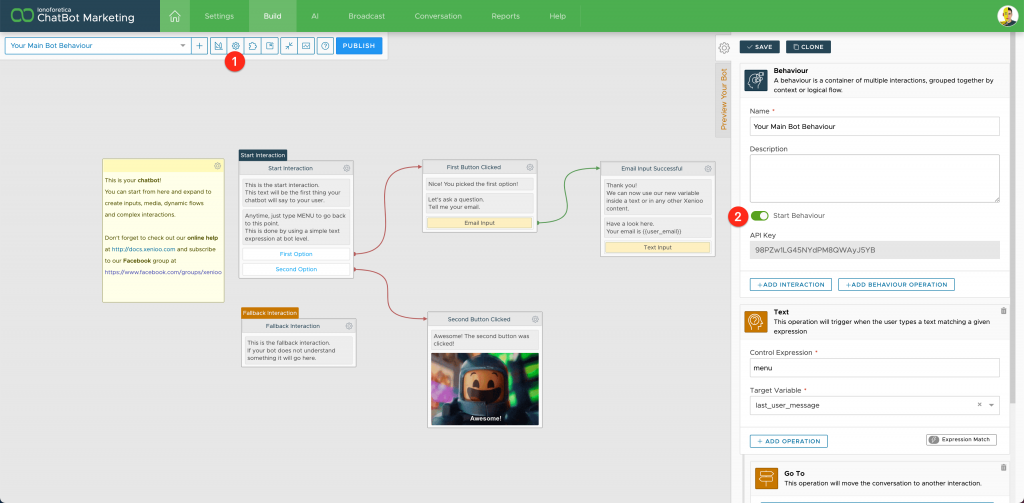
This flag makes the current behaviour the start behaviour, which is the entry point of your chatbot. It is where the conversation will start, so only one behaviour per chatbot can be marked with this flag.
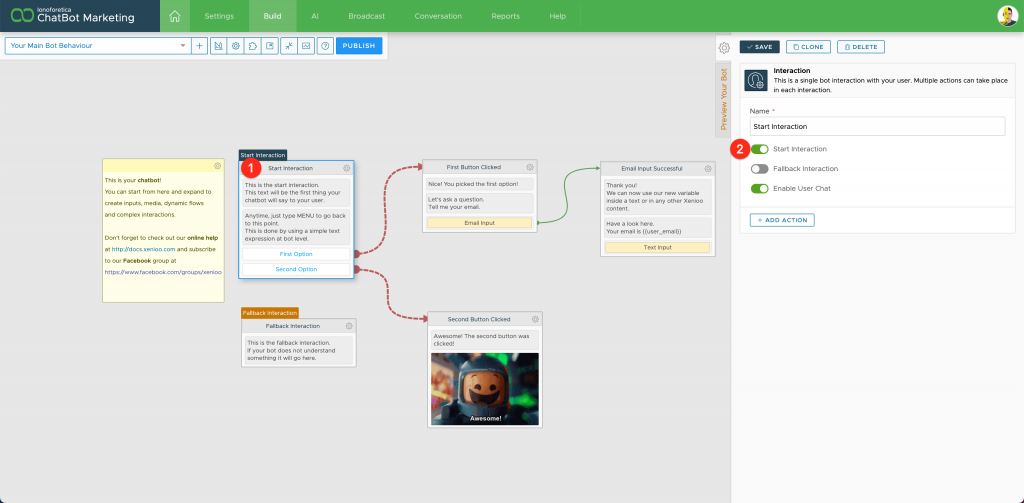
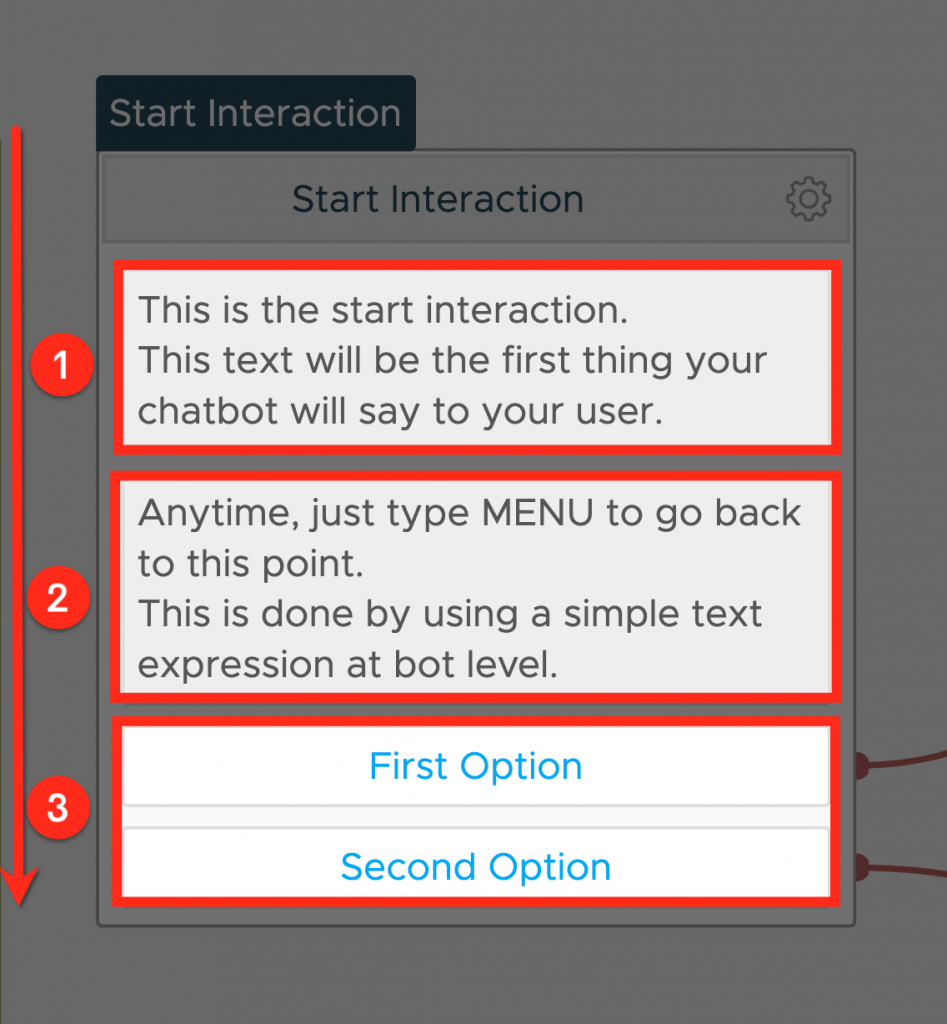
Then we have the Start Interaction. So at the Interaction level, you can decide what will be the first interaction that will be sent to the user once it goes into a specific behaviour.
You can set the starter interaction just by simply clicking on it (1) and then click to switch on the flag next to the “Start Interaction” item (2).
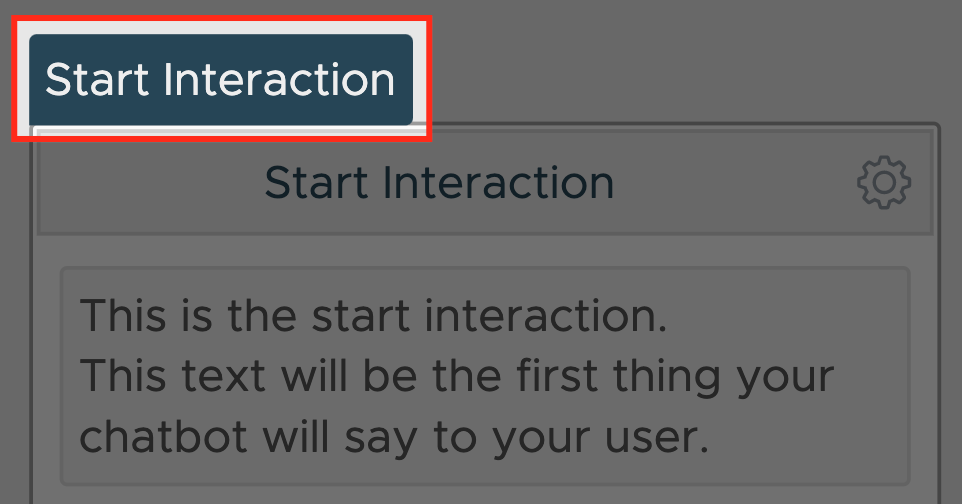
You can recognize the Start Interaction very easily because it will have on top this small blue rectangle that says “Start Interaction”.
There’s another type of interaction that we haven’t seen yet, which is called Fallback Interaction.
As you can see, even this one is marked with a little rectangle, this time with an orange background.
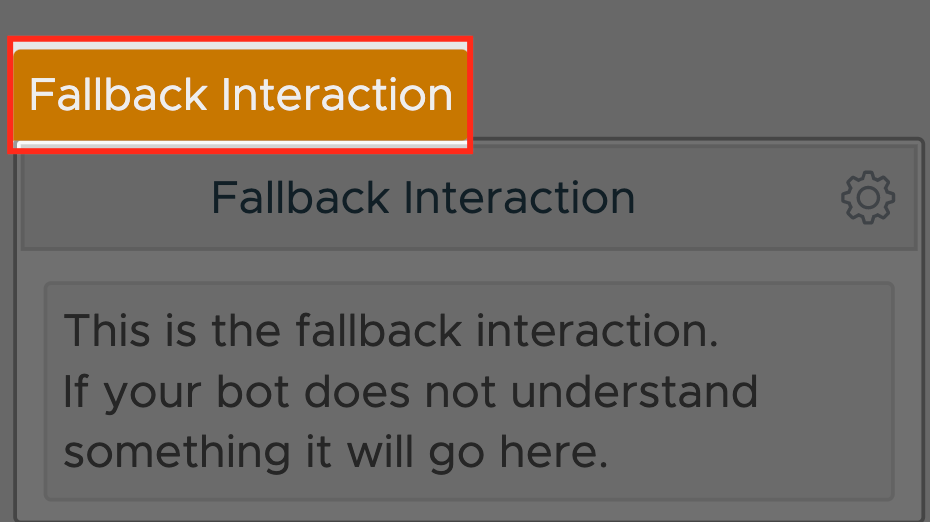
The fallback interaction is mandatory and it is automatically created by Xenioo, one for each behaviour.
The fallback interaction is what will be sent to the user anytime the chatbot doesn’t understand something. It is executed every time your chatbot cannot process an input or an event received from the user. For example, if the user says “hello” and no input or global detection catches the text, Xenioo will redirect the output to this interaction.
A behaviour must have one and only one fallback interaction. If you accidentally remove the fallback interaction, Xenioo will randomly pick another interaction to be the fallback one.
To force your chatbot to restart whenever something unexpected happens you may want to have an interaction to be both start and fallback. Although possible, this is not recommended as it may lead to odd flow redirection patterns during execution. A better approach is to redirect the user to a more dedicated handler.
Now let’s see how Xenioo executes the various actions and operations. I’m going to look at them on multiple levels.
Chatbot Flow: Execution at Interaction level
At the interaction level, as you can see here, we have several actions, one below each other:
The order in which actions are performed is simply from top to bottom. As soon as the user enters into this interaction, Xenioo will render the first text action (1), then the second text action (2), and finally these two buttons (3). You can change this order by dragging and dropping each action inside the same interaction.
Chatbot Flow: Execution at Behaviour level
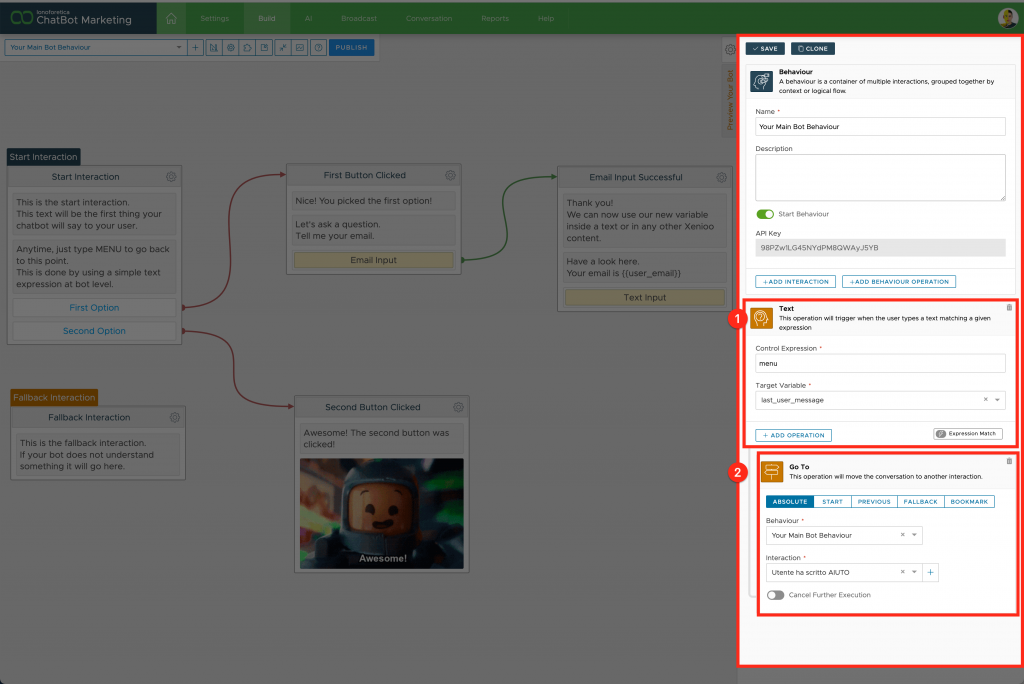
At the behaviour level, likewise, you can set up Operations. It is as if you are saying to Xenioo something like: “Regardless of the interaction the user is in, I want a specific thing to happen”.
Using pseudo-code, we can think about it like: “if this event happens inside this behavior, then do that operation“.
Let’s say you want to send a specific response to the user anytime he types the word “menu” inside the start behavior. Well, you can do that very simply just by click on the gear icon (the same one you used to change behavior’s name) and then click on “Add Behaviour Operation” button. From the list of operations, choose “Text Parse” (1) and set the word “menu” as the Control Expression. Finally, complete the work just by adding the target interaction (2) for that specific word. It can be an interaction contained in the behaviour itself, as well as in another behaviour.
You can see the settings in the image below:
Chatbot Flow: Execution at Bot level
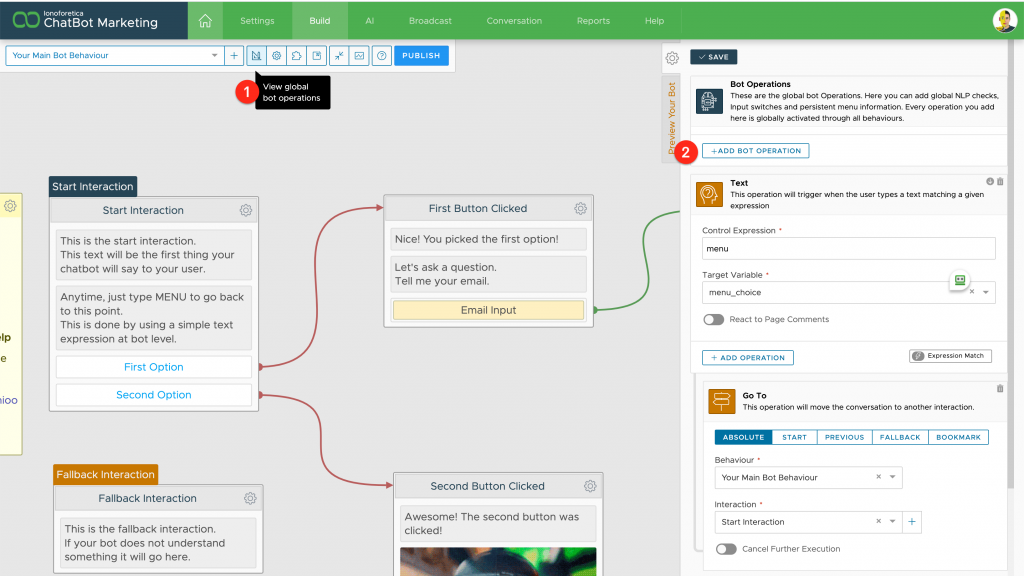
At a bot level, you add all operations that need to be triggered wherever the user is interacting.
Using pseudo-code, we can think about it like: “if this event happens everywhere inside the bot, then do that operation“.
These are the Global Bot Operations.
Here you can add global NLP checks, input switches, or persistent menu information. Every operation you add here is globally activated for all chatbot behaviors.
To create a bot-level operation, click on the global bot operation icon (1) on the designer toolbar, then click on “Add Bot Operation” (2) to choose a trigger event (like our “menu” expression) and target interaction.
How does Xenioo handle these three different levels?
When the user types something as a reply to your chatbot, Xenioo will first execute all of the current interaction actions. If no action produces an output for the user, it will scale to check Behaviour Operations and eventually scale further to Bot Global Operations.
If the user input triggers something at the interaction level, additional Behaviour or Bot Global operations are not evaluated.
Blocking Actions
When the execution is blocked by these actions, no other local or global actions can be evaluated. As we said, the flow will not continue until the user fulfills or skips the request.
Testing your chatbot
There are basically two ways to test your chatbot:
1) through Xenioo preview
2) directly over the channel you will publish the chatbot
My advice is to make the most of the test using the preview tools Xenioo provides. First of all, you can postpone your channel configuration at the end of the project when everything is ready to go online. Then, testing with preview tools will not consume your monthly message quota, and that’s good for your pocket.
So let’s look at the preview tools. They can be accessed by simply clicking “Preview Your Bot” then “Start Preview“.

What happens is that the chatbot will start from the start interaction of the behaviour currently opened in the chatbot flow designer. In the example, you’ll see coming (1) the text contained in the corresponding text actions and the buttons below.
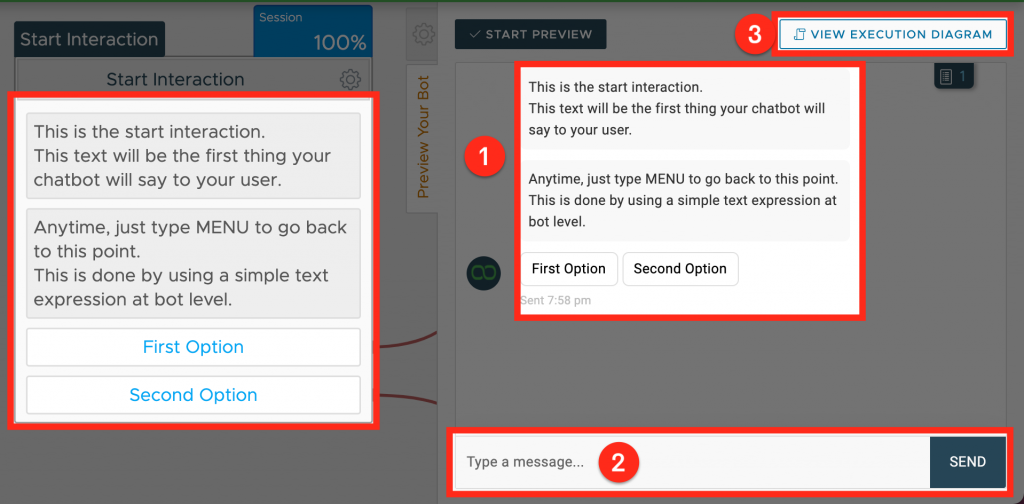
Since this is a test environment, in addition to clicking the chatbot buttons, you’ll also be able to write text (2) and send it via the “Send” button.
Debugging your chatbot
Aside from basic testing, Xenioo offers a powerful tool that allows you to fully explore what happens behind the curtains. This tool is the Execution Diagram.
The Execution Diagram, available with chatbot preview and from the conversations page (yes, you can debug each user conversation!), displays the full detail of each and every action and operation your chatbot has executed.
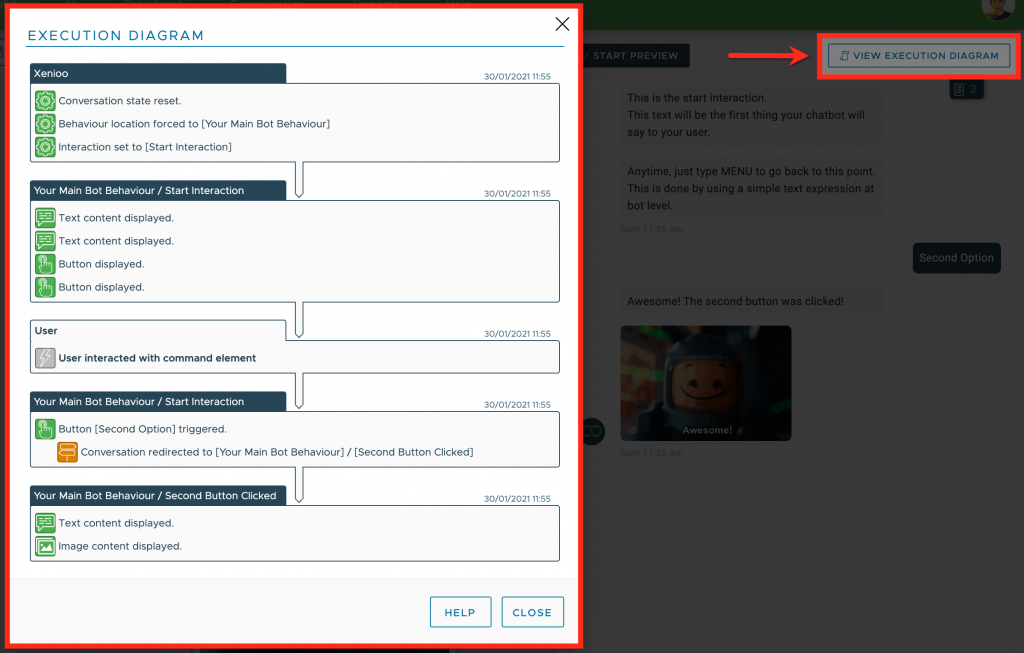
Being able to analyze up to the lower level of execution makes finding issues and fixing errors really much easier.
Every action or operation that is executed by your chatbot as well as NLP engine processing and user inputs are fully enlisted in the Execution Diagram window. Furthermore, past executions are retained, so that you can check and verify what happened during old conversations.
Using this tool it is very straightforward to verify each rule and switch results and find out where and why some actions take specific turns in your chatbot flow. Last but not least, any communication issue happening with users and external services (such as API calls) is finely reported.
Execution Diagram is a valuable and advanced feature that is available only to premium accounts. Upgrading to any paid account will unlock this feature for the entire account
Dissecting the chatbot
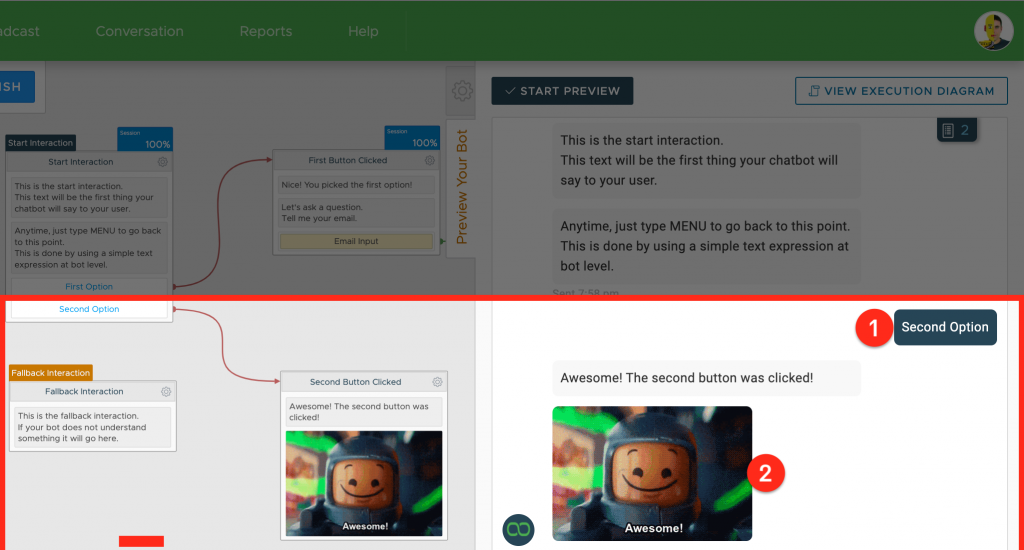
Let’s come back to the chatbot again. If I click the “Second Option” button, as you can see below, this choice is highlighted (1) and I will see the corresponding action configuration in the side panel on the right (2 ).
Let’s find out how this works by exploring the properties of the button action “Second Option”. Just click on it (1) in the chatbot flow designer to have them visualized in the right-side panel.
At the top right corner, beside the icon, you’ll see the action name “Quick Reply” and a brief description. Below there are all the properties that make up this action configuration.
Not all properties are mandatory and some of them could work only for some channels.
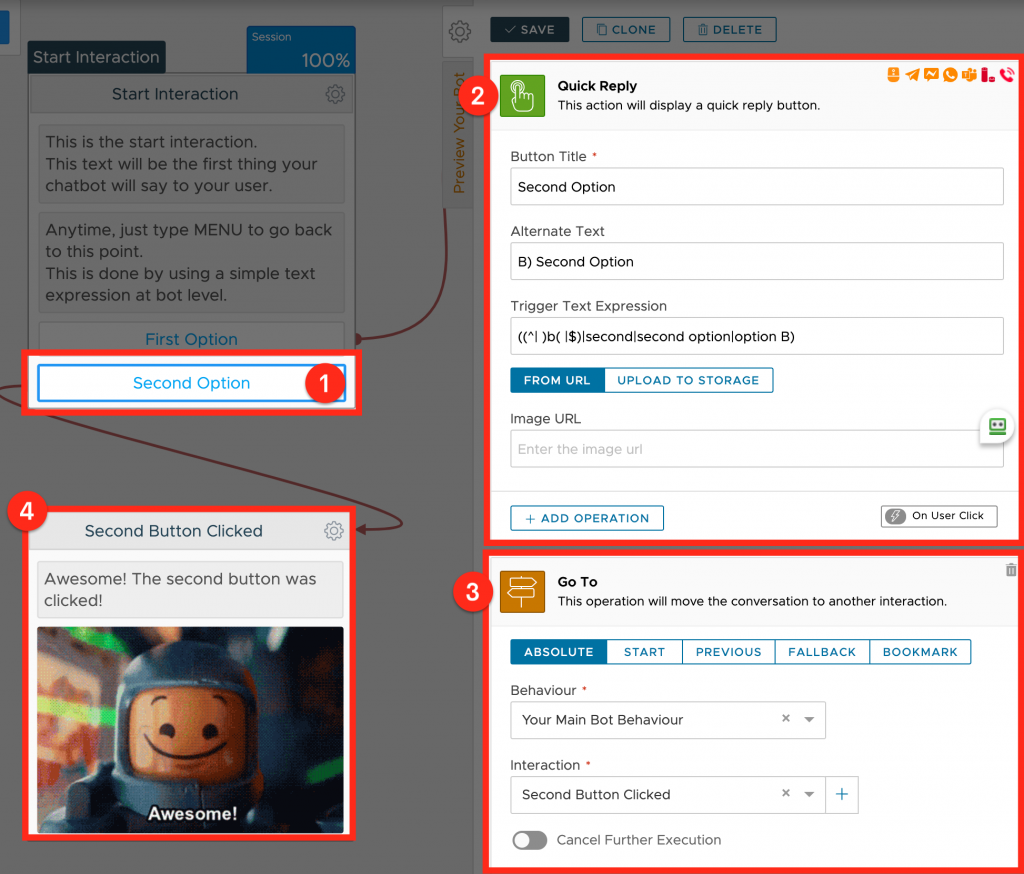
Buttons, as like other actions, will trigger an event that you should handle to react to a user response.
In the case of buttons, the trigger will fire when the user will click on the button (or the typed text will match the Trigger Text expression).
To react to this event, you have to just add one or more operations.
In our example flow, I’ve added a Go To operation (3) just to say Xenioo to redirect the chatbot flow to another interaction once the button is clicked(or triggered by the user input).
The Go To operation allows to set up 5 different ways to reach other blocks of the flow: Absolute, Start, Previous, Fallback and Bookmark.
If you choose Absolute, as in this case, you’ll be able to specifically choose the target behavior and interaction. The Start mode will move the chatbot flow to the start interaction of the current behaviour, while Previous will move the flow to the interaction executed just before.
Fallback mode will move the flow to the fallback interaction, while Bookmark will move the flow to the last set Bookmark.
As you see, Xenioo provides all the tools and features to create very complex and smart flows.
To Sum Things Up…
The Xenioo chatbot flow designer is really packed with keys and features. In this lesson, I’ve introduced the very basic bricks of building a chatbot with Xenioo. Knowing and practicing with them is the first step into mastering chatbot building with Xenioo.