In this video lesson, you’ll learn how you can contact a targeted audience of users just by sending them dedicated chatbot flows.
In all the previous lessons you have seen how to build a chatbot capable to understand and give answers to users. In the most common scenario, users will usually get in touch with the chatbot and actively start the conversation.
However, there are also situations in which you may need or want to contact your users later. For example, a chatbot can contact users to remind their appointments, or just to invite them to your next podcast or webinar.
Xenioo provides advanced functionality to properly manage this scenario: Broadcast and Targeted Audience.
Broadcast rules
Before going down to broadcast details, it is necessary to specify that you can’t just send whatever you want to whoever you want and whenever you want. That’s why I strongly invite you to stay updated on the various rules and policies that are employed by each channel. Violation of these rules could take to unpleasant surprises like an accounts ban on that channel.
Beyond the limitations imposed by the channels, I would also like to share with you some more ethical and social thoughts.
I would like to invite you to respect users, disturbing them as little as possible, and being aware that you are contacting them in the context of an invasive system like instant messaging. Within the chat rooms, users are all used to communicate with friends, family, and colleagues, so they’re much more sensitive to the communications they receive.
As a general rule of thumb, you can create automation to keep the user engaged as long as possible, but at the same time, you have to be careful and try not to exaggerate and annoy.
The number of messages, the time of sending, the relevance of the content are fundamental factors that you should consider when creating broadcast to push messages to your targeted audience. Think of broadcasting as a superpower to use upon on special occasions, rather than as a card to be played regularly at every match, you know what I mean?
Setting up a targeted audience
As we’ve seen, user information and data can be stored through the use of tags and variables that help us keep track of their interactions.
Variables and tags can then be used to create a targeted audience: thanks to the “man” tag, for example, you can easily recognize users by gender.
Finally, you can take advantage of these audiences by setting them as target audiences for sending out broadcasts.
Let’s create a new audience for your first broadcast.
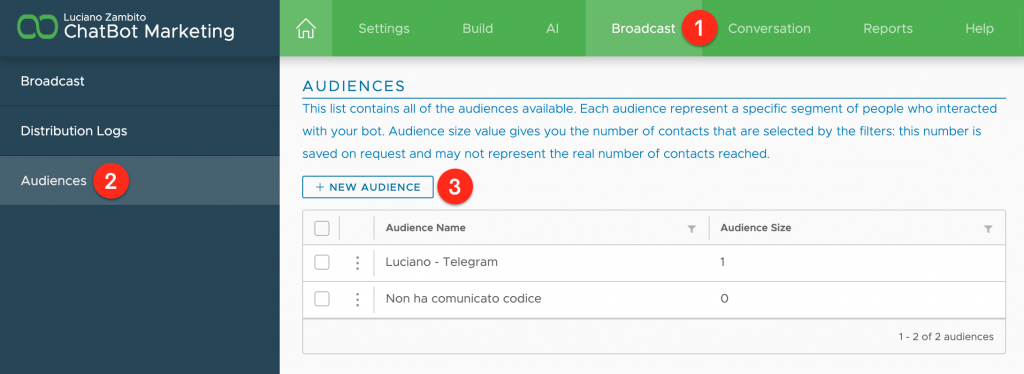
To create an audience, just click the Broadcast item (1) in the top menu, Audiences (2), and then the New Audience button (3).
At this point you have to define the characteristics of the audience itself, giving it a Name (1) and selecting the properties that will define the users that will be part of it.
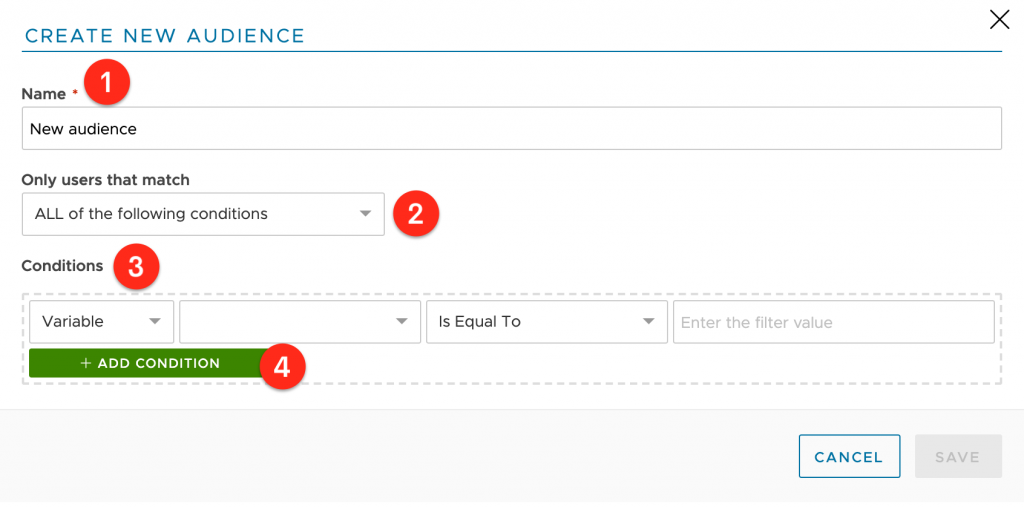
Using the “Only user that match” dropdown (2) you can choose if the current audience conditions are to be evaluated using AND (all conditions must be met) or OR (any condition can be met).
In the Conditions area (3) you have to set the criteria to filter out the users you want to include in this audience. Conditions can be created by mixing logical operations between tags and variables and will be evaluated at runtime.
You can create very advanced filters just by selecting Audience as a source condition. However, nested audiences can even reference other audiences up to 5 levels of depth.
Finally, press the Add Condition (4) button to add it.
Schedule a broadcast
When do we want our broadcast to be sent? I’ve created an example broadcast so you can see how many options you have to launch your broadcasts.
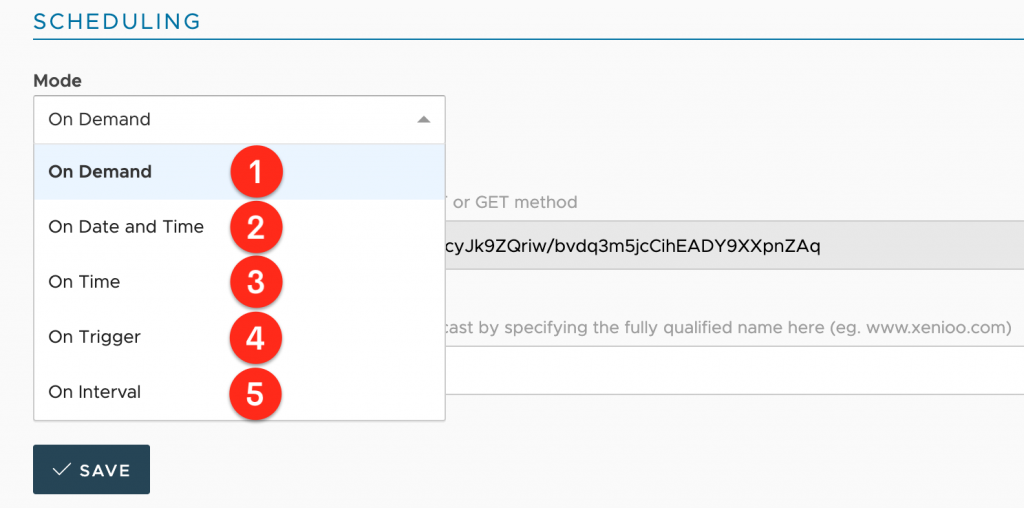
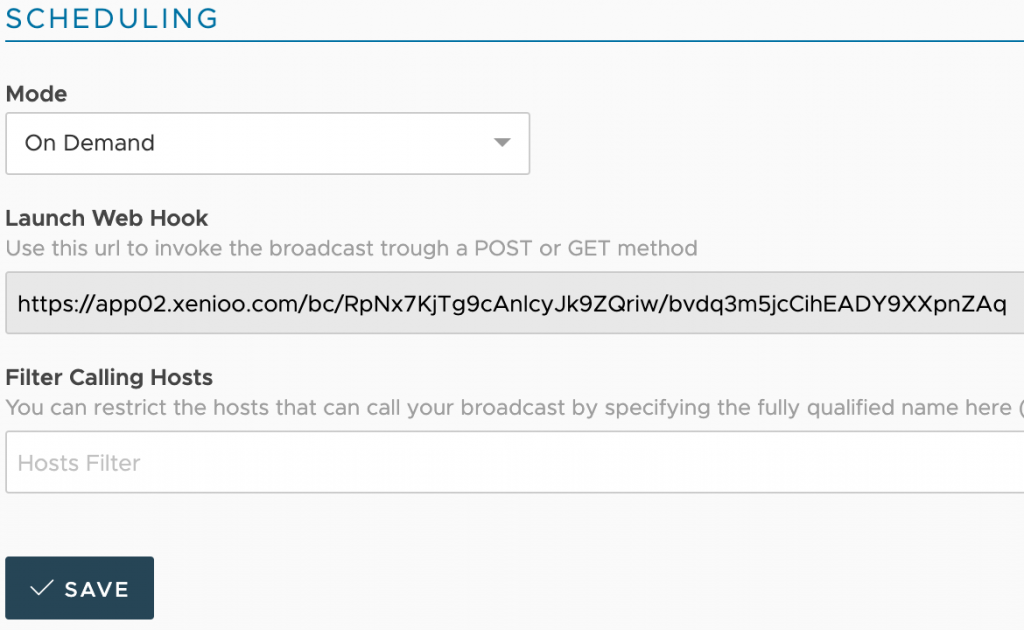
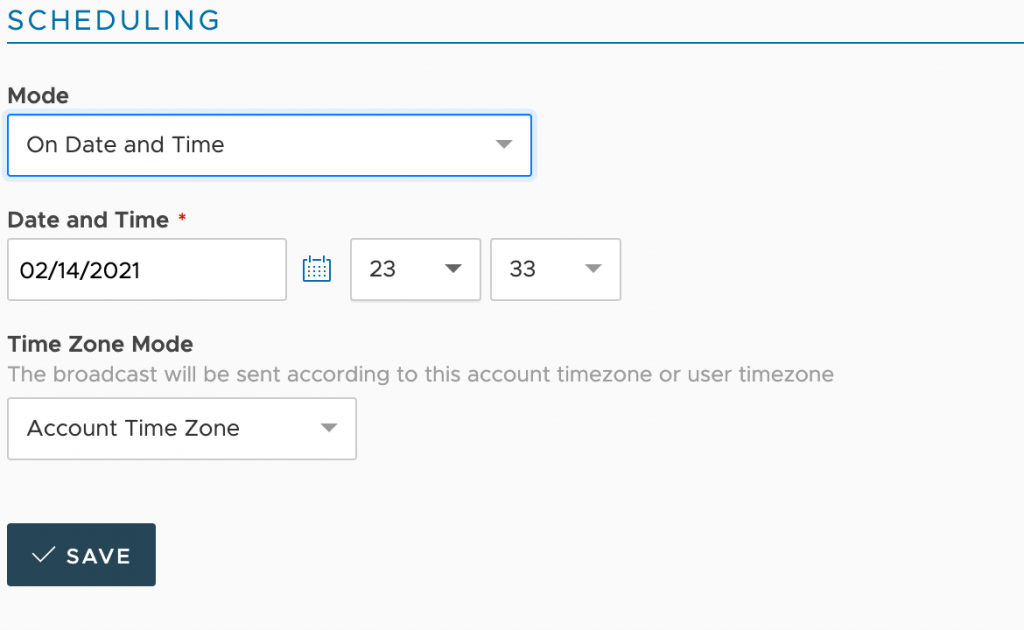
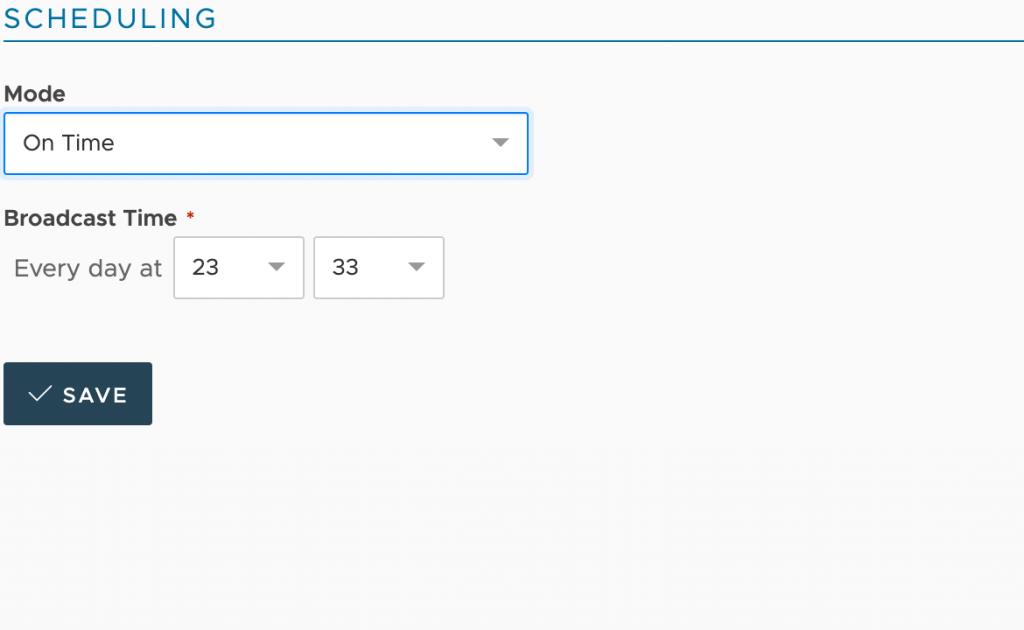
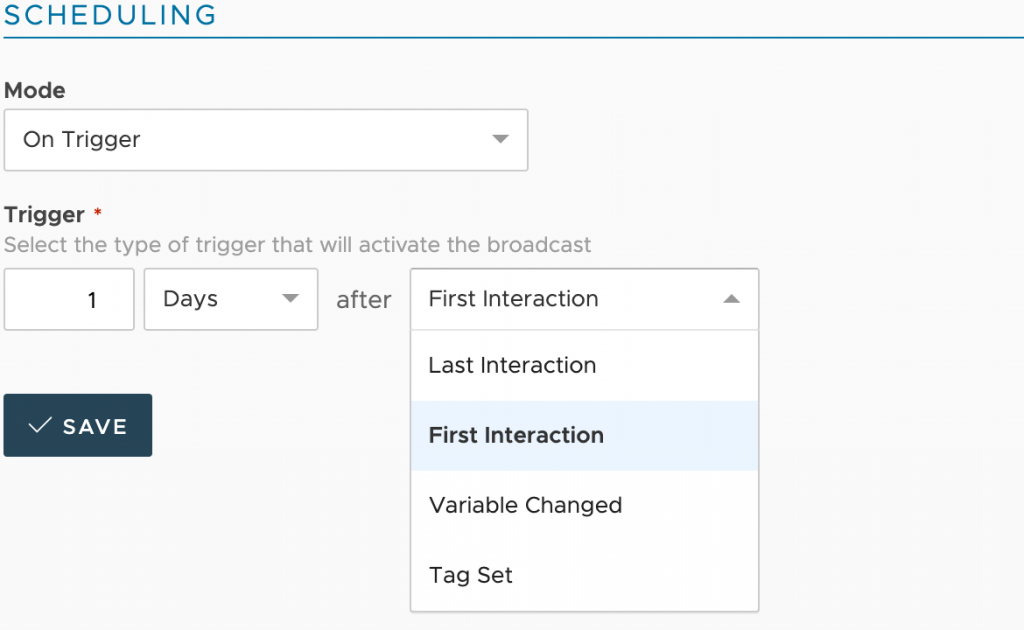
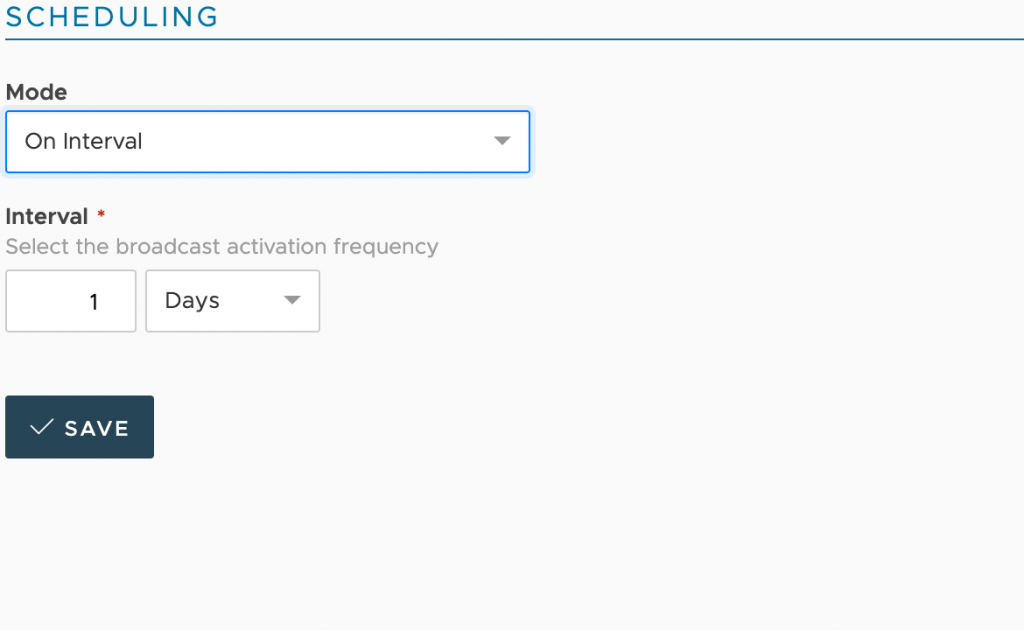
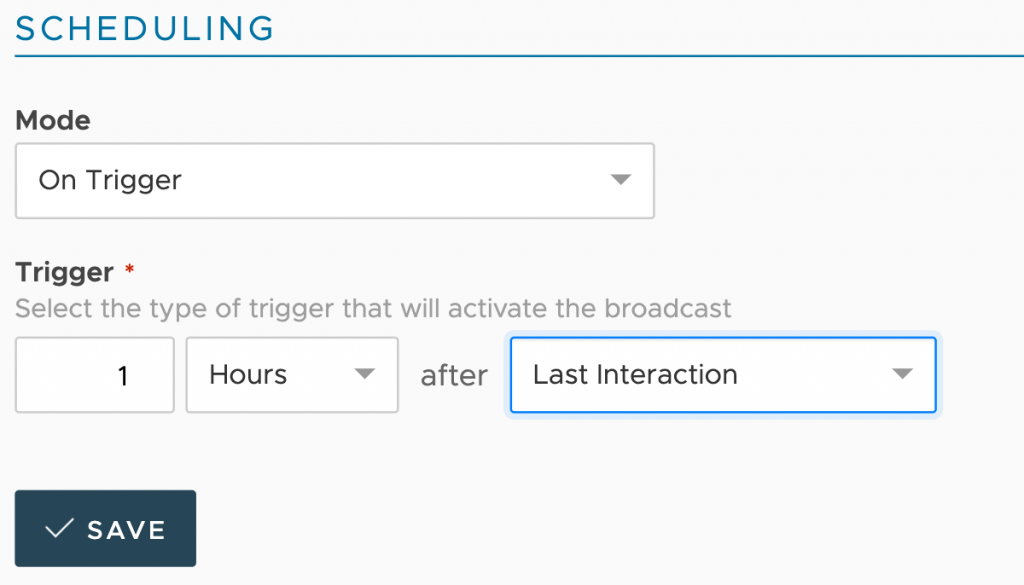
In the Scheduling section, you’ll find the Mode selection, which allows choosing between five different modes: On-Demand (1), On Date And Time (2), On Time (3), On Trigger (4), and On Interval (5).
On-Demand broadcasts are never sent automatically by Xenioo and can only be triggered by calling a very specific WebHook that will be dynamically generated. OnDemand broadcast can be easily invoked to target a single user and is very useful when you have a backend system capable of interacting with Xenioo to launch broadcasts at specific occurrences.
On Date and Time: this type of broadcast is sent at a very specific date and time and then automatically disabled. As your chatbot may have multiple contacts from all over the world you’re free to configure a fixed time, based on your account time zone or, if available, a dynamic time based on your user time zone.
On-Time: this type of broadcast is sent at a very specific time every day. Use this type of broadcast to daily sent off news or updates to your contacts.
On Trigger broadcasts are sent to your users after specific events. This type of broadcast is usually used to ping-back users after they left the conversation or give additional information after a while.
Using variable-based triggers you can also have operational broadcasts that trigger specific contents whenever the user does particular actions using your chatbot.
On Interval broadcasts are recurring broadcasts that are continuously sent at specific intervals. Use this type of broadcast to check for news daily or retrieve user-related information from your backend and dispatch alerts.
Design the flow and configure a targeted audience
You have seen how to create a targeted audience and how to schedule your broadcast. It’s now time to find out how to design the flow you’re likely to send out with the broadcast. Nothing new, simply use the Broadcast Designer, where you can design broadcast flows as you would do with any other Xenioo chatbot flow.
Finally, you can see in the image below the final settings you have to configure to activate your broadcast.
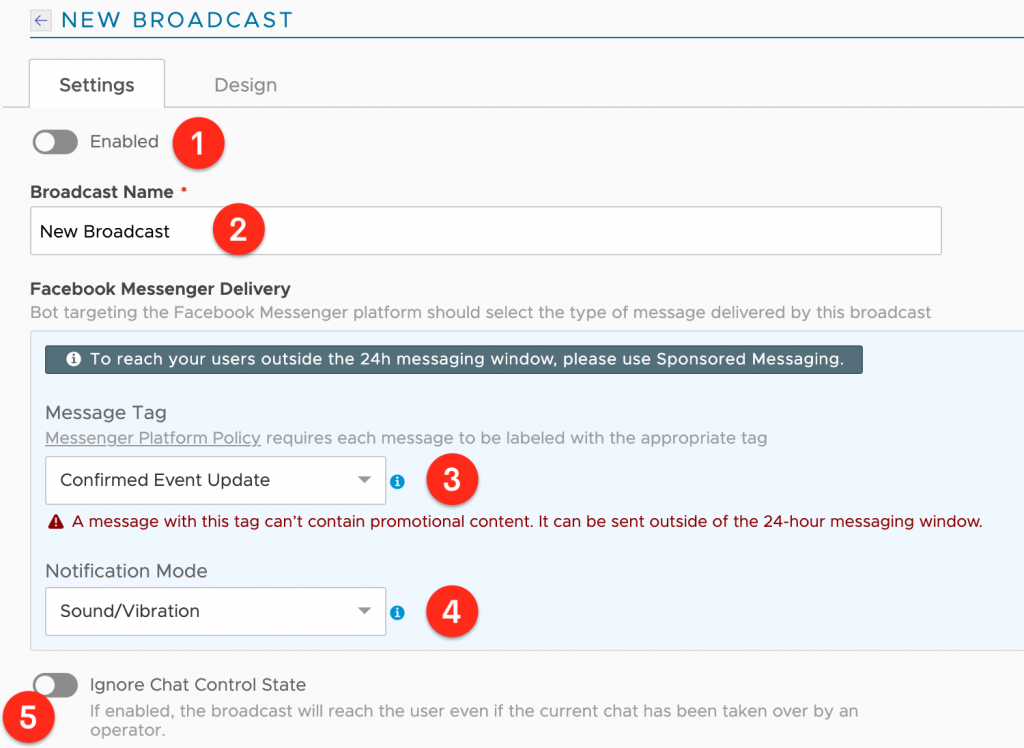
Enabled (1) broadcasts are active and will be sent to the selected audience according to the configured schedule. A disabled broadcast will not be sent and cannot be invoked on-demand.
The Name (2) of the broadcast can be anything you like. Nobody but you will see this text.
This Message Tag (3) field specifies the broadcast message content type and can be used to define the message content for the target channel. Message Type is ignored for every channel but Facebook Messenger.
Notification Mode (4) is the way the user will be notified when receiving your broadcast message. Message Type is ignored for every channel but Facebook Messenger.
Ignore Chat Control State (5) flag, disabled by default, will ignore the chat control state when sending your broadcast. If enabled your broadcast message will reach also conversations that are currently under human control, otherwise only to users that are currently engaged in a standard chatbot conversation.
Targeting is where you will set a targeted audience for the broadcast.
Here you can set “All Users” or select one of the Audiences previously created.
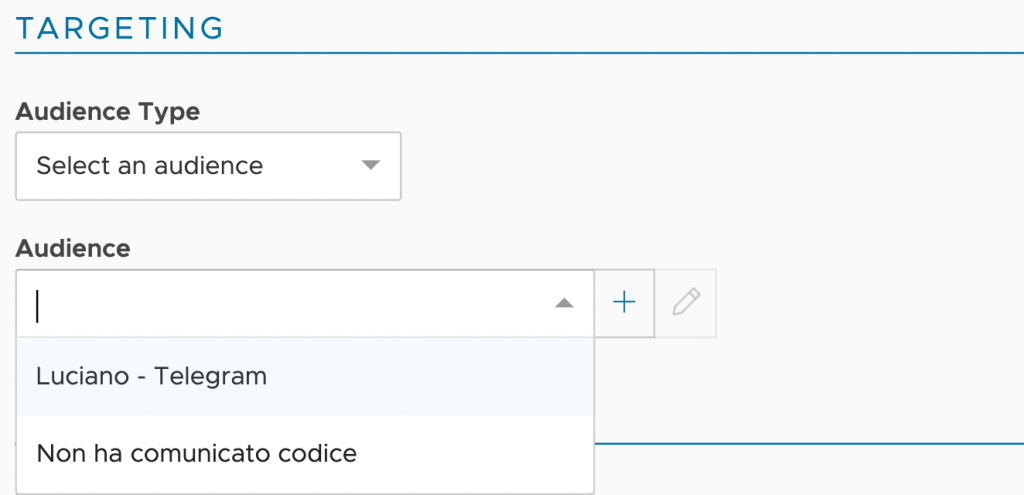
You can use the plus button to create a brand new audience or the edit button to interactively change the selected audience. Any changes made to an audience here are reflected on every broadcast that is using it.
Only users selected by the audience will be targeted for your broadcast.
The last parameters to set are those related to Scheduling.
Once set up and enabled, your broadcasts will appear in the Broadcast List. This list will show some details of each broadcast such as the date and time of the last execution and a bunch of metrics related to its delivery.
You can also manually launch the broadcast(if applicable), reset broadcast counters, clone, and delete the broadcast.

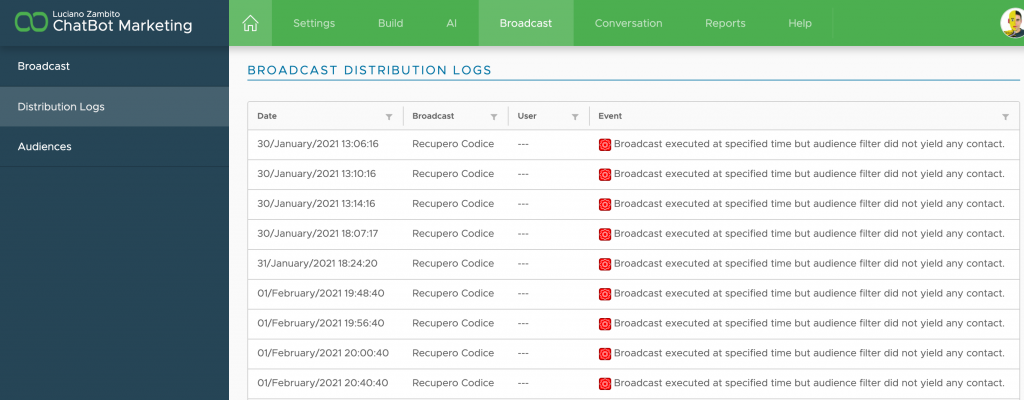
Check broadcast log
Broadcast is executed in the background and sometimes you have to see if they worked fine or check if something wrong happened. Distribution Logs is the area where you can check the logs that are automatically generated by Xenioo for each broadcast operation that is processed by your chatbot.
Using the Distribution Logs view you can quickly verify if a specific user has received a required broadcast or diagnose issues and errors that happen during execution.
A more detailed log is available for every user inside each specific conversation Execution Diagram.
Distribution Logs are cleared using a tail approach that automatically deletes any entry older than 7 days.
To sum things up…
Broadcasts and targeted audience are a very powerful tool in your hand and it’s something you should use wisely to retain your user’s engagement and generate further leads.