

The Xenioo Custom Channel allows any application capable of making simple RESTful https calls to integrate and interact with a chatbot engine
Using the Xenioo Custom Channel you will be controlling the way the conversation will be displayed to the user as well as being able to change runtime variables anytime.
In this post, we will go into every detail of how the Xenioo Custom Channel works and how to use it.
General Approach
You will be communicating with Xenioo to RESTful https API calls. Each API must include some fields that will let Xenioo know of what chatbot we are talking about and, eventually, of what user we are managing the conversation.
Each call made to your Xenioo chatbot must include the following headers:
| Header | Value | Description |
|---|---|---|
| Authorization | Bearer [APIKEY] | This is the API Key you can copy from your Xenioo API publishing dialog. |
| Content-Type | application/json | All data exchanged with Xenioo must be of this type |
| user-id | [any string] | This is the current chat user id. If no value is specified, Xenioo will create a new user |
Retrieving your chatbot configuration
You chatbot basic configuration, as specified in your Xenioo designer, can be retrieved using the config endpoint as follows:
curl -X GET \
  https://app.xenioo.com/apihook/config \
  -H 'Authorization: Bearer [APIKEY]' \
Since this is a global configuration, you don’t need to specify the current user-id here. Xenioo reply to this request will be similar to this one:
{
    "Name": "My Awesome Bot",
    "EnableTypeSpeed": true,
    "WordsPerMinute": 800,
    "Avatar": "https://app.xenioo.com/api/assets/8e23ff8b3ee7_60f1113c-8e6e-46ce-bf19-a53da5ff4ed0.jpg",
    "Version": 96,
    "DefaultBehaviour": {
        "Name": "My Top Behaviour",
        "APIKey": "[Behaviour API Token]"
    }
}
| field | type | description |
|---|---|---|
| Name | string | The name of your chatbot |
| EnableTypeSpeed | boolean | Indicates if the chatbot is configured to use typespeed simulation. If so, TypeDelay will be valued for actions where necessary |
| WordsPerMinute | number | The number of words per minute your chatbot can write. This affects the TypeDelay parameter value |
| Avatar | string | The url of the avatar specified under your chatbot general settings |
| Version | number | The version number of your chatbot. This number is automatically increased by Xenioo |
| DefaultBehaviour | object | The name and the API Key associated to your default chatbot Behaviour. You can use the API Key to forcefully redirect your chatbot conversation to another Behaviour |
Initiating Chat
The fist connection to your chatbot chat must be done by calling the chat endpoint using the previously specified headers.
This endpoint, called without sending any data will reset the conversation to the starting point. If the user-id is specified in this call, the conversation will be reset but historic conversation will be kept in the Xenioo conversation history interface.
curl -X POST \
  https://app.xenioo.com/apihook/chat \
  -H 'Authorization: Bearer [APIKEY]' \
  -H 'Content-Type: application/json' \
  -H 'user-id: some-user-id'
If you wish instead to continue a previous conversation with a know user you can add the READY command to the request as below. In this case, Xenioo will not reset the conversation and return the full history as first reply.
curl -X POST \
  https://app.xenioo.com/apihook/chat \
  -H 'Authorization: Bearer [APIKEY]' \
  -H 'Content-Type: application/json' \
  -H 'user-id: some-user-id' \
  -d '{
	"Command":"READY"
}'
A successful reply from Xenioo may look like this:
{
"Parts": [
{
"Type": 0,
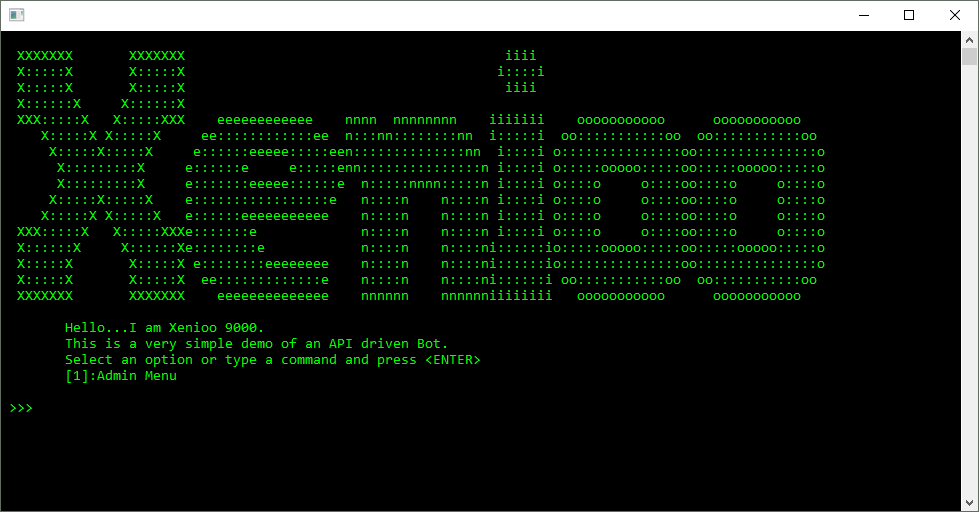
"Text": "Hello...I am Xenioo 9000.",
"TypeDelay": 300,
"BehaviourName": "New Bot Behaviour",
"InteractionName": "Start Interaction",
"Parts": []
}
],
"UserId": "some-user-id",
"Creation": "2018-10-05T14:43:43.7057755+01:00",
"EnableUserChat": true,
"ControlType": 0
}
The root reply fields have the following format:
| field | type | description |
|---|---|---|
| Parts | array | This is an array of 1 or more chat parts. Each chat part is usually a Xenioo Action Result |
| UserId | string | The user-id of the current user chatting with you. If you did not create it yourself store it and re-use it for subsequent calls |
| Creation | datetime | The Xenioo reply creation date and time |
| EnableUserChat | boolean | This may change depending on your chatbot design. You should comply to the chabot designer choices by either allowing or forbidding an open reply from the user |
| ControlType | number | The control state of the chatbot. 0-Xenioo, 1-Operator Requested, 2-Operator Taken Over |
Chatting
Once the chat control is given to the user, he can interact with your chatbot in two ways: executing a command or saying something (sending a text).
After acquiring the user input, you can relay it to Xenioo using the same connection endpoint, with the following syntax:
curl -X POST \
  https://app.xenioo.com/apihook/chat \
  -H 'Authorization: Bearer [APIKEY]' \
  -H 'Content-Type: application/json' \
  -H 'user-id: some-user-id' \
  -d '{
  	"Text":"Hello there!"
  }'
Depending on how you’ve implemented your chatbot reactions and interactions the answer may change but will always be compliant to the previous reply fields. If your user has instead any means to click on chat buttons you’ve implemented or on Carousel contents you must forward to Xenioo the command payload as follows:
curl -X POST \
  https://app.xenioo.com/apihook/chat \
  -H 'Authorization: Bearer [APIKEY]' \
  -H 'Content-Type: application/json' \
  -H 'user-id: some-user-id' \
  -d '{
	"Command":"3131292d-945e-4b6b-9f78-7f5eacebf5b6"
}'
Command payloads are always GUID values generated by Xenioo. If the command payload is recognized, the command will trigger and the conversation continues, according to the flow you’ve designed.
Variables and Tags
You can update (or create new) variables value or conversation tags using the status endpoint like in the example below:
curl -X POST \
  https://app.xenioo.com/apihook/status \
  -H 'Authorization: Bearer [APIKEY]' \
  -H 'Content-Type: application/json' \
  -H 'user-id: some-user-id' \
  -d '{
	"UpdateType":"[type]",
	"Name":"variable_name",
	"Value":"variable_value"
}'
The UpdateType parameter specifies the type of operation to be done on the chatbot conversation. You have four different update types as specified in the table below:
| type | description |
|---|---|
| set-var | Updates or set the variable with name specified in Name and value specified in Value |
| de-var | Drops the variable with name as specified in Name field |
| set-tag | Adds a new tag named Name in the conversation |
| del-tag | Removes the specified tag |
Variable changes are immediate and can even alter variables that have been created or changed during last interaction execution.
Time To Try it!
As you you’ve seen, Xenioo Custom Channel really has all the tools that allow you to build your chatbot the way you want, leaving the hard work to us!
Ready to give it a try? Head right away to our GitHub repository to get the full source code and examples in both .NET and Python. If you are using .NET, there’s also a very handy Nuget Package ready to be downloaded.