
WhatsApp is one of the most used messaging channels in the world and WhatsApp chatbot is the new revolution around the corner.
In fact, WhatsApp has over 2 billion users around the globe.
But did you also know that you can automatically chat with your customers via WhatsApp? That you can have one-on-one conversations with your customers, at scale?
If you didn’t, it is possible.
And in this article, I will explain what WhatsApp chatbots are, why you need to use them, and how you can create one yourself using Xenioo.

What is a WhatsApp Chatbot?
A WhatsApp chatbot is an automated conversation partner on WhatsApp.
Usually, when you chat on WhatsApp, you are chatting with another person. But with chatbots, this is different. Because you are not talking with another person, but with a computer.
The benefits of a WhatsApp Chatbot
Because you can automatically talk with your (potential) customers, you can have one-on-one conversations, at scale.
This means that your chatbot can have personalized conversations with each one of your users and it could be talking to thousands of people at the same time.
So, what are the benefits of such a WhatsApp chatbot?
First of all, a WhatsApp chatbot can have a significant impact on your customer service. For example, you can drastically reduce your customer service costs. Your customer service probably handles a lot of standard questions every day and it is proven that 80% of these questions can be easily answered by a chatbot. Besides, your chatbot can reply in seconds to customers’ questions instead of hours (or even days). Moreover, your chatbot is always available. Instead of using live chat where a customer needs to wait on an available live chat agent, you can use a chatbot that is always ready to respond to questions.
Secondly, you can boost your sales by using a WhatsApp chatbot. With a chatbot, you can directly sell your products to your customers and let them pay via the chatbot. Think of it as like an eCommerce store inside your chatbot. Another way would be to promote your products and services via the chatbot.
The third benefit of chatbots is that they can automatically qualify your leads, which is especially useful for B2B companies. In most B2B companies, there are some qualification rules to determine whether a lead could become an actual client. They ask questions like:
- What industry are you in?
- How many employees does your company have?
- What is your role inside the company?
But often these questions are asked by humans. But why would you not automate this? The chatbot can ask these qualification questions and if the lead is qualified, he/she will be forwarded to a sales agent (that can close the sale).
So in short, a chatbot:
- Can have personalized conversations, at scale
- Drastically reduce your customer service costs
- Can reply to your customers in seconds
- Is always available for your customers
- Increase your sales
- Automatically qualify your leads
Why WhatsApp is the best platform to engage users
So now we know why we need to use a chatbot, why should we put it on WhatsApp?
As said before, WhatsApp has over 2 billion users worldwide.
From these 2 billion users, 1.6 billion access the app on a monthly basis. This results in 65 billion WhatsApp messages that are sent on a daily basis.
With so many people on one channel, it is safe to assume that your customers are also using it.
And you need to be on the channels where your customers are.
Different types of chatbots
In general, there are two types of chatbots:
- Standard-guided chatbots
- Pure conversational chatbots
Or you can have a mix of both (probably the best way).
Standard-guided chatbots
Standard-guided chatbots are chatbots that are mainly based on rules. These chatbots often use buttons to guide the user to a specific part of a conversation. Also, the user often cannot talk freely to the chatbot, because the chatbot is not smart enough to handle it.
Benefits of standard-guided chatbots
- Good for qualification of leads
- Control of the conversation flow
Drawbacks of standard-guided chatbots
- Falls short when users want to ask questions freely
- Can lead to frustration
Pure conversational chatbots
Pure conversational chatbots are more advanced types of chatbots. They can understand the intent of the user and the context of the conversation, by using Artificial Intelligence techniques. With these types of chatbots, the user can ask anything they want, and the chatbot probably often provides a good answer or redirects the customer to a live chat agent.
Benefits of pure conversational chatbots
- More natural conversations
- Chatbot can understand the intent of the user
- Chatbot can understand the context of the conversation
- Users can ask more advanced questions
Drawbacks of pure conversational chatbots
- Higher costs, because of Artificial Intelligence techniques
- Development of the chatbot takes longer
Create your First WhatsApp Chatbot
So, now we know why we need to use a WhatsApp chatbot, let’s create one ourselves using Xenioo.
And as an example, we will create a chatbot for a Pizza restaurant.
First, go to the Xenioo console and log in with your account credentials.
(If you don’t have an account yet, you can create one here).
When you are logged in, you can click on Create New Bot:

This will automatically create a standard chatbot flow for you, which should look like this:

So, let’s start by editing the name of this flow to “Welcome Message” by clicking on the gear icon on the top-right corner. Then, you can just type in “Welcome Message” and hit Save:
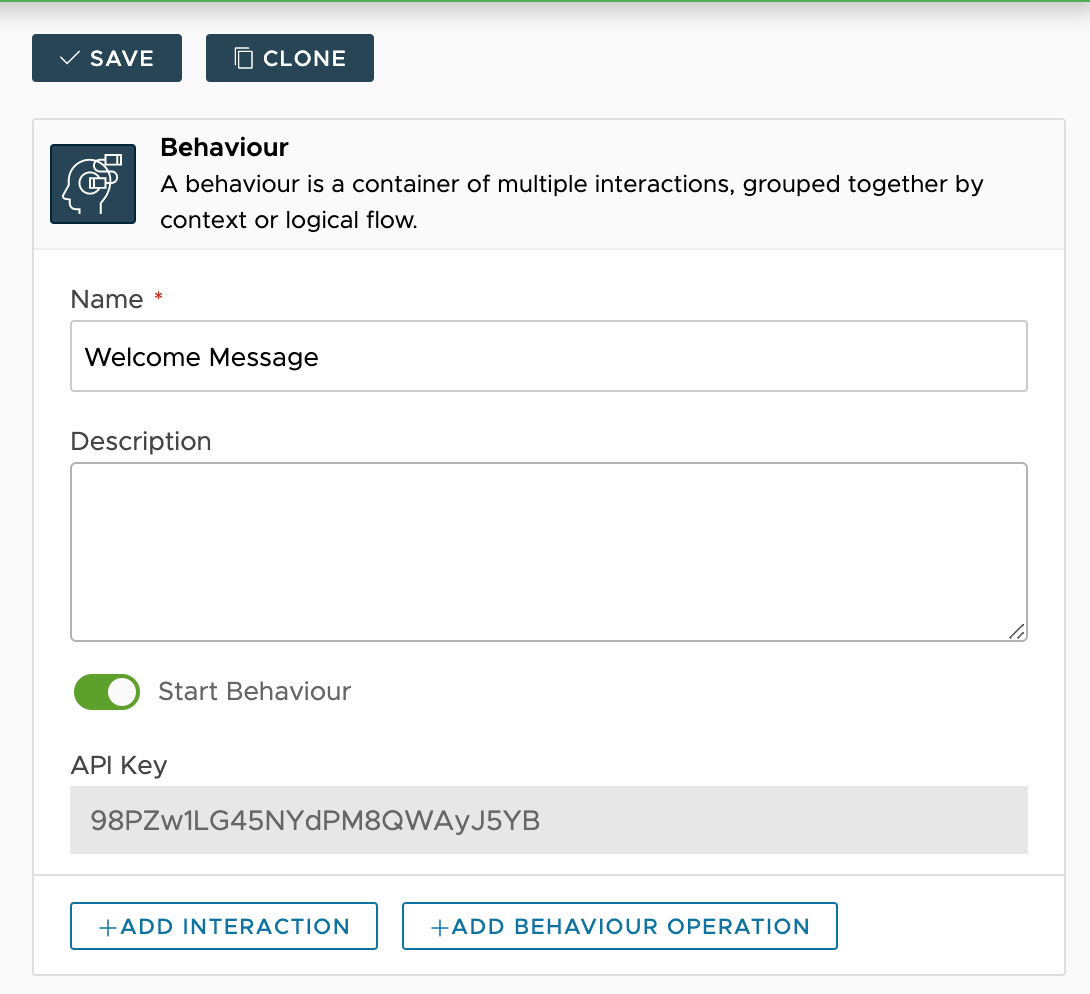
Before we are proceeding, I recommend that you already create three chatbot behaviors in Xenioo. You can do this by clicking on the Add new behavior icon in the top-center:

What are these chatbot behaviors? These are for:
- Ordering a pizza
- Making a reservation
- Showing the menu
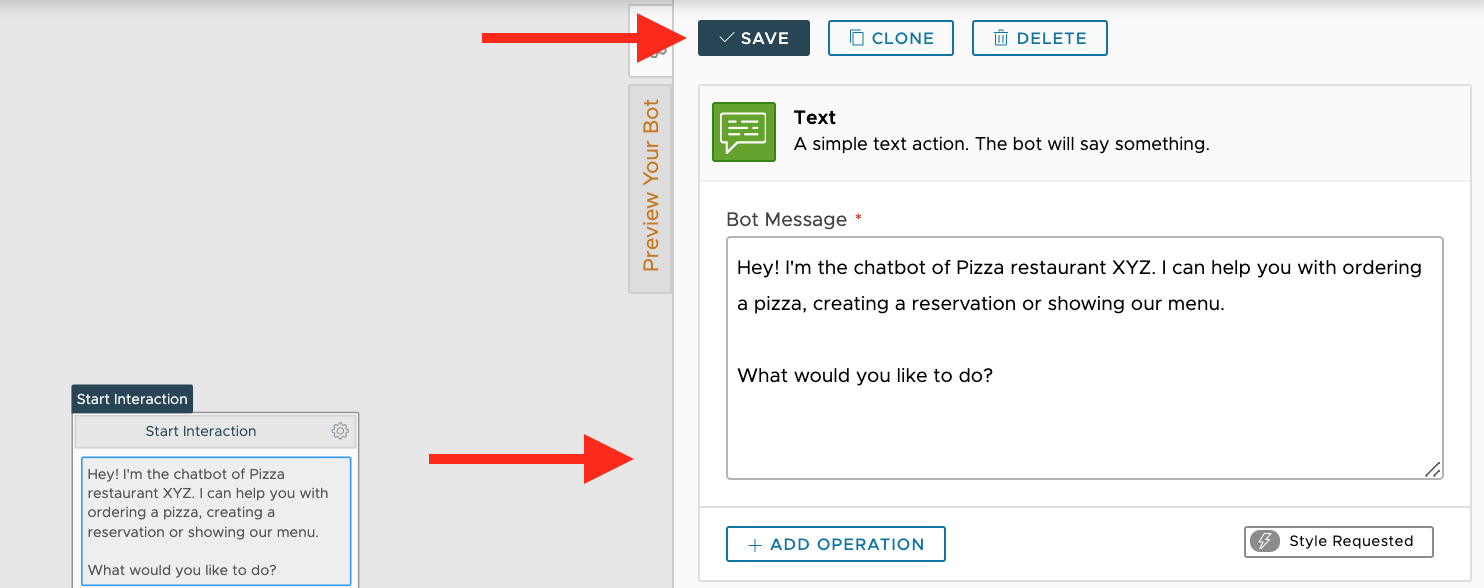
Now, head back to the Welcome Message behavior and go to the Start Interaction. You can just change the text by clicking on the element and type in a new message in the right panel and clicking on Save:
Then, we need to make three buttons for the Order pizza flow, Make a reservation flow and Showing the menu flow.
We can do this by clicking on the gear icon of the start interaction and then clicking the Add new action:

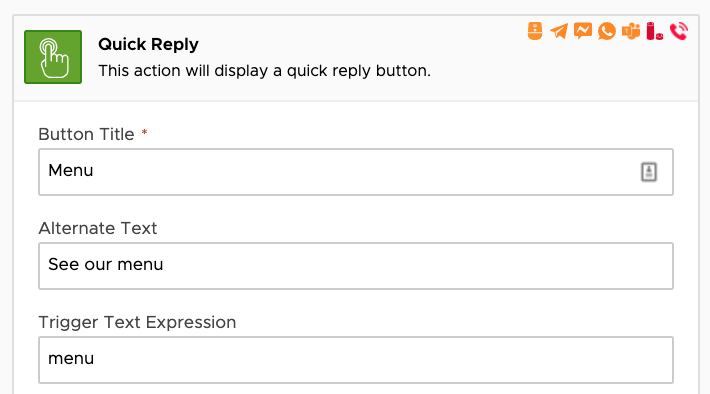
Here, you can select the Quick Reply Button:

Next, you can set the text of the button with Button Title and set the “Go To Operation”, which will move the conversation to another interaction:

NOTE: WhatsApp doesn’t support showing buttons. Instead, the buttons are shown as plain text as “If you want to go to the menu, type in 1”.
Now you can do the same for the Making Reservation button and Menu button, so it looks like this:

Before we move on, I want to tell you about two awesome features of Xenioo regarding buttons.
The first one is called the “Alternate text”, which displays an alternate text for text-based channels (such as WhatsApp).
So one a more visual channel (like Facebook Messenger), Xenioo will show the Button Title, but if you have set the “Alternate Text”, this will be shown on WhatsApp:

With this example, the button on Facebook Messenger will show ‘Menu’, while on WhatsApp it will show “See our menu”.
The second feature is called “Trigger Text expression”. Let’s say the user chooses not to use the buttons, but instead just types in “menu”. Then, your chatbot will break (because he is not familiar with that). This feature fixes that, so if the user types in “menu”, it will go to the appropriate flow:
Now, let’s first create the ‘easy’ flows: Make a reservation and showing the menu.
The Make a reservation flow is also pretty straightforward for this tutorial, just tell the user that they can make a reservation via a phone call or your website:

With the menu, we need to change the text and add the File Download action:

If you select this, you can set the URL of the your Restaurant menu:

So the Menu flow looks like this:

Next, we are going to do the more advanced part: Ordering a pizza.
Before we are going to deep dive into this flow, start by creating five interactions and name them like this:
- Check on toppings
- Check on size
- Pizza with topping and size
- Pizza confirmation
- Start over
You can do this by clicking on the Add new interaction icon in the top-center:

And naming them accordingly by just clicking on them and changing the Name:

Now, head back to the Start interaction of the Order pizza flow and start by asking a question:

NOTE: We will handle the response to this question later on in the NLP part, so don’t worry about that now 😉
Next, we are going to set the actions for the “Check on toppings” interaction. This interaction will check whether the user has typed in a topping. If the user has filled in one, we will move on to the next interaction and otherwise, we will go back.
We can do this by selecting a Variable Switch as action (Under the ‘Flow’ section):

And check whether the topping has any value:

By the way, ‘topping’ is a variable name I created. You can just type in a variable name and click on “Add new variable” and Xenioo will automatically create it.
Accordingly, we need to determine what happens if the topping has a value. And we can do this by clicking on Add operation and select the Go To Bot interaction:

The Go To Bot interaction will redirect the conversation flow to the next interaction (Check on size):

But what happens when the user didn’t type in a valid topping? Then, they will go back to the previous question (using another Go To Block action):

With the next interaction (Check on size), we are doing a similar thing, but then we check on the size of the pizza, instead of the topping.
So, we will add a Variable Conditional Switch to this block that checks on the size:

If the size already has a value, we continue with the “Pizza with topping and size” interaction, and otherwise we are going to ask a question.
NOTE: Now, you might be thinking “Huh, but we didn’t ask for the size, yet?” That is completely true! We will cover this in the next section where we will handle the NLP part of our chatbot 😉
Now, let’s create the question that asks for the size of the pizza. You can just add the Text action and type in “What size pizza do you want?”:

Then, we need to add three buttons for “Small”, “Medium” and “Large”, which all go to the next interaction. For each of the buttons, click on Add Operation and select Set User Variable (under Profile):

We can use the Set User Variable to change the variable size to small:
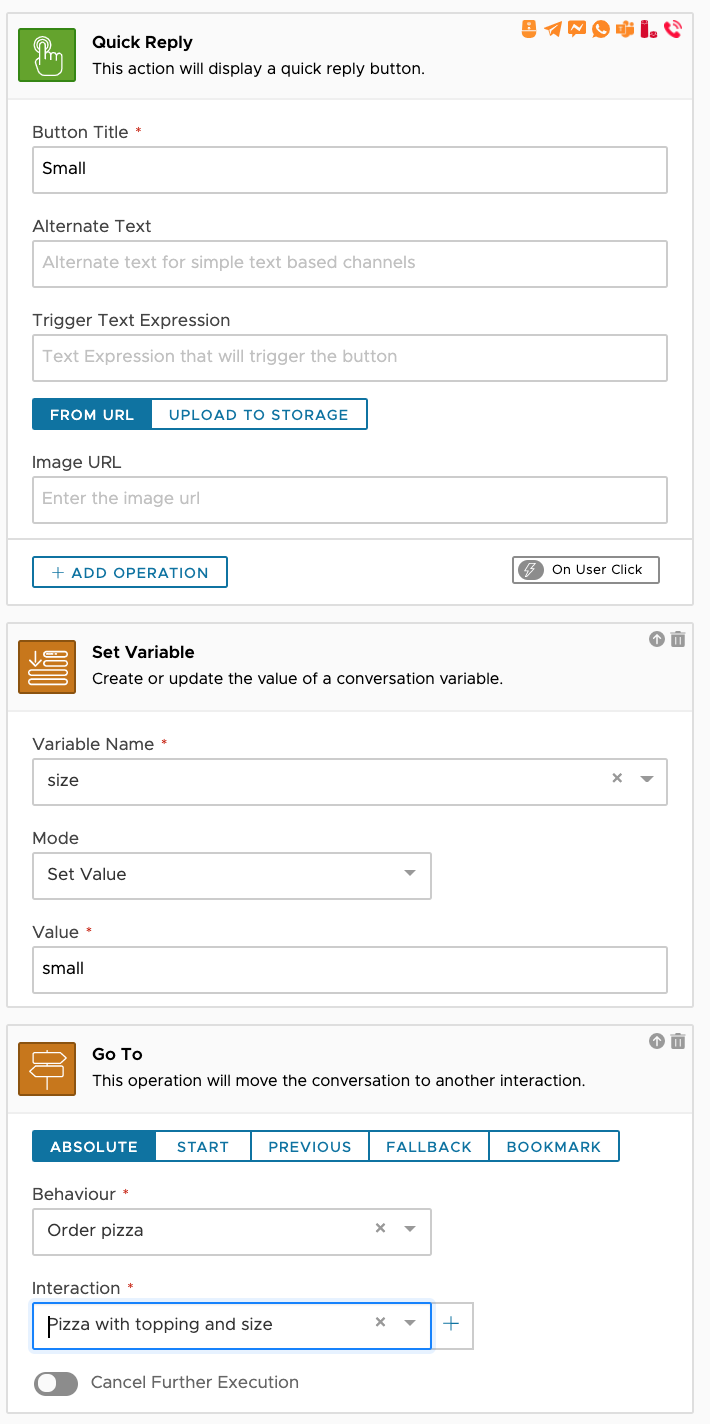
NOTE: Don’t forget to also add the Go To action, which makes sure the flow goes to the next interaction (“Pizza with topping and size”)
Now, you can do the same for the Medium and Large buttons, so it looks like this:

Lastly, we need to ask whether the user is satisfied with the chosen toppings and size of the pizza. You can do this by adding a Text action and two buttons for Yes and No.
Afterwards, you can connect the buttons to the right interactions. If the user is not satisfied with the pizza, the chatbot can start over again by connecting the “Start over” interaction with the first interaction.
Because we already covered all the things you need to know to do this, I assume you can handle this yourself 🙂
Here is the final flow of the Order pizza behavior inside Xenioo:

Use NLP to make your chatbot smarter
What we’ve created now, is what you would call a standard-guided chatbot.
But, as you might remember, we still need to handle the input for the toppings and size of the pizza, so that people can just type in what pizza they want.
We can do this by using the NLP feature of Xenioo.
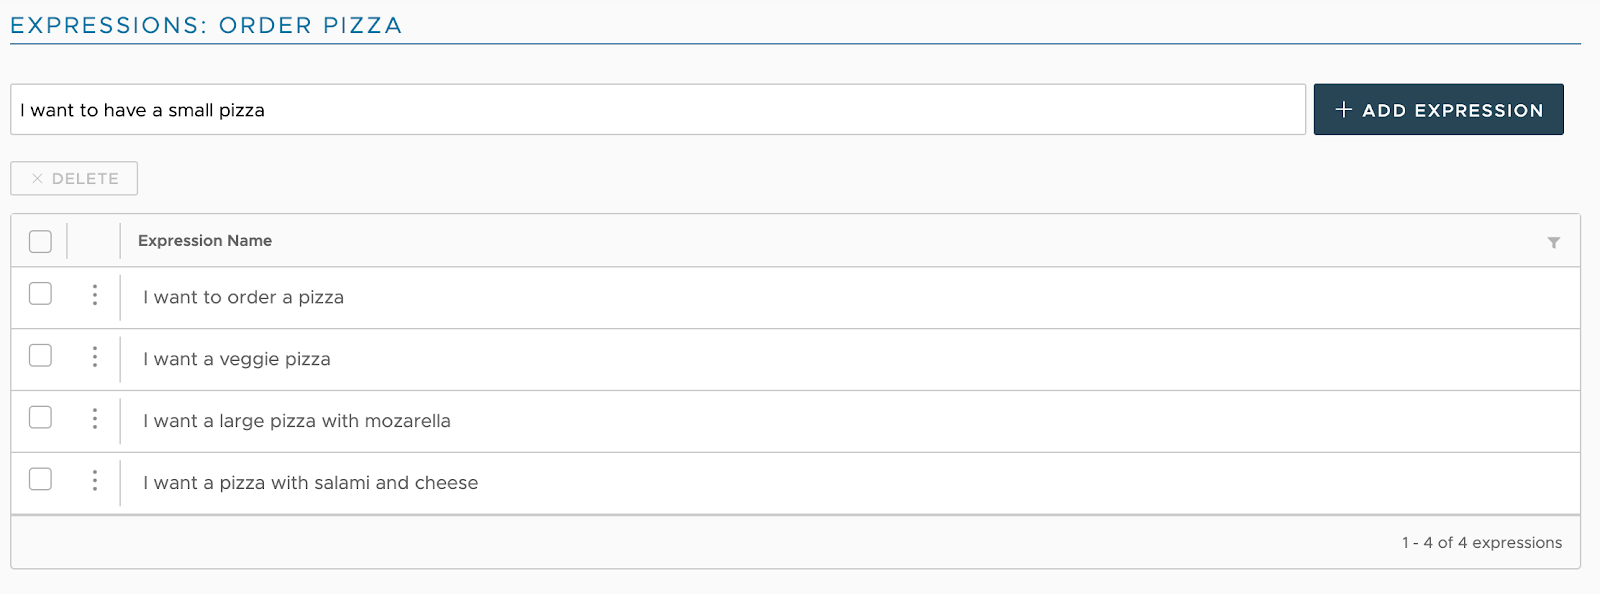
Thus, let’s start by creating an intent. An intent is an action your user wants to do, such as ordering a pizza. So let’s create an intent for exactly this.
In Xenioo, you need to go to the AI section and then click on Add intent:

Here, you can type in the name of the intent and click on Save:

Next, we need to give the chatbot certain training phrases, so it knows when this intent is triggered. You can do this by just typing in phrases and hitting Enter:
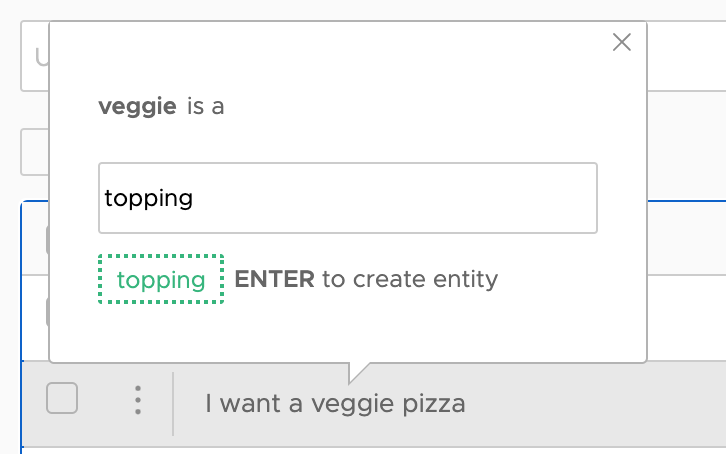
Then, we need to make sure that the chatbot understands the difference between a veggie pizza and a mozzarella pizza. We can do this by using entities.
Entities are useful facts the user is saying, such as the size of the pizza or the kind of topping they want. In Xenioo, you can just click on one of the words and tell Xenioo it is a size:

And you can do the same for toppings:
You can extend these entities, by going to the Entities section, click on the three dots and choose for “Edit”:

Here, you can extend the entity values. For example, for topping you add more toppings, such as:
- Beef
- Sausage
- Bacon

And we can also do that for the size entity:

But, how are we sure that this is actually working? By using the Train & Test feature of Xenioo. You can just type in a sentence and Xenioo will give you the matched intent and entities:

There is just one last thing, how do we use this inside our chatbot flow?
Go back to your Order Pizza behavior and choose for the Start interaction. There, insert a new action called NLP Input (under Input):

Then, you just need to make sure that if it matches the Order Pizza intent, that it automatically goes to the “Check on size” interaction:

Chatbot Fallback: What to do if the chatbot doesn’t understand the user
But what happens when the chatbot doesn’t understand the user?
Then, you need to make sure that there is a human that can ensure a good user experience.
And I have written a full guide on this, that you can read here.
Deploy your chatbot on WhatsApp
Now we’ve created our complete WhatsApp chatbot inside Xenioo, we can deploy it on WhatsApp.
And Xenioo does provide a lot of direct integrations with WhatsApp service providers.
One of them is Kaleyra Cloud, which is the one we are going to use in this tutorial, and one of those providing WhatsApp Business API integration.
So, if you don’t have an account on Kaleya Cloud yet, I recommend you to create one.
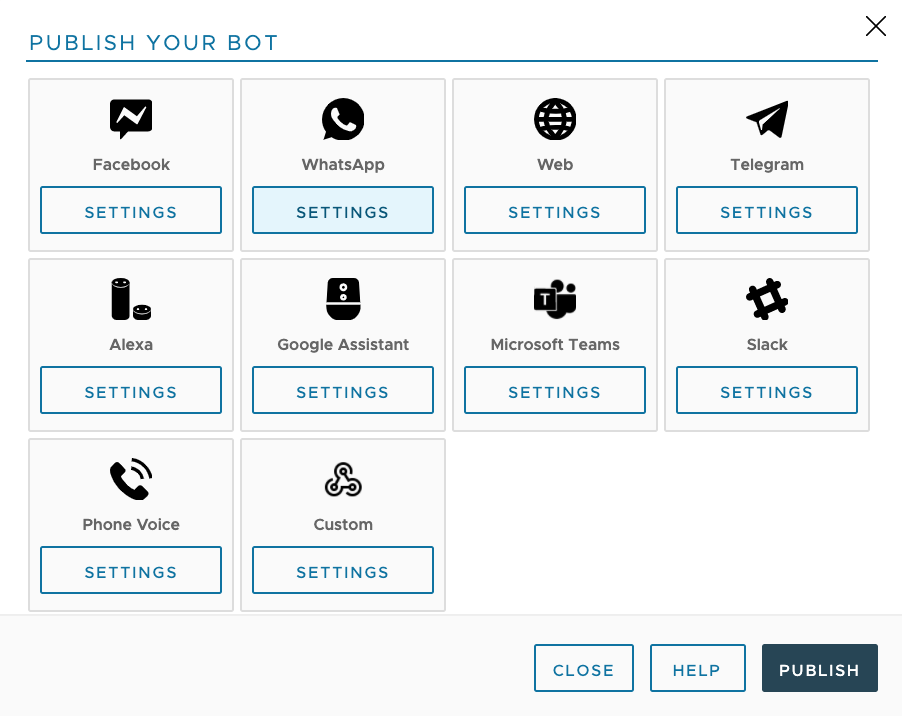
First, we need to go to our chatbot in Xenioo and click on Publish:
Here, you can choose for WhatsApp (Click on Settings under WhatsApp):
Then, we can select Kaleyra Cloud as our provider:
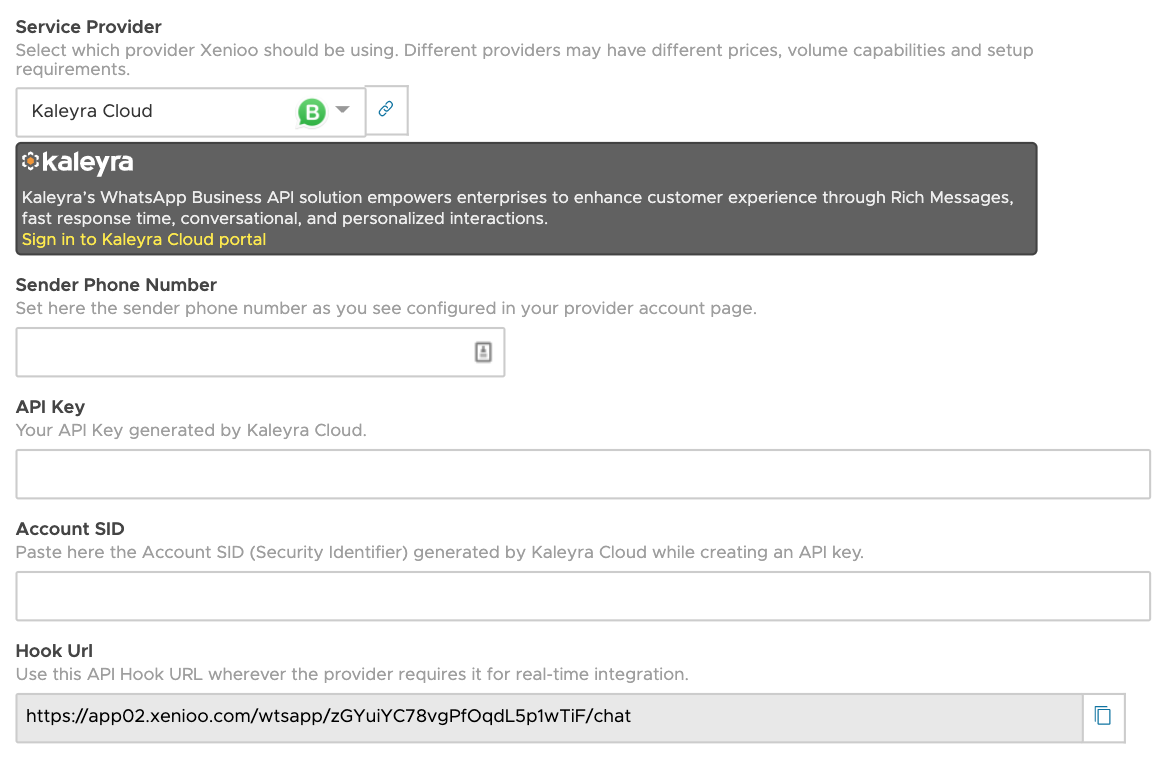
As you can see, we need some information of Kaleyra to get this to work, so let’s get it.
If you log in at Kaleyra, go to Developers and click on Create API Key:

Then, a pop-up opens and you can give it a title and click on Save:

If everything went good, you must get the following confirmation:

NOTE: I recommend to click on “Download” to make sure that you have stored your API key securely (we need this in the next steps).
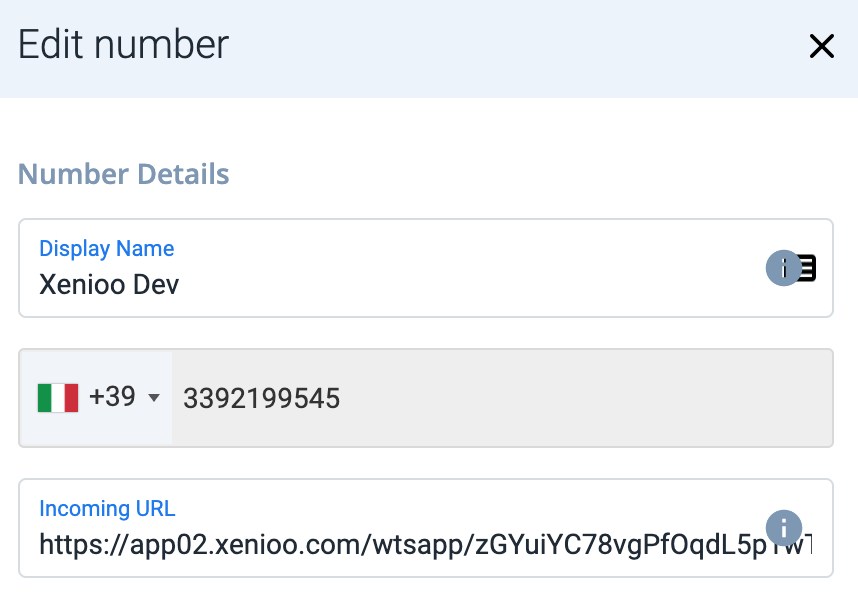
Next, we need to go to Channels → WhatsApp → Click on Manage:

Then, choose for Configuration and click on Add number:

Here, you need to specify the number you are going to use on WhatsApp and the incoming URL (which is the “Hook URL” inside Xenioo):
Then, if we go back to Xenioo, we need to fill in our:
- Sender phone number
- API Key
- Account SID
If you have done this, you can click on Save:

And that’s it! Now, your chatbot is working on WhatsApp!
How it looks on WhatsApp
And here is how it looks on WhatsApp:


That’s it
That’s it! That’s how you create a basic WhatsApp chatbot with Xenioo.
Next article we’ll continue with that basic chatbot enhancing it with new options and make it ready for production.
Have any comments or would like to discuss Xenioo and chatbots?
Join the Facebook group and let us know!