

We all know how much of an asset a smart and well-designed customer support chatbot can be.
Current usage and results statistics place at least 70% of the amount of level one customer questions that can be handled without real human interaction.
More than 75% of adults today would prefer to exchange messages with a brand instead of waiting indefinitely in a phone queue.
If your support workflow is ready to make the jump it is very likely that your current setup is holding you back. A chatbot can become a new stream of information but also a new application to check and train for your support team.

In the following article, we’ll be looking at how we can integrate Salesforce, a widely used CRM platform that is also used for customer services and marketing automation.
We will be integrating Xenioo deeply into the Salesforce interface so that it will become a component and functionality, rather than just another external software.
Getting Started
The first things we need for our integration is, of course, a Xenioo account and Salesforce account.
You can signup for a Xenioo account right away to build and preview the bot we’re building in this post. When you’re happy with your build you can then choose the upgrade path you prefer to make your chatbot public.
Since we’re going to deeply integrate with Salesforce API, make sure that your Salesforce license allows external API. If not, you can still signup for a free developer account and complete the integration before choosing to fully upgrade.
Salesforce Connected App
With our Salesforce account created, we need to retrieve our account client id and client secret values that we will use in our API integrations.
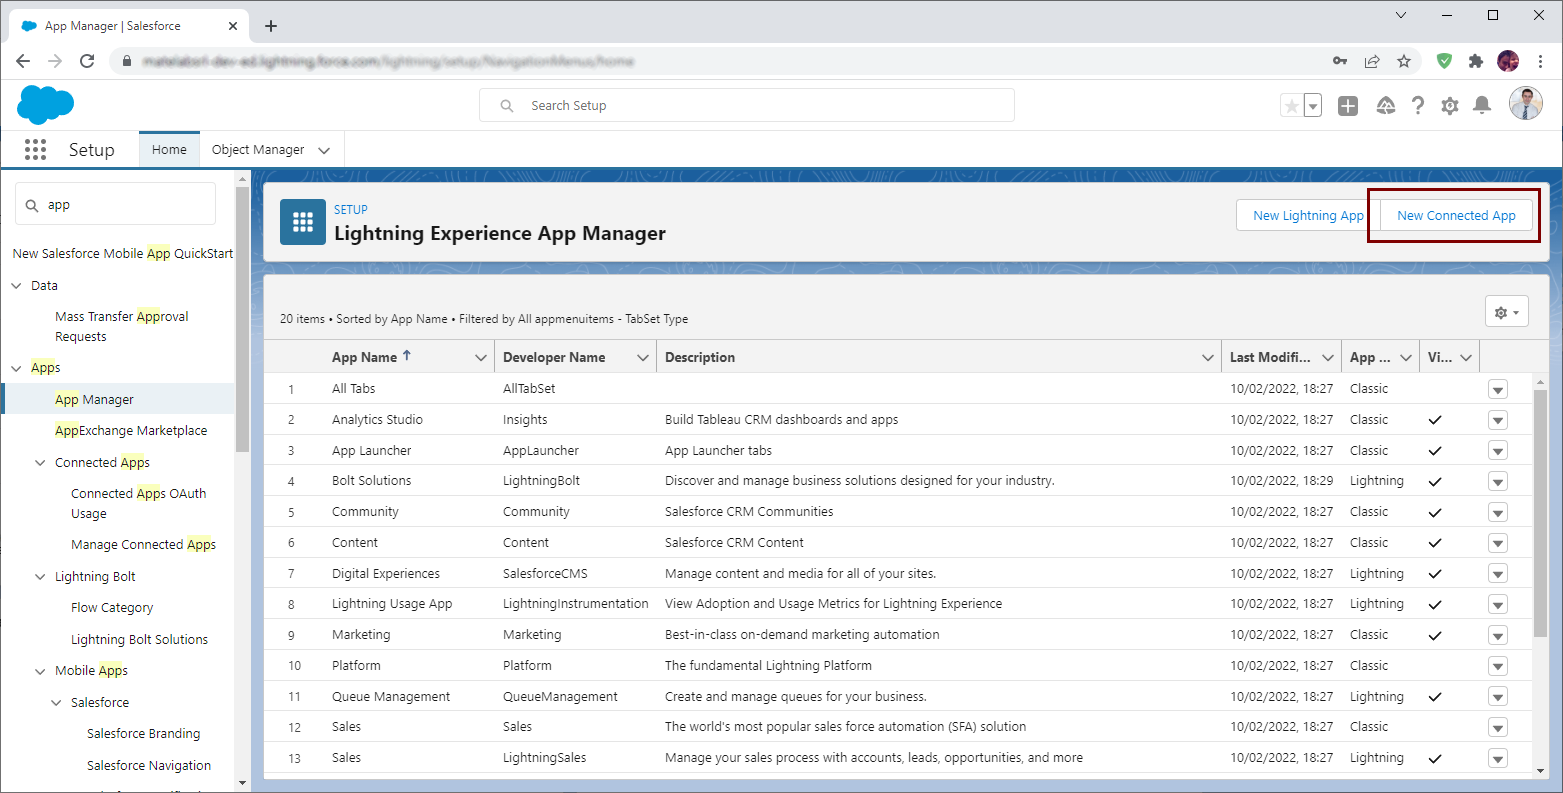
To do so, from our Salesforce console, we must click on the Setup menu item you can find on one of the top right menus. The command will open the general setup page.
From the Quick Find menu on the right, type app and then click on the App Manager item on the left menu.
This will display the Lighting Experience App Manager view. From there we must click on “New Connected App”.
You can give your app the name you prefer as long as it is not taken. Set the contact email you prefer and scroll down to the API section.
Fill the Callback URL field with any URL you prefer (since we won’t be using it) and set the scopes of your connected app to at least “Manage User data via APIs (API)”. Since it is a test and we’re going to play around with multiple things we suggest you also add “Full Access (full)” to the list.
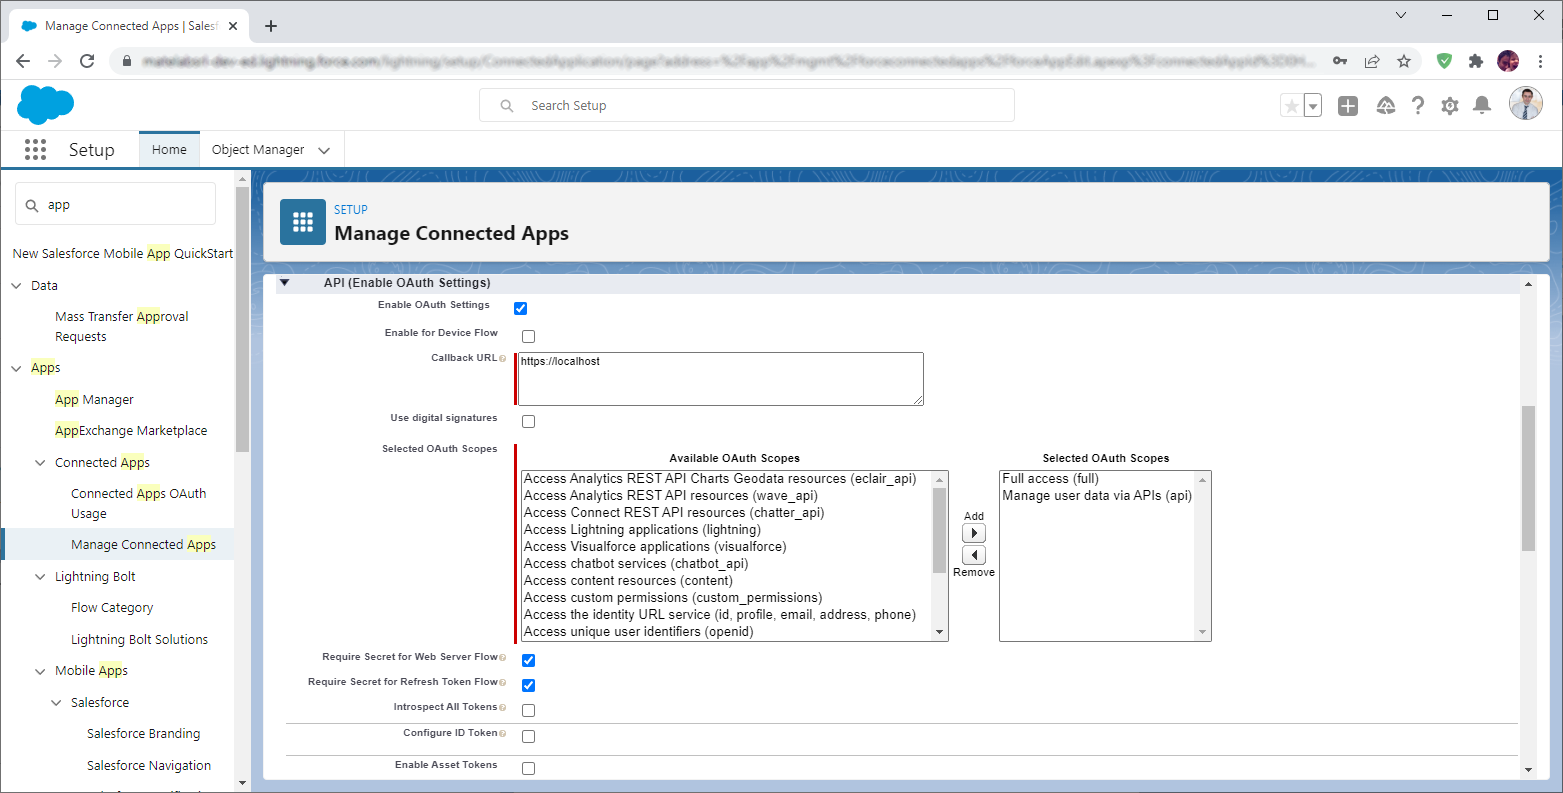
The general setup is done and we can now save our connected app configuration. You should be taken back to the list of connected apps. From there click on the “View” command for your app to access the newly created information.
In the API section of the details, you should find both Consumer Key and Consumer Secret fields which are in turn, client id and client secret required for every API call. Copy both values somewhere handy and let’s continue to Xenioo.
Building our Support Bot
Instead of starting from scratch for our support bot we will use a pre-made template and change it for our integration.
For our example, we will restore inside our account the free Advanced NLP Customer Care template that you can find in your Templates section inside Xenioo.
All templates are free to preview and use: we can just click on the “Use This” button to create a copy of the bot inside our account.
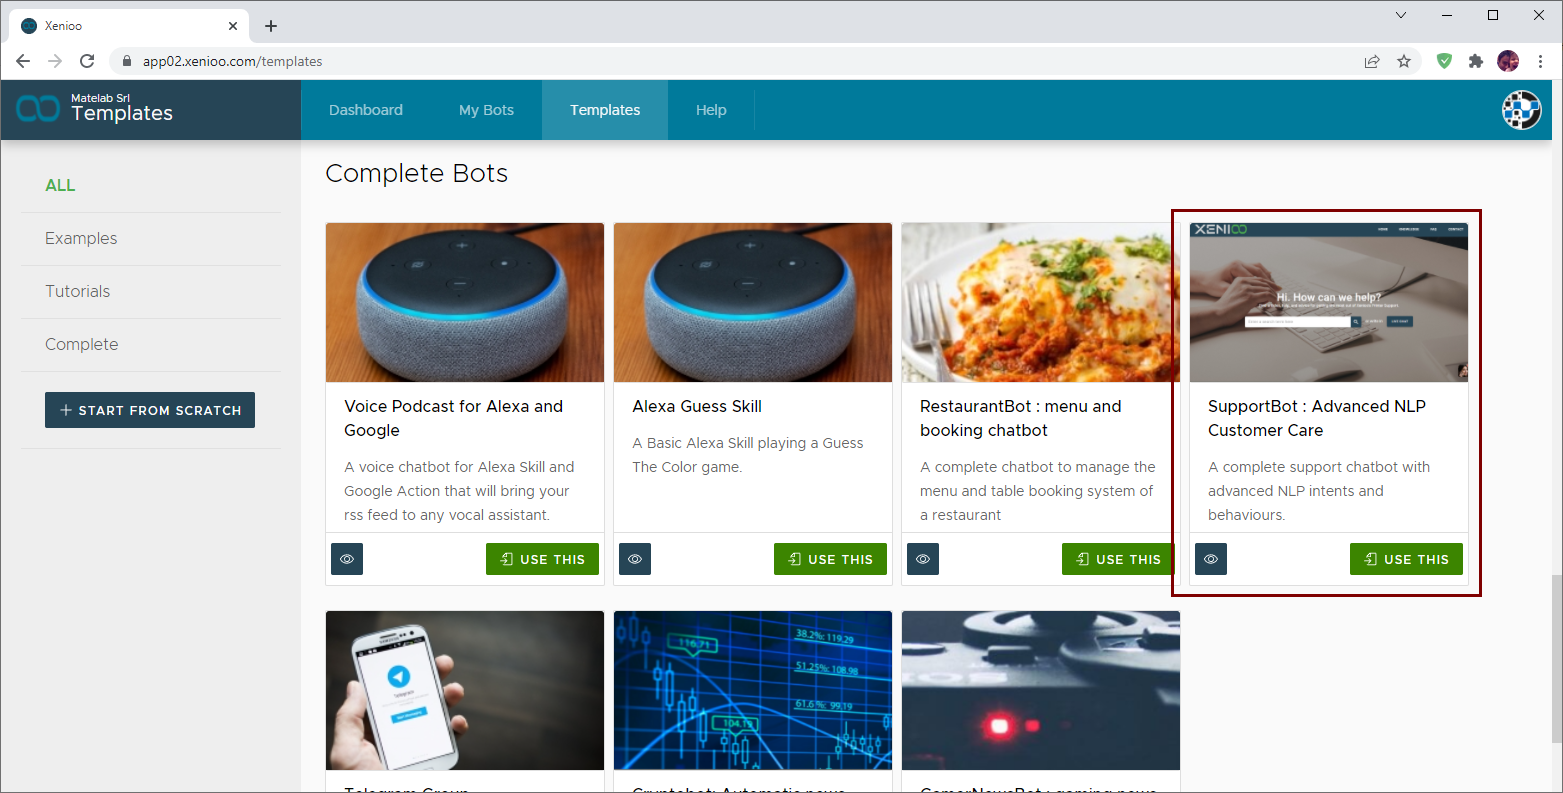
This support bot is already trained to reply to simple questions about the printer’s connectivity and general drivers setup of a sample company and is the perfect playground for our integration.
If you wish to delve deeper into the flow and logic used in this chatbot you can head to this blog post explaining the AI setup or here, where we talk about teams and escalation.
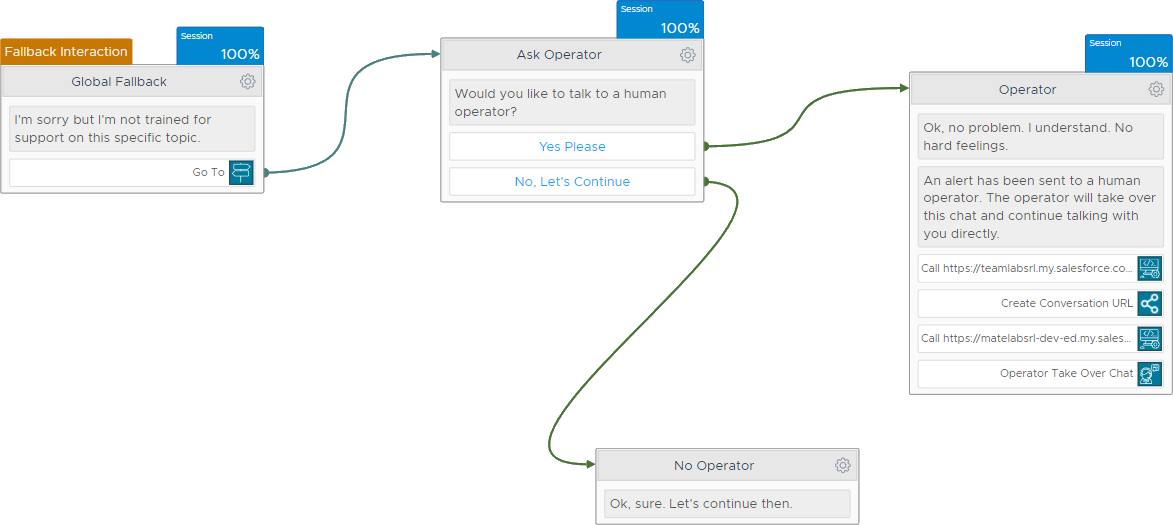
For our example, we are going to slightly change our fallback flow so that the bot will immediately ask the user if human interaction is preferred so that we head to the integration part right away.
Let’s suppose our bot has a conversation like this:
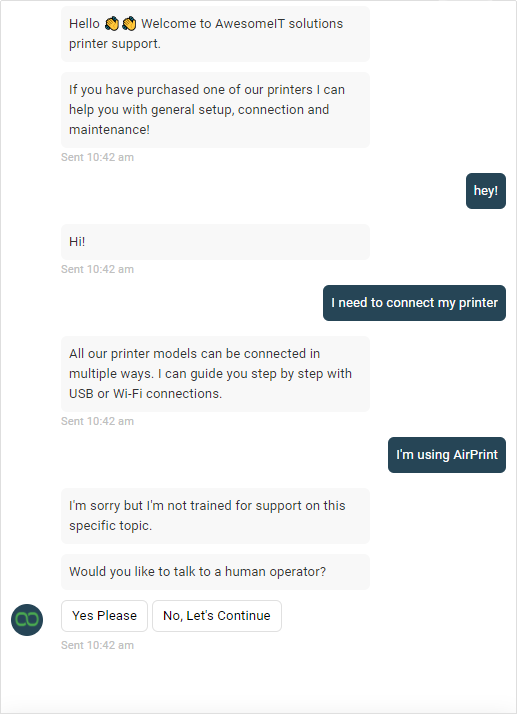
Now, if our customer asks for a human operator, what we want to do is first hand over the conversation so that the Xenioo bot engine will know to not interfere with the conversation.
After that, we can create a case in Salesforce so that our support personnel can be engaged.
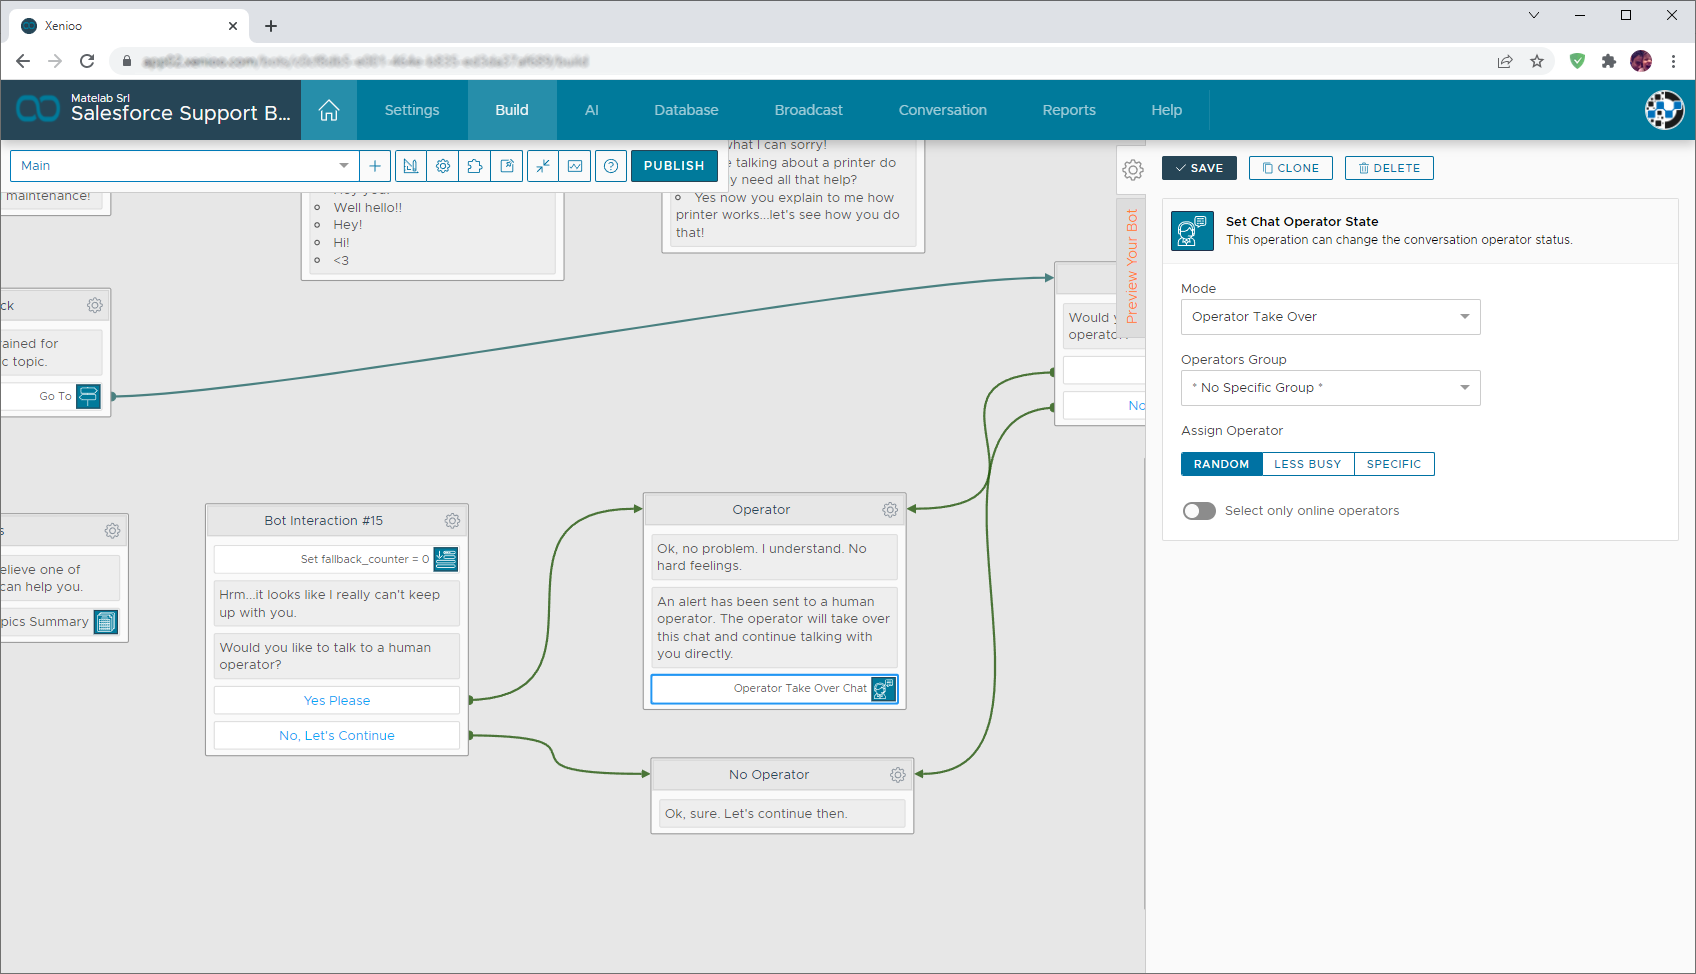
The first step is very easily solved by using the Set Operator Chat State Action of Xenioo. This action, when executed in any part of the flow, will hand over the conversation to an operator.
Just note that when set on your flow interactions, this action may appear differently if you do not have the Pro-Team package enabled.
Salesforce API Integration
With the client id and client secret we just retrieved from our brand new Salesforce Connected App and our chatbot ready, we can now move on to the true API integration.
Xenioo can integrate with any public API by using the Call API Service Action you can find under the Integrations section of actions and operations menu.
This action is extremely flexible and powerful as it really allows for any kind of external call.
To use Salesforce API we need to first create an API token. We will do it with our very first API action:
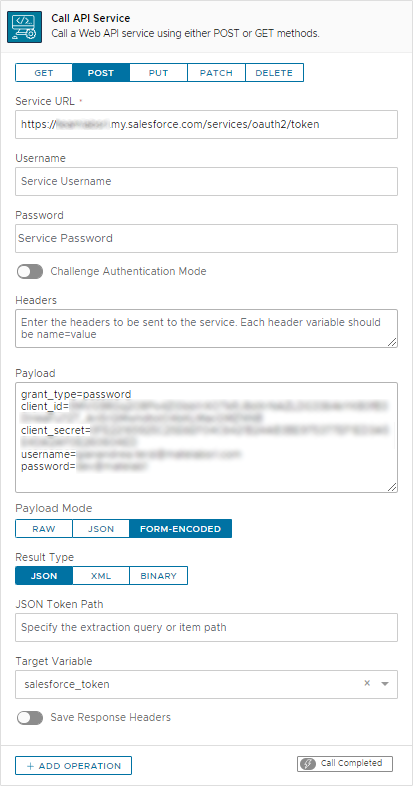
There are a couple of interesting things going on in this call. First of all the URL of Salesforce is your own so make sure to use the base URL of your account.
The second part is the Payload. The token creation API needs to be invoked with a form POST and using Xenioo we accomplish this by selecting “From Encoded” mode. Also, Salesforce API still needs a user besides client id and secret. You can provide your own administrative user or create a user that can create an API token.
If this call succeeds, the result returned by the API will be stored by Xenioo in the “salesforce_token” variable you can see configured. The resulting data is a full JSON model similar to this:
{
     "access_token":"...DCadsfaqweSAKDSLklerdaoijwqeoif...",
     "expires":3600
}
We don’t need everything, we just need the access_token value. Thanks to Xenioo’s native support of complex JSON models, we can use our variable directly without resorting to any custom script: accessing the values of a JSON model is no different from accessing the value of a simple variable.
Now that we have our token we can add another API action and call the Salesforce Cases endpoint to create a new support case. Inside the Payload this time we are writing the full JSON model that Salesforce API expects.
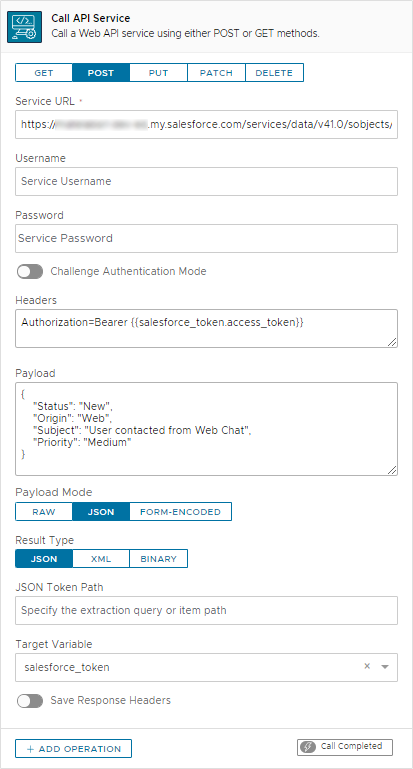
See how the token was used by simply referencing the model value? This can be done everywhere, in any Xenioo action!
If we repeat the previous flow and we chose to talk to a human and we head to our Cases section inside Salesforce we will find the new case created with the data we just sent using our API.
The case can now be handled by the support team.
If we stopped here, our example would already solve many scenarios…but it would be a little too limited.
The biggest piece missing from this integration would be the fact that our support team has no way of contacting back the user and interacting in a real chat.
What we need to do is add a piece of the Xenioo conversation directly inside Salesforce. This way our support team can chat directly with the customer having the issue in real-time and be ready to answer any question without going back and forth with email and one-way messages.
Exporting the current conversation
To allow for our support team to get in touch with our customer in the very same conversation that created the case we need an incredibly powerful feature of Xenioo called Unique Conversation URL.

Using the Conversation URL Action Xenioo can generate a unique URL pointing to that single conversation and make it accessible for a given time window.
The URL is built so that it can be shared as a view-only or even as a take-over view where a destination operator can interact with the user.
While the URL will display a web view of the conversation, the real exchange happens from Xenioo to the real customer channel.
This means that our customers will receive the messages on the platform being used and that our operators do not need to engage on the same channel: our operators do not need to use a WhatsApp account or a Facebook account since they will just chat with users through Xenioo seamlessly.
Extending the Salesforce Database
Generating the URL is very straightforward but what we really need is a field where this information can be stored on Salesforce. To do so, we will need to customize the Cases table.
To edit our case table, we need to head again to the Setup section of Salesforce. This time, we’re going into the “Object Manager” menu you can see on the top.
From there we scroll down to find the “Case” object we need to edit.
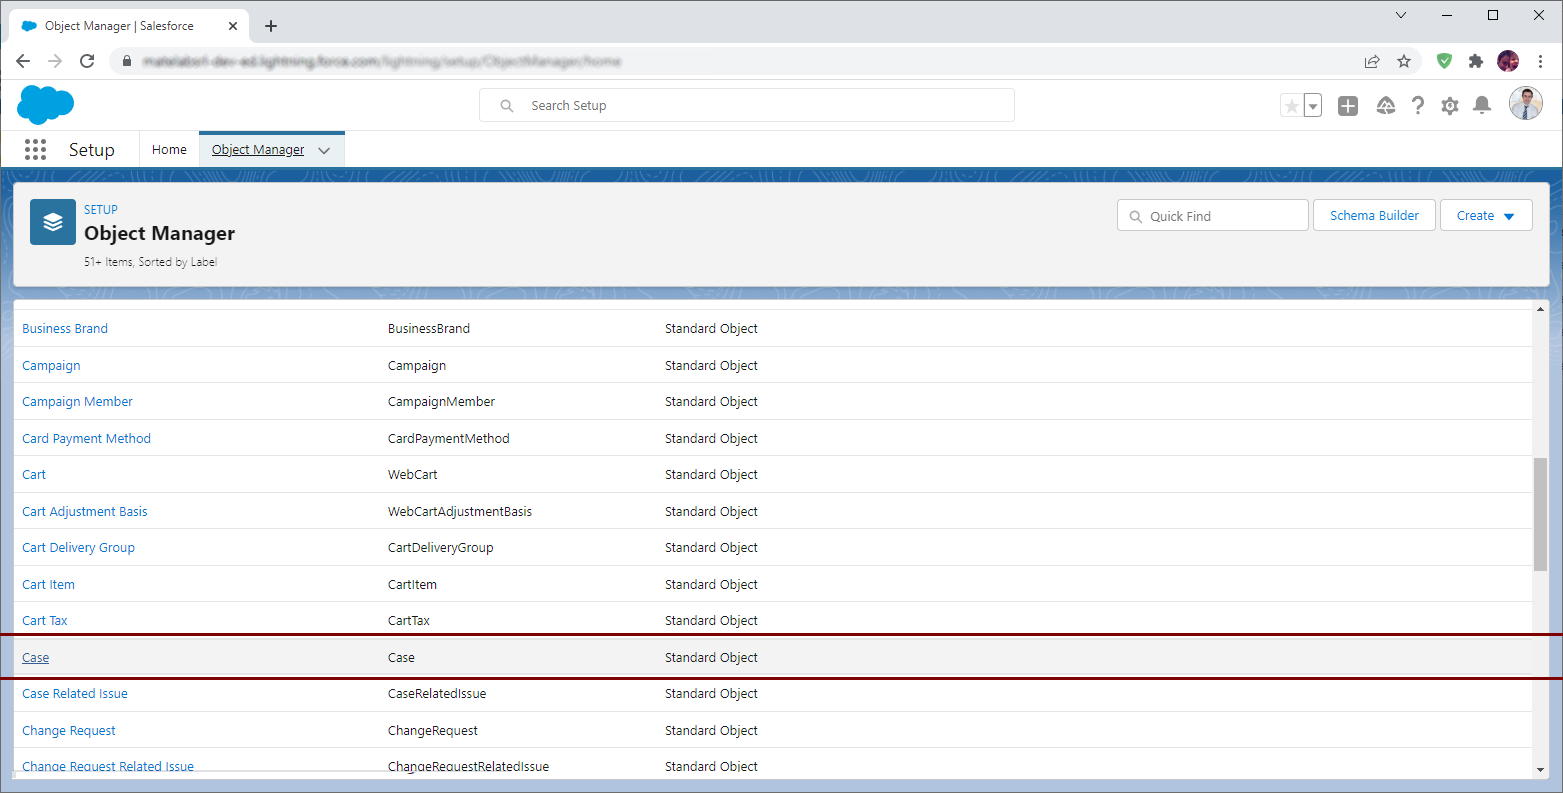
In the menu that will appear, we click on “Fields & Relationships” and then on “New” to add a new field.
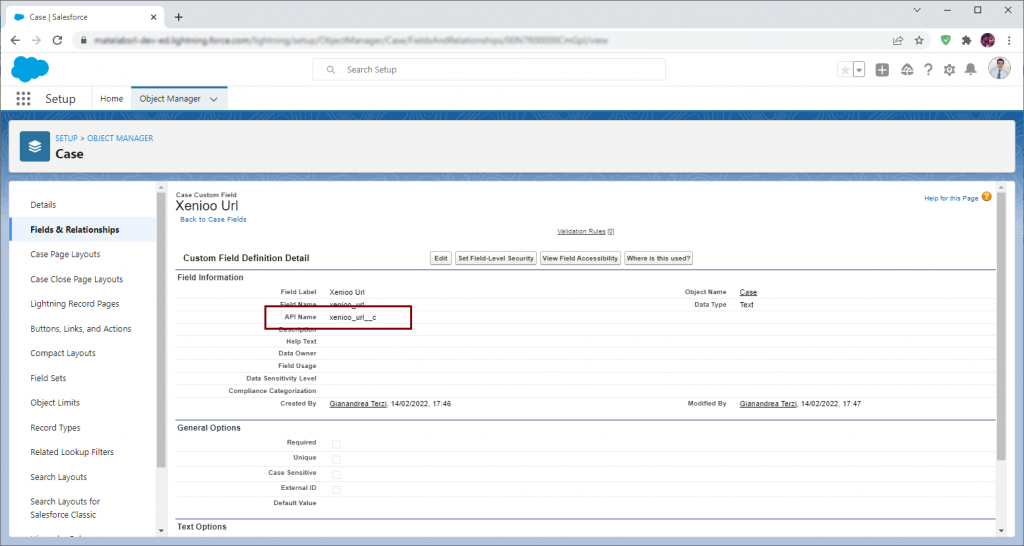
The name of the field is up to you, as long as it doesn’t already exist it will be fine. For our example, since it is going to handle the Xenioo Conversation Url, we’re going to call it “Xenioo Url”. Since Xenioo will create a fairly short Url, a field of text of 255 characters will be more than enough to hold all the data we need.
Once created, in the full fields list or in the field detail, take note of the Salesforce API field name. This is the real name of the field for Salesforce and it is the one we need to mention in our updates.
Now that our case has been modified all we need to do is do a little change to our flow in Xenioo so that also the URL is sent to our case. The Share Url action, when executed, will create a variable holding the unique Url value. We will send this to Salesforce.

If we create a new case from Xenioo and we go back to the detail page, we will find the shared URL set as expected.
Nice, but still not quite the type of integration we’re looking for. We cannot ask our operators to copy/paste the URL or anything like that. We do want the conversation to appear inside the Salesforce page.
Creating a Salesforce Component
To bring Xenioo inside Salesforce we need to create a Lighting Component that can be hosted inside a Salesforce page. This may sound difficult but in truth is fairly easy and once done, can be reused anywhere.
What we need to do to create our component is open the Developer Console window from Salesforce. From the menu there, select “New” and then “Lighting Component”.
The component itself is built around some kind of HTML/XML notation that merges standard HTML with Salesforce objects. We don’t really need much complexity since it is Xenioo doing all of the heavy liftings here. All we need from this component is to access the current case data and access the Xenioo Url field we just created.
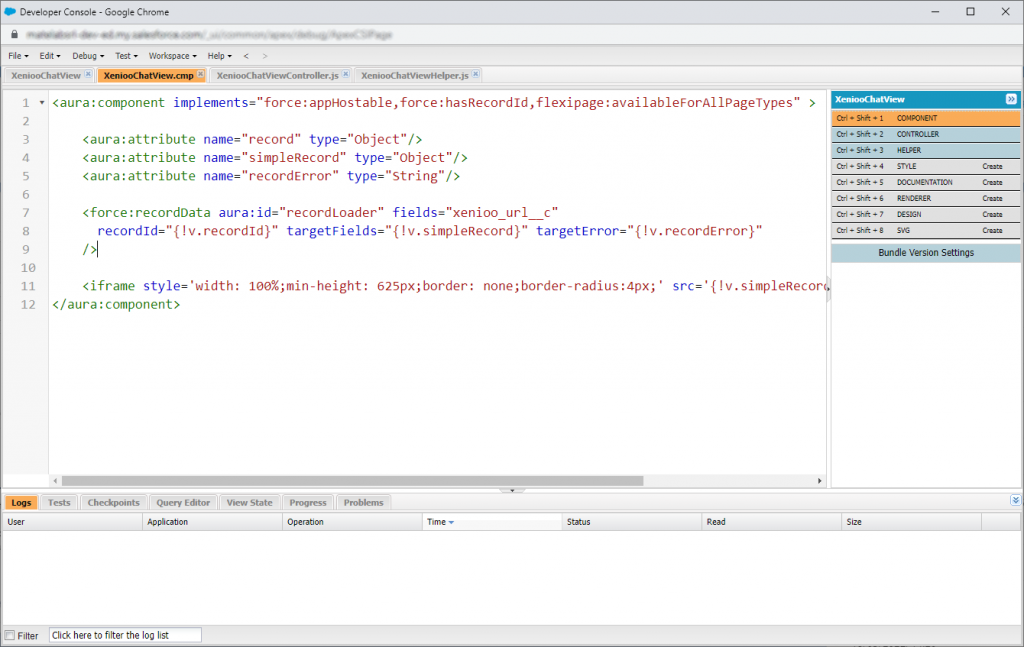
Copy and Paste the component source below and your component is done:
<aura:component implements="force:appHostable,force:hasRecordId,flexipage:availableForAllPageTypes" >

    <aura:attribute name="record" type="Object"/>
    <aura:attribute name="simpleRecord" type="Object"/>
    <aura:attribute name="recordError" type="String"/>

    <force:recordData aura:id="recordLoader" fields="xenioo_url__c"
      recordId="{!v.recordId}" targetFields="{!v.simpleRecord}" targetError="{!v.recordError}"
    />

    <iframe style='width: 100%;min-height: 625px;border: none;border-radius:4px;' src='{!v.simpleRecord.xenioo_url__c}'></iframe>
</aura:component>
It looks complicated but it is not. We’re just telling the component we need the current record and that we’ll be reading the Xenioo Url value. From there we use the Url value to set the source for a simple iframe page. The iframe will display the Xenioo conversation Url.
Once the component has been updated we can save everything and close the Developer Console.
Changing the Case Page
If we head back to our case page, we can now add our Xenioo Lighting Component to the page. To do so, we can just click on the Edit Page menu you can see on the top-right menu. This action will activate the page editor.
You can place our Xenioo Lighting Component wherever you like. In our example, we’re setting it in an additional Tab of the details area. If everything we’ve done up until now is correct, our Xenioo component will be available on the left side of the page, under the Custom Components section.
Drag the Xenioo Lighting Component on the page, wherever you like. Don’t worry if you see any sad emoji icon in the target spot. It is just Xenioo telling you that there is no current Url for the conversation.
Once you are happy with how your custom page looks activate it and save everything to go back to the real case detail.
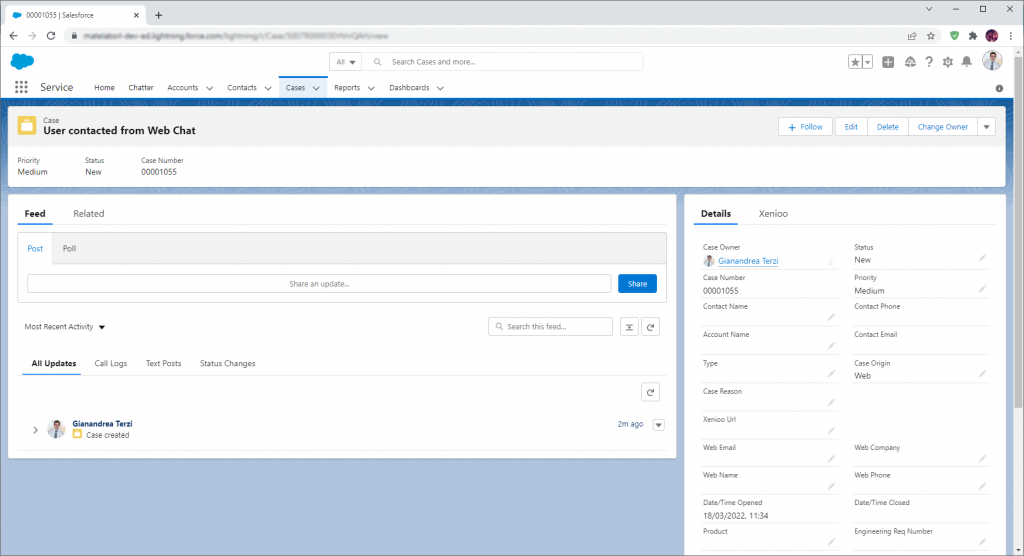
All there is to do now is just click on the Xenioo tab we’ve just created to access the component live.
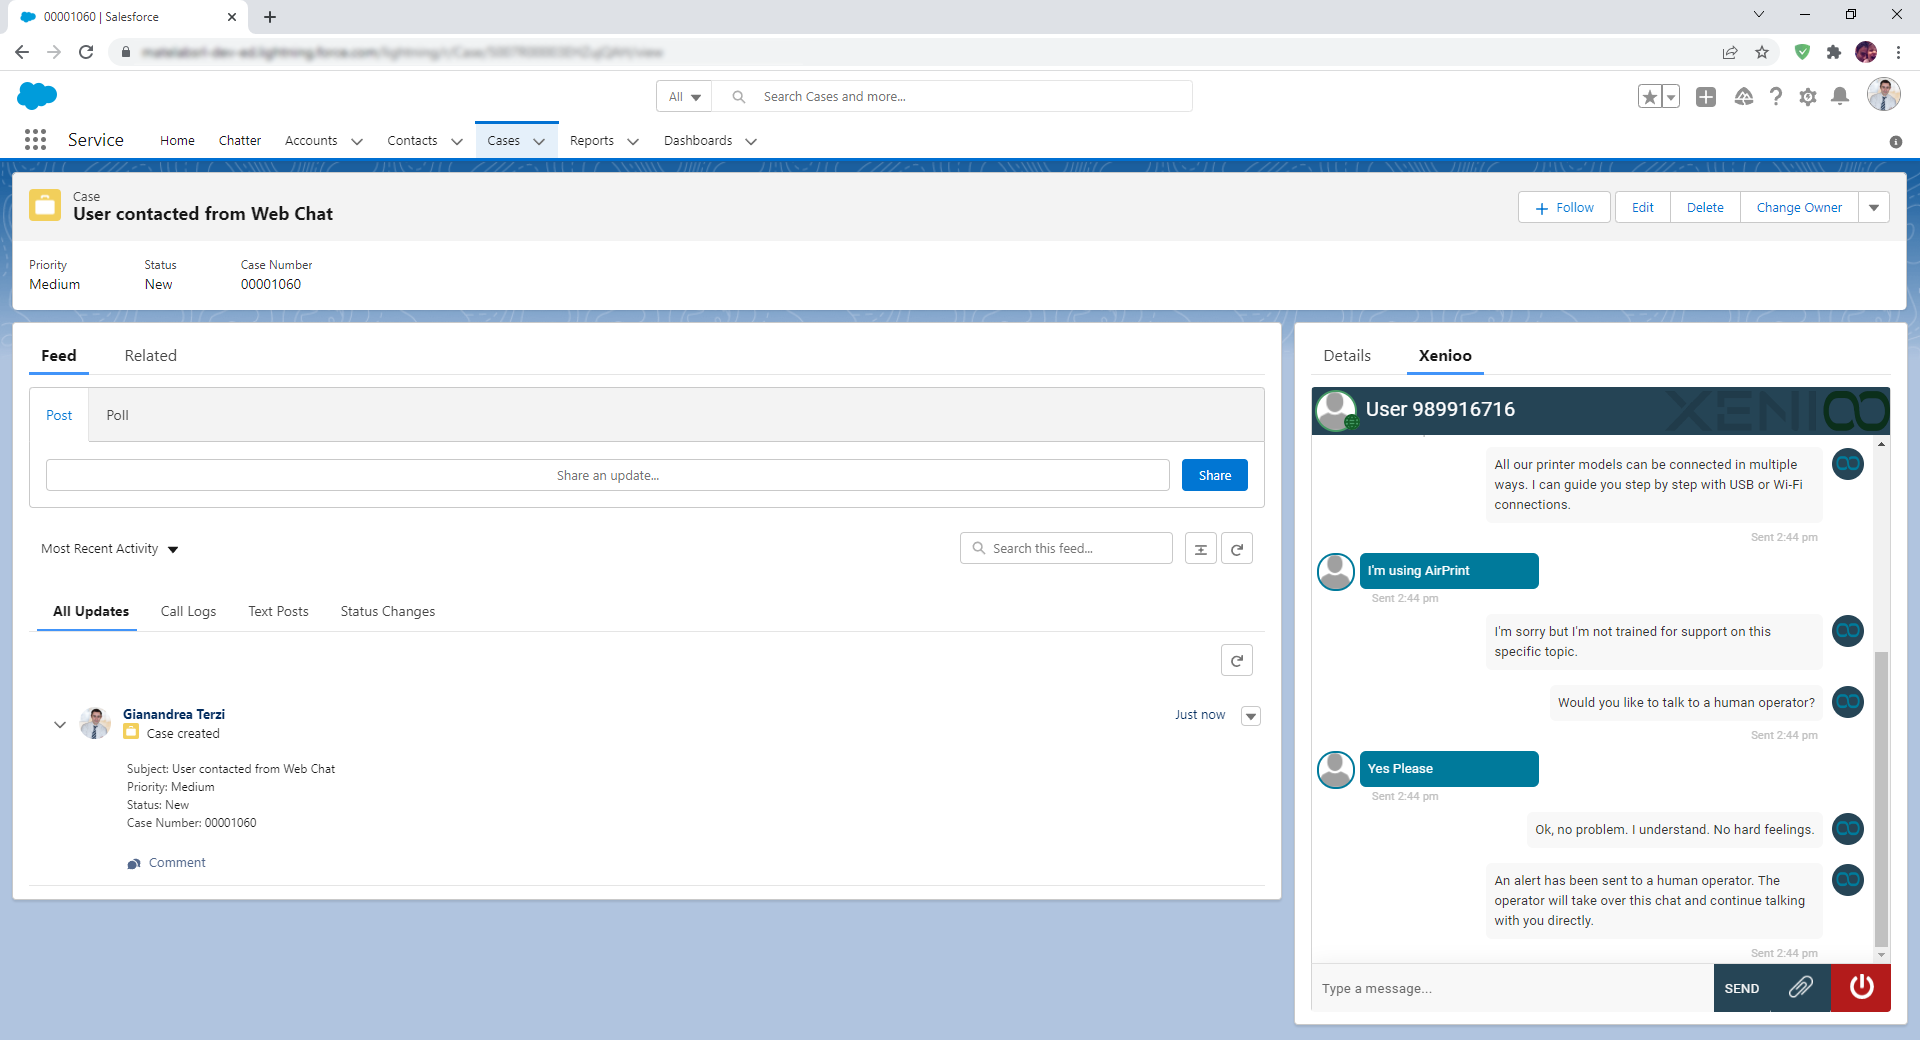
And there it is! Our Xenioo conversation seamlessly runs inside a Salesforce case page. From there we can conversate with our customers, share files and handle our chat support case.
Wrapping Up
You can now integrate any Xenioo chatbot and conversation inside Salesforce Cases. Salesforce API let you exchange data with just about everything so now that you know the way there are no limits to the depth of your integration!
Any questions about the features explained in this post? Do you want to let us help with your awesome bot idea? Be sure to get in touch with the Xenioo team at team@xenioo.com or leave a message on our Facebook Group.