
Now that we’ve learned all the basic aspects of the Xenioo chat flow design, we’re ready to further extend our chatbot by reaching out to external services.
In this
You can follow our lesson directly from the video below. At the end of the post you will find a Xenioo bot file that simply restores the example bot into your account for playback and testing. Let’s start!

Adding the API Service
Besides
To add a new API integration, we just need to select an interaction and click on “Add Action”. In the Available Actions dialog, under the Integration tab, select “Call API Service”.
The new action will then be added to your interaction ready to be configured.
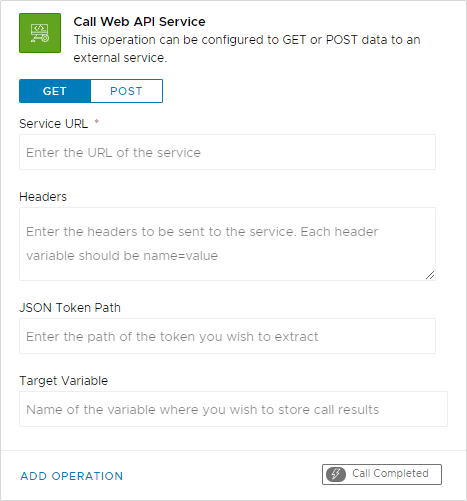
To keep this example simple, we’re going to skip services with a sign-up and API key and go straight for a public, immediate one.
We found Pokèapi: a free public API endpoint that can reply to a RESTful GET call with details about a named Pokémon. A standard GET call to something like http://pokeapi.co/api/v2/pokemon/pikachu will return a full JSON with details about Pikachu and its abilities.
How awesome is that? Let’s use it!
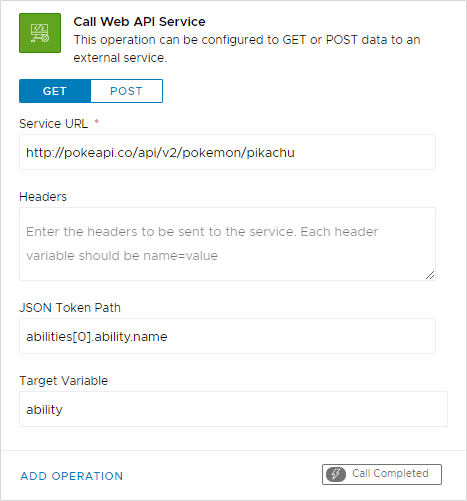
As you see, besides specifying the service full request URL, we can also select a property to be extracted from the resulting JSON and a variable where we want the value to be stored.
Notice how the JSON property is fully specified based on the model structure: Xenioo is going to extract the object at index zero of the abilities collection and read the property name of the sub-object ability.
Making it dynamic
The action we have just configured is going to retrieve the data about our Pokémon but it will always be the same.
We want the user to tell us what Pokémon to search, and dynamically display our results. To do so, we need to place a Generic Input Action
We will
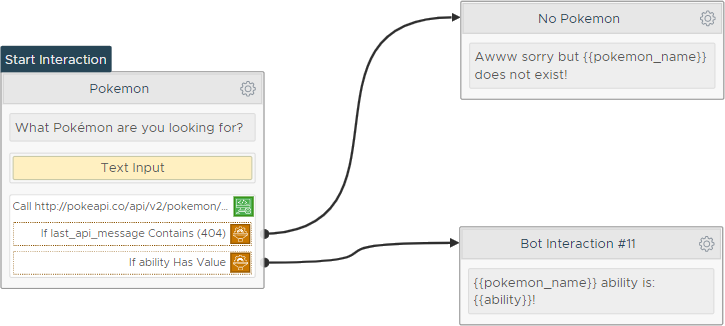
The important bit here is the service reply: a fully compliant RESTful request will usually reply with a 404 code (Not Found) as the requested record is not found.
This is not always the case however, and Xenioo allows you to fully control it by just using a built-in variable called ‘last_api_message’. By checking the contents of this variable after the API call, we can tell the user that a Pokémon does not exist, or display its abilities.
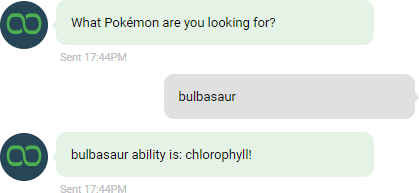
There we go! After setting up our interactions and personalizing the reply interactions, we’re ready to test drive our Pokémon look-up chatbot.
Sync or Async
API Calls may take a while to complete as some services may be slow or congested.
Xenioo’s approach to an API call is two-fold: if your API call has no child operations, the call will always be done asynchronously. If the API call has at least one child operation, the call will always be synchronous.
In the first case, the chatbot conversation will move forward while Xenioo completes the API call while in the second case, the conversation will hold until Xenioo has completed the API call.
In this lesson we’ve learned how to implement an API call to an external server and use the call results in our chatbot conversation.
As with all our lessons, you can find the chatbot sample in your Xenioo account so that you can import it to further experiment and learn.