
In our previous How To Build post series, we’ve detailed how to build a complete Q&A chatbot using Xenioo AI engine, database, and flow capabilities.
In this first of two-part posts where I’m going to detail instead all the steps to build a complete Food Delivery chatbot. Thanks to Xenioo’s built-in AI, Database, and advanced Conversation features you’ll see how it is possible to realize such a powerful and smart chatbot without writing a single line of code.
The How To Build posts series aims to show how a complete chatbot can be built using all of the available Xenioo features with the highest possible detail. By the end of each post, you will gain insight into basic and advanced Xenioo functionalities and be ready to try more complex approaches. All of the additional material used for these posts and the complete chatbot are made available here for download or inside the Xenioo templates section.
The case for a Food Delivery Chatbot
During the last two years, we’ve witnessed tremendous growth in e-commerce chatbots. By either working as “on the side” consultants or being the first line of sales, these chatbots are for all intent and purpose driving thousands of product sales. The Food industry, and in particular the home delivery services part of it, has definitely embraced this trend by acquiring all the good aspects of this kind of revolution:
- Your chatbot can work with multiple customers simultaneously. You’re not missing any more phone orders because customers find a busy line and stop waiting;
- If your restaurant is also serving seated customers, no one needs to answer any call and get distracted from regular service;
- Orders are written clearly and checked multiple times by your customers. No more wrong orders because of over-the-line misunderstandings or badly written notes;
- Your customers can update orders anytime, even after placing them, instead of calling your restaurant multiple times;
- Doing some kind of promotion? Reaching out to your previous customers would be a lot easier than putting out paper fliers no one is reading.
If you feel like your business could benefit from one or more of these improvements keep reading as we’re going to build the definitive food delivery chatbot!

Building our chatbot
The first step for building a successful chatbot is to have a list of the main features we’ll need to implement so that we know how to set up our flow. A food delivery chatbot needs to be capable, at the very least, to:
- Take orders from customers using a free dialogue approach;
- Allow customers to review, edit and confirm their orders;
- Take direct payment from our customers;
- Get customer location to set up a delivery route;
- Engage with our delivery personnel, dispatching orders and routes;
- Let the customer check the order state;
- Collect service feedback after the order has been delivered;
- Signup our customers for a promotional campaign so that we can engage them with new offers;
Not a bad list of features right? Now let’s see how we can tackle all of these points with Xenioo: let’s create a brand new chatbot in our account and let’s start building!
Creating our Food Menu
In order to allow our chatbot to get orders we need to first create some kind of menu. Our menu will contain all of the information about each and every food served by our imaginary restaurant.
To create our menu we will use all the power of the Xenioo Database feature: we’ll store in our menu collection all of the information we need to display, search and categorize the food we sell.
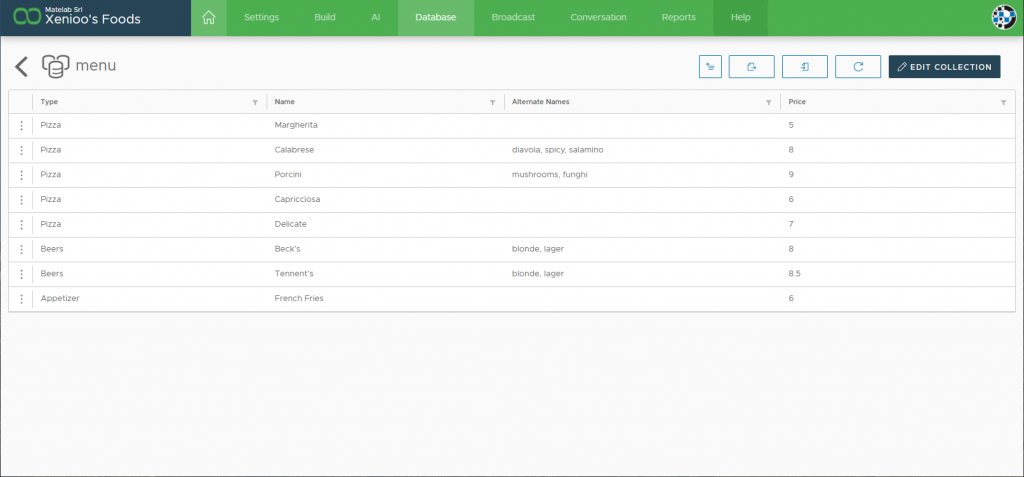
Let’s head to the Database section of our brand new chatbot and create a new collection named “menu”. We will be adding to menu items data such as name, description, price (obviously!), image, and, since we’re at it, also possible intolerances that our customers may be worried about.
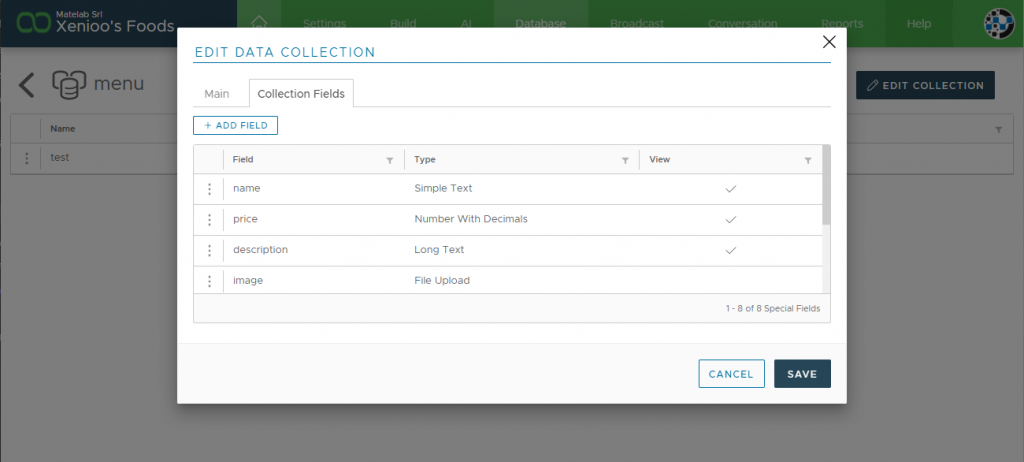
Using the group property of our collection fields we’ll make sure to split our data into different sections so that Xenioo will build a nice data-entry form for us, without writing a single line of code. Once our collection is created we can head to the add new button and select “Add new record with form” to start our data entry.
Xenioo has automatically built for us a complete data entry form with the right input control for each of our fields. Boolean fields are shown as checkboxes, numeric fields have already set decimals or whole numbers and file type fields can manage your attachments and automatically store them in your account storage. All we have to do now is add all of our menu items.
As we have seen also in our previous Let’s Build Post, records can be exported and imported directly using simple CSV files. This makes it incredibly easy for you to manage your data: if you happen to have already a menu in an excel format or, later on, if you wish to maintain your whole food offering using excel. Better yet, if you do not wish to create collection fields manually, you can just import your CSV file directly and Xenioo will import all columns as fields and do all the heavy lifting for you.
Using Xenioo granular users permissions activated by the Pro Team package, it is also possible to create a user that can access only the Database section of the chatbot. Just imagine building a chatbot for your restaurant customer and then giving them a full back office to let them maintain their own data. How much development time would software like this take usually?
Training our NLP Model
Once we’re happy with our menu data we can move on to training our NLP model. What we’re going to do next is basically teach Xenioo how to handle the different requests that may come from our customers. To do this, the first thing to do is to move to the AI section of our chatbot and create a brand new intent.
Within a chatbot, intent refers to the goal the customer has in mind when typing in a question. For our restaurant, the very first intent will be “Food Ordering”.
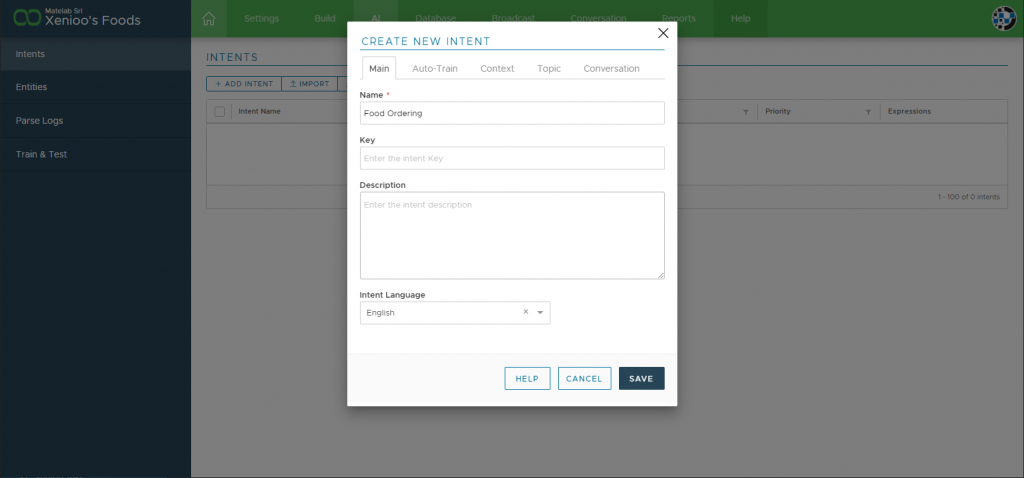
Let’s go ahead and create the intent by clicking on the add intent button. All we need to do now is just give it a name and click on Save. We’ll be back later to add more details.
Once our intent is created let’s double-click on it to move to Expressions editing. In an intent, expressions are the utterances we’re expecting our customers to use to express their goals. We can set up some typical examples now and fine-tune our training later, even while our chatbot is live.
For our restaurant, a Food Ordering intent may have expressions such as “I want a pizza” or “I would like two margherita and a blonde beer” and so on. Let’s add some typical expressions to our expressions list.
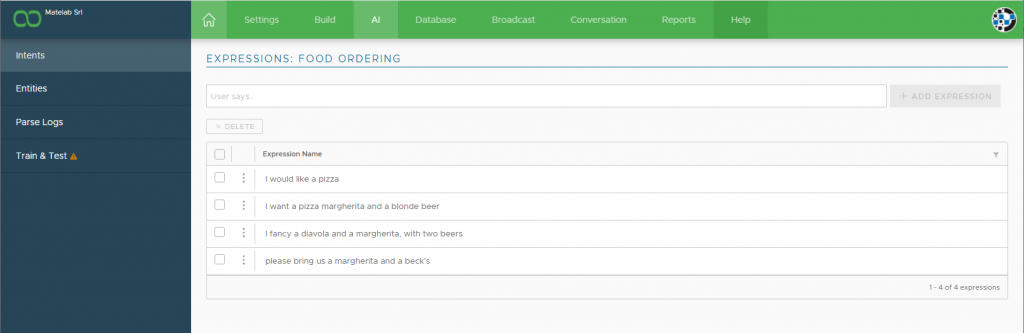
You don’t really need to think of all of the possible ways your customers may order food. Just write some of the most typical and the Xenioo engine will be capable of understanding also expressions that diverge from what you’ve entered.
Of course having our chatbot understand our customer’s expressions is just half of the job: what we really need is to understand what exactly they are asking for. Is it a pizza? If so, what pizza? Do they want a beverage? What exactly do they want to drink?
The information that can be found inside an expression is called Entity. An entity represents a value that can be extracted from the expression and later used by your chatbot. For example in the expression “I want a pizza margherita” what we really need to know is that the required pizza is Margherita and that our customer wants just one.
Usually, we would just go ahead and click on the parts of the sentence that may represent our entities but since we already built our menu we could make things even faster and use our database as an entity list. Let’s move to the Entities section and create a new entity called “food” where we say that the data is coming from our collection.
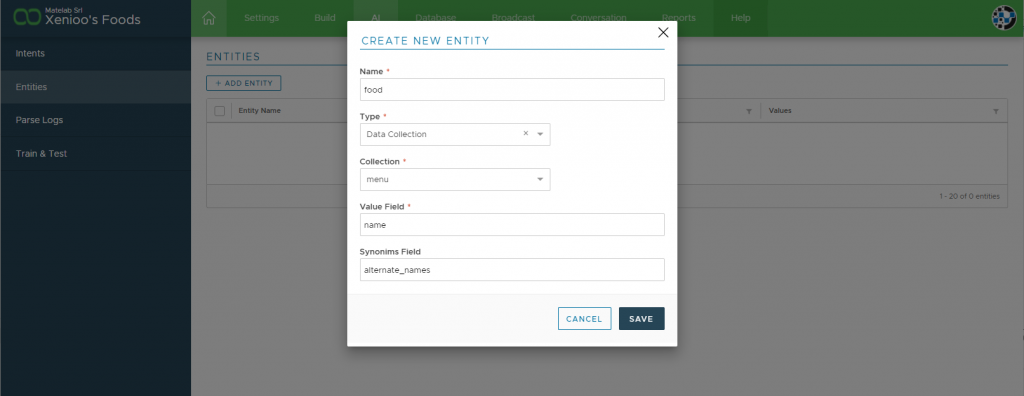
All that we need to do here is select our collection and pick which fields we would like to represent the possible entity name and the possible synonyms of our entity. Once we’re done with the creation we can just hit save to confirm our entity.
Now, all we need to do to make Xenioo apply our entities to our expression is head to the Train & Test section. After a very short while, Xenioo will finish modeling our expressions. If we go back to our Food Ordering intent and double-click on it we’ll see how our expressions list has changed.
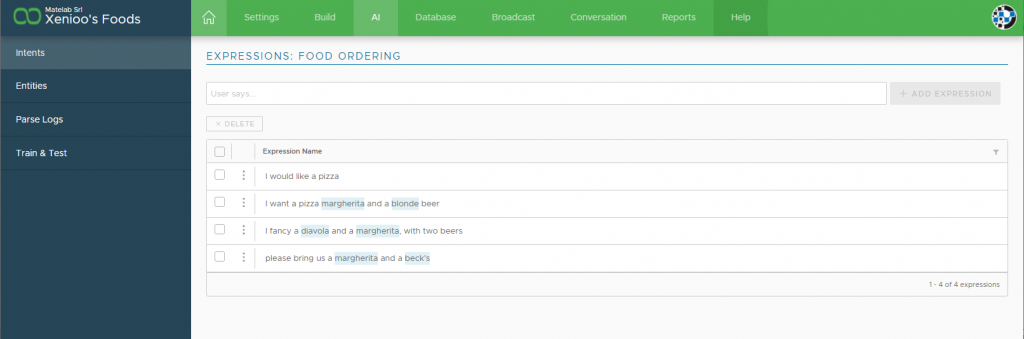
As you can see now some of our words are highlighted. That is Xenioo showing that some of the words are now recognized as entities. It means that the values that will be found will be made available to our chatbot during the flow.
Let’s try our NLP training by clicking on the Train & Test section again. On the input box, to test our training, we type “I’m eating a margherita and a cold blonde”. Press enter or click on Evaluate Expression to see the results.
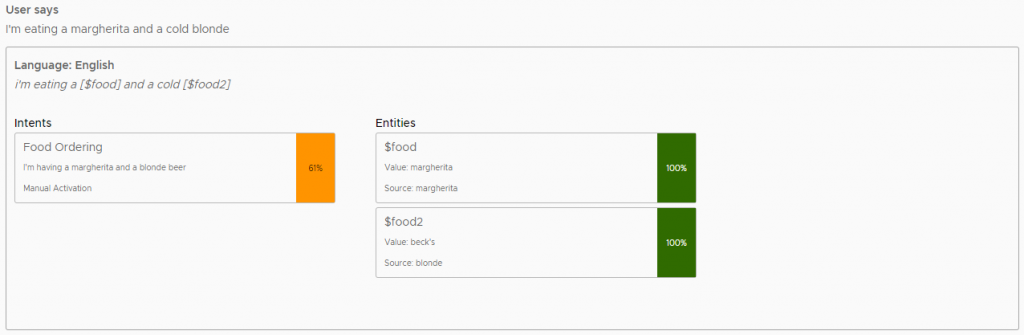
The sentence is way different from any other we’ve been training but still, Xenioo manages to get a 61% score best of all, as you can see, we get our food recognized automatically. If we were in a real conversational situation, $food and $food2, our entities, would be available to our chatbot as standard variables, ready to be used in any part of the flow.
Speaking of flow, it is time to move to the build section and start creating our chatbot!