
Now that we’ve explored just about all of the possible contents that our chatbot can display, is time to move a little behind the scenes and discover the sheer number of customization and automation features that Xenioo offers.
In this
You can follow our lesson directly from the video below. At the end of the post you will find a Xenioo bot file that simply restore the example bot into your account for playback and testing. Let’s start!

Intents and Expressions
Working with Xenioo AI components is very quick and easy. The first main
To have an actual example, let’s create our first intent: we want to accept pizza orders from our users!
Go ahead and create a new Intent by clicking on the “add intent” button. Call the intent as you please: it is just a descriptive name and can be changed anytime. Nobody but you will see this name.
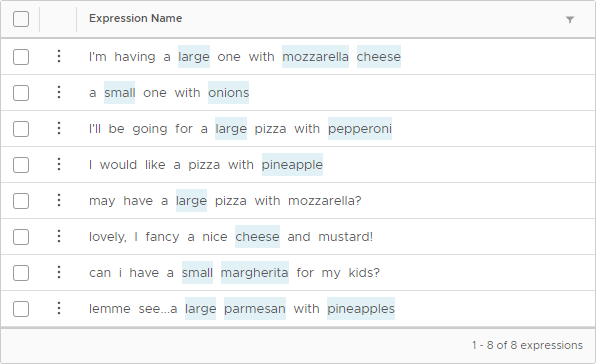
Once your intent has been created, it is time to click it on and go to the Expressions List. An Expression is a phrase that can be associated with the Intent. In our example, a phrase like ‘I would like a large pizza!’ may very well define (although not completely) a pizza ordering sentence.
Go ahead and add as many phrases defining placing an order, as you can.
Language Entities
Once you’re happy with all your expressions, it is time to go ahead and define entities.
An Entity is a word (or a group of words) that you want to be automatically detected and extracted from your expressions.
When the Xenioo AI Engine detects an expression with enough confidence it will also automatically extract any defined entity and make it available in your chat flow.
As we’re going to see in our tutorial, this is an incredibly powerful feature that opens an unlimited number of flow and interaction possibilities.
To create an entity simply click on a word of an expression. A small popup will appear, asking you to define what the word is.
In our example, since we’re accepting orders, we may click on any topping name and define it as “topping”. And we may click on any small, large or regular and define them as “size” for our pizzas.
Once you’ve selected all the entities you want to go ahead and add a new Expression.
See how Xenioo has automatically detected any Entity you’ve written? That is the NLP Engine running and learning as the list grows.
You can test your intents anytime by just selecting the “Train & Test” section. From there you can write any phrase you like and verify in real-time how the Xenioo AI Engine detects different Intents and Entities.
Using NLP in your chatbot
Once you’re happy with your NLP training, you can move back to the Build menu to implement the AI in your chatbot.
Select your default interaction and add a new Action: this time, we’re using an NLP action, under the Input tab
That’s it! From that point, your chatbot will stop the flow and wait for the user input. If your Pizza Order intent is detected, your flow will continue. If not, the chat flow will continue looping until the Intent is detected.
Putting Intelligence near Artificial
If that was all we could do with NLP there wouldn’t be very much to help us in our Pizza Ordering bot.
Detecting an order is just the very first step: what we need to do really is also check what the user has ordered. Xenioo Actions and Operations can allow us to extend the NLP Action to suit our needs.
Instead of simply making the flow go on, we can use a Variable Condition Switch Operation to check the value of topping and switch the flow accordingly.
As you see, we can use any detected Entity to switch our chat flow and really react to our user input. There are no limits to the number of switches and conditions that you can make based on Xenioo variables!
Wrapping up
In this tutorial, we’ve learned
In the next
As with all our lessons, you can find the chatbot sample in your Xenioo account so that you can import it to further experiment and learn.