In the previous lesson, we configured a very basic bot with a simple quick button interaction.
In this lesson we are going to complicate things a little bit: we want to ask the user a question and then make the bot react accordingly.
Xenioo supports many different built-in questions such as phone number, email and open, configurable actions that can be used to ask the user just about anything.
For this lesson, we are going to ask for an e-mail address.
You can follow our lesson directly from the video below. At the end of the post you will find a Xenioo bot file that simply restores the example bot into your account for playback and testing. Let’s start!
Setting up your new chatbot
First of all, let’s create a brand new chatbot.
As always, Xenioo will create a blank Behaviour and a simple Interaction with just a text action. Let’s click on the designer background to activate the Behaviour settings: from there we can click on the “add new interaction” button and add two more interactions.
We want to ask the user their email and modify the flow if the user gives us a correct address or just move ahead if he decides to skip the question.
So let’s call one interaction “Thank you” and the other “Going On”. In the “Thank you” interaction we can change the text to thank the user for giving us the email while in “Going On” we can go on with the normal flow.
Configuring the Email Input
Let’s go back to the first Interaction and add a new action.
This time we browse to get the Input section, and then pick an Email Input Action. Once selected, the Action is automatically added to the Interaction: we can click it on to see the properties available.
While powerful, the Email Input Action stays simple: all the validation is done by Xenioo so that you do not need to worry about getting bad addresses.
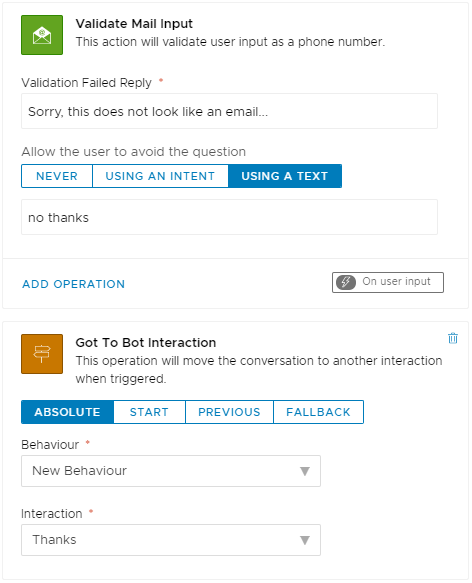
All you may want to do is change the validation reply with something you like and decide if you want the user to opt-out of your question.
With some questions, it may be a good idea to allow the user to go on. Every Xenioo Input Action allows you to do so: as the email input has a default setting of Never. However, you can change it to an Intent (using NLP), or using simple text.
Let’s use some simple text right now and specify ‘no thanks’ in the reply textbox.

Right away, the Input Action has added a Go To Interaction Operation: this operation will be triggered as the user gives a correct reply (in our case, gives a valid email address).
Select the Thank You interaction as the target: notice how Xenioo shows that the action, when successful, goes to the Thank You Interaction.
Question Opt-Out
In our configuration, if the user types ‘no thanks’, the successful reply never gets triggered and the interaction can move on.
Let’s put a message after our input and an immediate Go To Action, directed to the Going On Interaction. As the user uses the Opt-Out, the flow will continue back from the input block and immediately jump to the Going On Interaction.

Using Variables
The Email Input Action, like all other input actions, will automatically store the results of
Variables, like Tags, are stored at the user level and will remain forever, even if the user connects to the bot at a later time.
Everywhere in a Xenioo bot, you can reference these variables to change the flow conditionally, or simply display different data.
This is a very powerful Xenioo feature that we will discover in depth over the next tutorials.
Wrapping up
While simple, this example shows how incredibly easy it is to create conditional choices based on user input and to use them right away.
In the next lesson, we are going to explore the media capabilities of the chatbot using images, videos, audios
As with all our lessons, you can find the chatbot sample in your Xenioo account so that you can import it to further experiment and learn.
